


Erin’s Recipe Rundown

Texture: Perfectly chewy with a paper-thin shiny top.
Taste: I like to use Dutch process chocolate for the ultimate rich, deep chocolate flavor!
Ease: Easy, one bowl recipe that’s ready in less than 1 hour!
Top Tips: I highly recommend using a good quality Dutch process cocoa powder for this brownie recipe. This is my favorite brand! I also like to use this 9-inch brownie pan.
Recommended GF Flour: Use a high-quality flour that contains xanthan gum. I like to use King Arthur or Bob’s Red Mill Flour.
Would I make these again? 100% yes! These gluten-free brownies are my new favorite thing to bake! They remind me of the Ghirardelli brownies I used to love to make from a box mix, but even better.
xoxo erin

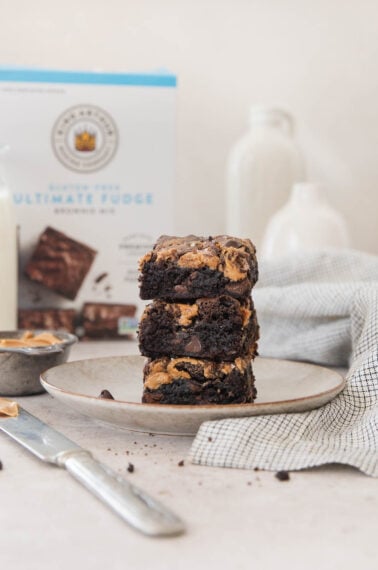
I still love these fudgy gluten-free brownies, but these NEW chewy gluten-free brownies have quickly become my new favorite!
They are as irresistibly chewy as boxed brownies, but packed with so much more rich chocolate flavor. It’s impossible to eat just one!
Table of Contents
- Erin’s Recipe Rundown
- Ingredients You’ll Need
- How to Make Chewy Gluten-Free Brownies
- Make-Ahead/Storage/Freezing Instructions
- Can these chewy gluten-free brownies be made dairy-free?
- What is the difference between Dutch-process and natural cocoa powder?
- Can I make these brownies in a 9×13 pan?
- More Gluten-Free Brownie Recipes
- Chewy Gluten-Free Brownies Recipe
Ingredients You’ll Need
Here are a few notes on some of the key ingredients to make these chewy gluten-free brownies. Jump to the recipe below for the exact measurements.

- Gluten-free flour: I tested this flour with both Bob’s Red Mill and King Arthur Flour Flour gluten-free flours. Both flours work equally well!
- Dutch-process cocoa powder: I use natural cocoa powder in many of my other recipes, but I really love the flavor of Dutch process cocoa for these brownies. Dutch-process cocoa powder is treated with an alkalizing agent to neutralize its acidity, resulting in a smoother, richer chocolate flavor. This brand of Dutch-process cocoa powder is my favorite!
- Butter/sugar: Adding the sugar to hot butter so that it partially dissolves is a key element in this recipe for a thin, shiny top every time.
- Eggs: Another trick to achieve that beautifully crackly top is to incorporate air into the eggs by whisking them vigorously for 1 minute.
How to Make Chewy Gluten-Free Brownies
Here’s an overview of how to make these brownies. You can jump to the recipe for the full instructions!

- Whisk dry ingredients: Mix together the cocoa powder, gluten-free flour, baking powder, and salt. Set this bowl to the side for now.
- In a saucepan: Melt the butter over medium heat until it starts to bubble. Add the sugar and whisk vigorously for 1 minute until it’s combined, then take it off the heat.

- Whip the eggs: I like to use a hand mixer for this step. Whip the eggs for about 1 minute to incorporate air into them. Stop when the eggs start to foam.
- Add liquids: Put the mixer on low and slowly add the butter/sugar mixture. After that’s added, turn the mixer on medium and whip for another minute. Add in the vanilla.
- Add dry ingredients: I like to use a rubber spatula to stir in the dry mix. Try not to overmix. Stop when it’s all just combined. Sitr in the chocolate chips if using.

- Spread and bake: Pour the batter into the a 9-inch pan (this is my favorite pan) and bake! You can also use an 8-inch pan. You want the toothpick to come out with just a few moist crumbs.
- Cool: This is the hard part — let the brownies cool on a wire rack for at least 30 minutes before slicing. Enjoy!
Make-Ahead/Storage/Freezing Instructions
- Make-Ahead: These chewy brownies are a great make-ahead dessert and taste even BETTER the day after baking! Store them at room temperature or, if needing to keep them fresh longer, freeze them.
- To Store: Store the brownies in an airtight container at room temperature. They will stay fresh for up to 4 days.
- To Freeze: Wrap the brownies tightly in plastic wrap and freeze for up to 3 months. Defrost them at room temperature overnight or microwave them individually for 30 seconds.
Can these chewy gluten-free brownies be made dairy-free?
Yes, you can use dairy-free butter in this recipe to make it dairy-free! If you want to add chocolate chips to the batter, just make sure to use a dairy-free brand.
What is the difference between Dutch-process and natural cocoa powder?
Dutch process cocoa powder is treated with an alkalizing agent to neutralize its acidity, making it darker and milder in flavor, while natural cocoa powder is untreated and retains its natural acidity and robust chocolate flavor. Both are delicious, but I love the Dutch-process cocoa in this recipe!
Can I make these brownies in a 9×13 pan?
Definitely! Double the recipe for a 9×13 pan. The batter will also need to bake a little longer. Start with 5 extra minutes and monitor closely. Use a toothpick to test doneness.


Chewy Gluten-Free Brownies
Ingredients
Dry Ingredients:
- ¾ cup (70g) Dutch process cocoa powder
- ¾ cup (112g) gluten-free measure-for-measure flour
- ½ teaspoon baking powder
- 1 teaspoon kosher salt
Other:
- 3 large eggs
- 1 cup (226g) butter (2 sticks)
- 2 ¼ cups (450g) granulated sugar
- 2 teaspoons vanilla extract
- ¾ cup chocolate chips optional
Instructions
- Preheat the oven to 350°F. Line a 9-inch square baking pan with aluminum foil. Spray the foil with cooking spray.
- In a medium bowl, whisk together the cocoa powder, gluten-free flour, baking powder, and salt.
- Melt the butter in a medium saucepan over medium heat until completely melted and starting to bubble. Pour in the sugar and vigorously whisk for 1 minute to combine. Remove from the heat.
- Add the eggs to a large bowl. Use a hand mixer to whip the eggs for 1 minute, until starting to foam.
- With the mixer running on low, slowly add the butter/sugar mixture. Once the butter/sugar mixture has been added, increase the mixer speed to medium and whip for 1 minute. Stir in the vanilla.
- Using a rubber spatula, stir in the dry ingredients until just combined. Fold in the chocolate chips, saving 1/4 cup to sprinkle over the top.
- Spread the batter into the prepared pan. Sprinkle with the remaining chocolate chips. Bake for 35-40 minutes, until a toothpick inserted into the center comes out with a few moist crumbs.
- Remove from the oven and let cook on a wire rack for at least 30 minutes before slicing. I like to press a few more chocolate chips on top. Enjoy!
Notes
- Dairy-Free: Use vegan butter in place of the regular butter. If adding chocolate chips, use a dairy-free brand.
- Make-Ahead: Works great for a delicious make-ahead dessert! Store them at room temperature or, if needing to keep them fresh longer, freeze them.
- To Store: Store in an airtight container at room temperature for up to 4 days.
- To Freeze: Wrap the brownies tightly in plastic wrap and freeze for up to 3 months. Defrost at room temperature overnight or microwave them individually for 30 seconds.


Hi! I made this recipe and it was rising nicely. I had to test 3 times too see if they were done. I poked the tooth pick in. They collapsed in the center. I’m so disappointed. Can U shed light on why this happened and how to stop it from happening again ! Thank u
Hi Carmella, we’re sorry you had this experience! The middle typically sinks if the brownies are underbaked or if they aren’t given enough time to set before being checked. Each time the oven door is opened it loses heat which can mess with how well the brownies bake through and set in the middle. Next time, we’d recommend leaving the brownies undisturbed for most of the baking time, waiting until the edges look puffed and the top crackly. We hope this helps and the brownies go better next time!
Absolutely delish! Super gooey and tasty. I added milk and dark choc chips AND mini marshmallows for extra gooo! Def baking again soon!. I didnt mention they were GF and NOONE could tell! Many thanks
Yay! We’re so happy to hear the brownies were such a hit! Those additions sound delicious too. Thank you for sharing with us, Mel!
The best gf brownies I’ve tried. Not sure why but myn fell. My grandsons had them warm with ice cream.
Hi Teresa, we’re so pleased to hear how much you and your grandsons enjoyed the brownies! Brownies tend to fall if they are a little underbaked or cool too fast. We hope next time they go even better for you! Happy baking!
By far the best gf brownies we’ve had! Instead of microwaving the butter and chocolate we melted it on the stove then added all of the ingredients to the pot making it all one bowl which was really nice for clean up!!
Love that idea, Jadyn! Thank you for sharing your positive experience with us. We’re so glad you loved the recipe!
They look so good. The recipe calls for a lot of sugar, can I use coconut sugar as a substitute? Thank you
Hi Suzette, we don’t typically bake with sugar substitutes to say for sure. If you decide to give it a try, we’d love to hear how it goes!
Very good recipe. I found there was too much batter for the pan and had to burn the edges to get the rest of the pan to cook enough. I’m thinking I will try making them thinner next time. The flavor is excellent and I’m sure my guests tomorrow will love these warmed up with a little ice cream on them. and I’ll love the leftovers if there are any. Thanks for the good recipe!
Hello, these brownies look delicious but sadly I can’t have dairy. What could I swap for the butter, please?
Hi Yvonne, you can use dairy-free/vegan butter in place of the regular butter. We hope you enjoy the brownies!
Hi can I substitute oil for butter in the brownie recipe?
Hi Shana, we would recommend using butter or dairy-free/vegan butter in this recipe. We hope you enjoy the recipe!