
Featured Comment
From Ann: “These turned out absolutely amazing. They look and taste like something professional! Meaningful Eats is my go to for all gluten free recipes. But this is just a super delicious recipe. You could never guess they are GF!”
From Jen: “These are the best banana muffins I have ever made in my life (and I am old…lol). Thank you!”
From Haley: “I love your recipes! Just made this one today and they look phenomenal! Never guess they’re gf thank you for your dedication to helping us make sweets at home!”
Recipe Overview
⏱️ Time to Taste: About 55 minutes (includes batter chill)
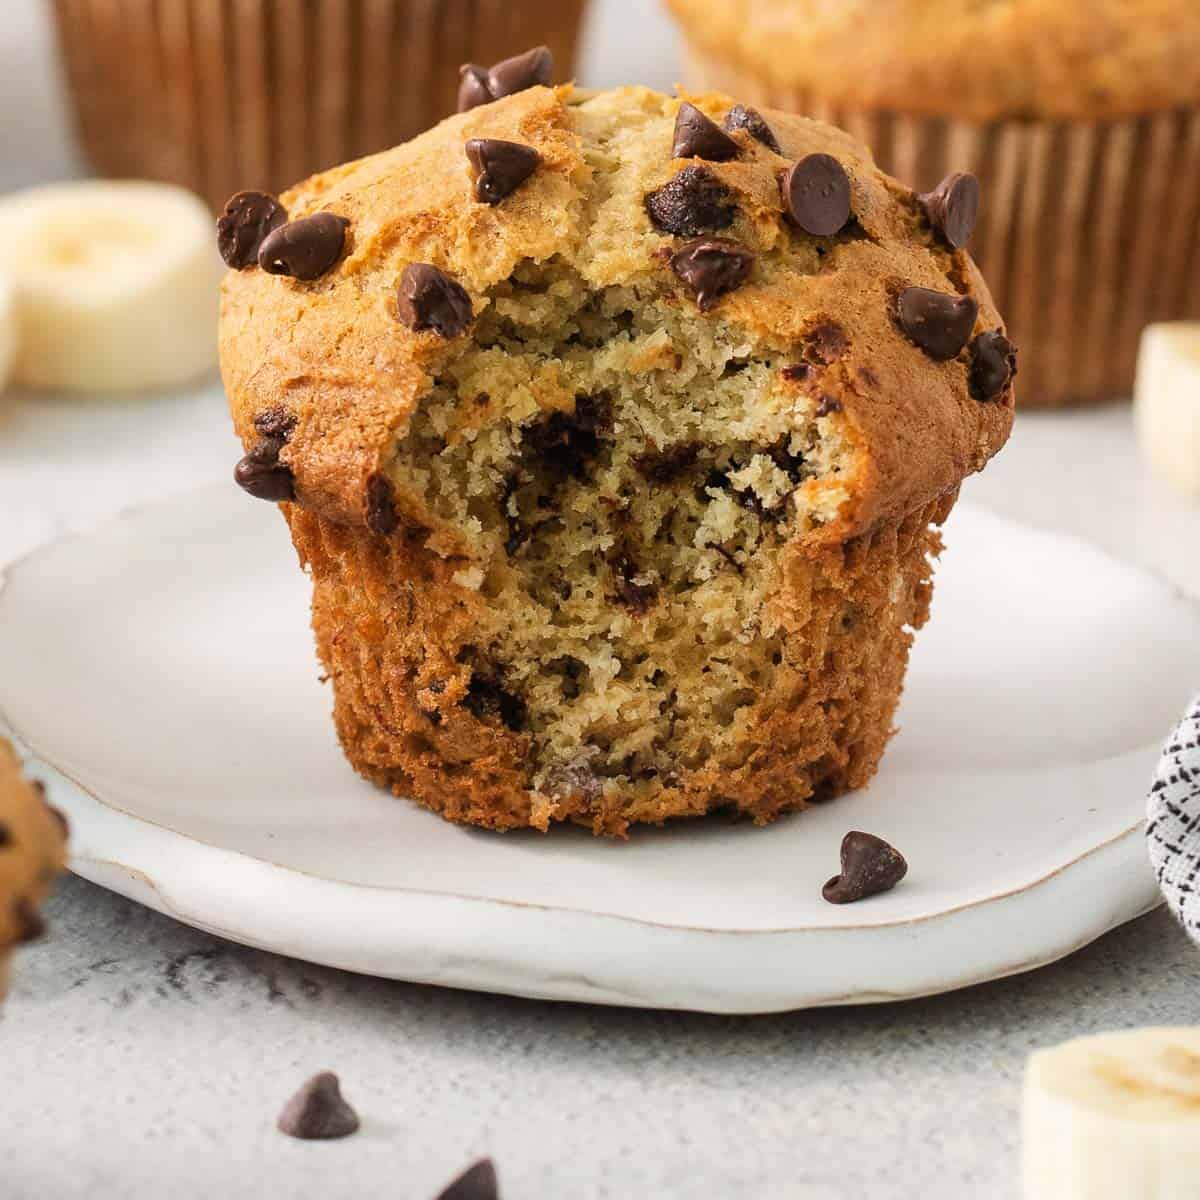
✨ Texture: Soft, fluffy, moist with tall bakery-style domes
🥣 Ease: Easy (Beginner-friendly with straightforward steps and reliable results)
🌾 Flour Used: Gluten-Free Measure-for-Measure Flour + Almond Flour
🧁 Equipment Needed: Standard 12-cup muffin pan, paper liners, mixing bowls
🎉 Best For: Breakfast, snacks, lunchboxes, meal prep, freezing
❤️ Why You’ll Love It: The combination of ripe bananas, sour cream, oil, and a short batter rest creates incredibly soft gluten-free banana muffins that stay moist for days.

I’ve tried dozens of gluten-free banana muffin recipes over the years and this is my family’s absolute favorite!
This recipe has been a total lifesaver on busy mornings. I can whip up delicious, kid-approved gluten-free banana muffins in just 30 minutes and even freeze the extras for quick breakfasts or snacks later on!
Ingredients You’ll Need
Here are a few notes on some of the key ingredients to make these gluten-free banana muffins. Jump to the recipe card below for the exact measurements.

- Gluten-free flour: I recommend using a high-quality gluten-free flour that contains xanthan gum. This is my favorite brand.
- Almond flour: Adding a little almond flour a go-to trick in many of my recipes, including my master gluten-free muffin recipe! It helps with texture and browning.
- Bananas: Overripe bananas with brown speckles work best! Just like with my gluten-free banana bread recipe, be sure to measure out the amount of mashed bananas exactly for best results!
- Sour cream/oil: I love using a combination of full-fat sour cream and a neutral oil for the most tender crumb! I often use this duo in my cake recipes, like this gluten-free banana cake.
How to Make Gluten-Free Banana Muffins
Here’s an overview of how to make this recipe. You can jump to the recipe for the full instructions!
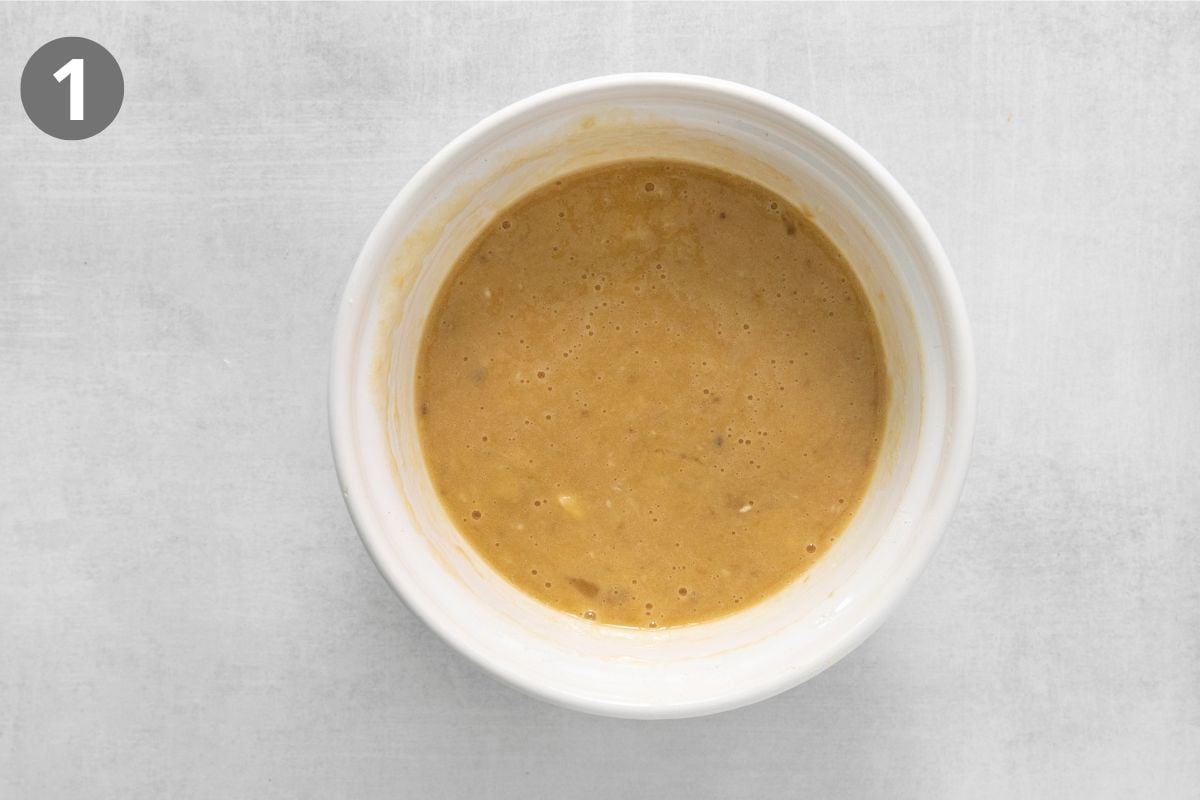
Start separate: I whisk the dry ingredients in one bowl and the wet ingredients in another to make sure everything is evenly distributed.
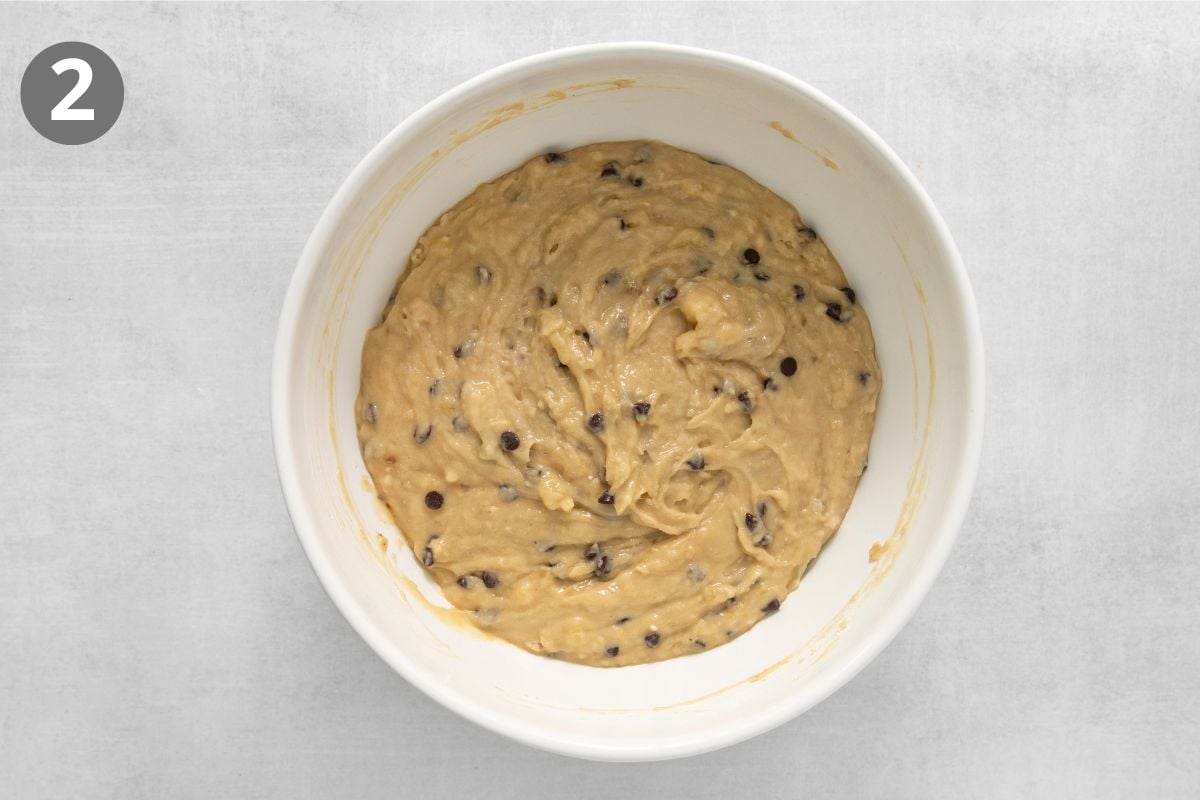
Build the Batter: I fold the wet and dry ingredients together until just combined, then add any mix-ins. Watch out for overmixing! It can lead to dense muffins.
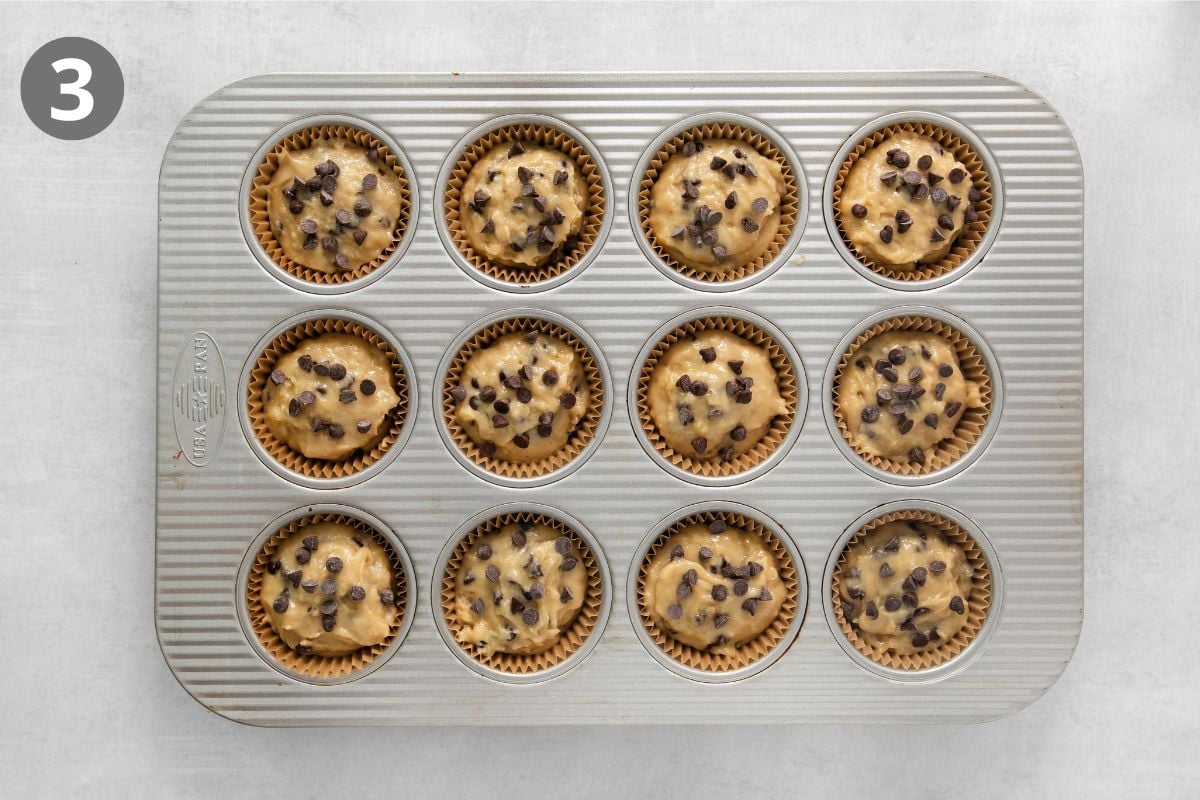
Fill and Chill: I portion the batter into the muffin tin, filling the cups all the way up, then chill it for 20 minutes. This helps the gluten-free flour hydrate for the best texture. You don’t want to skip this step!
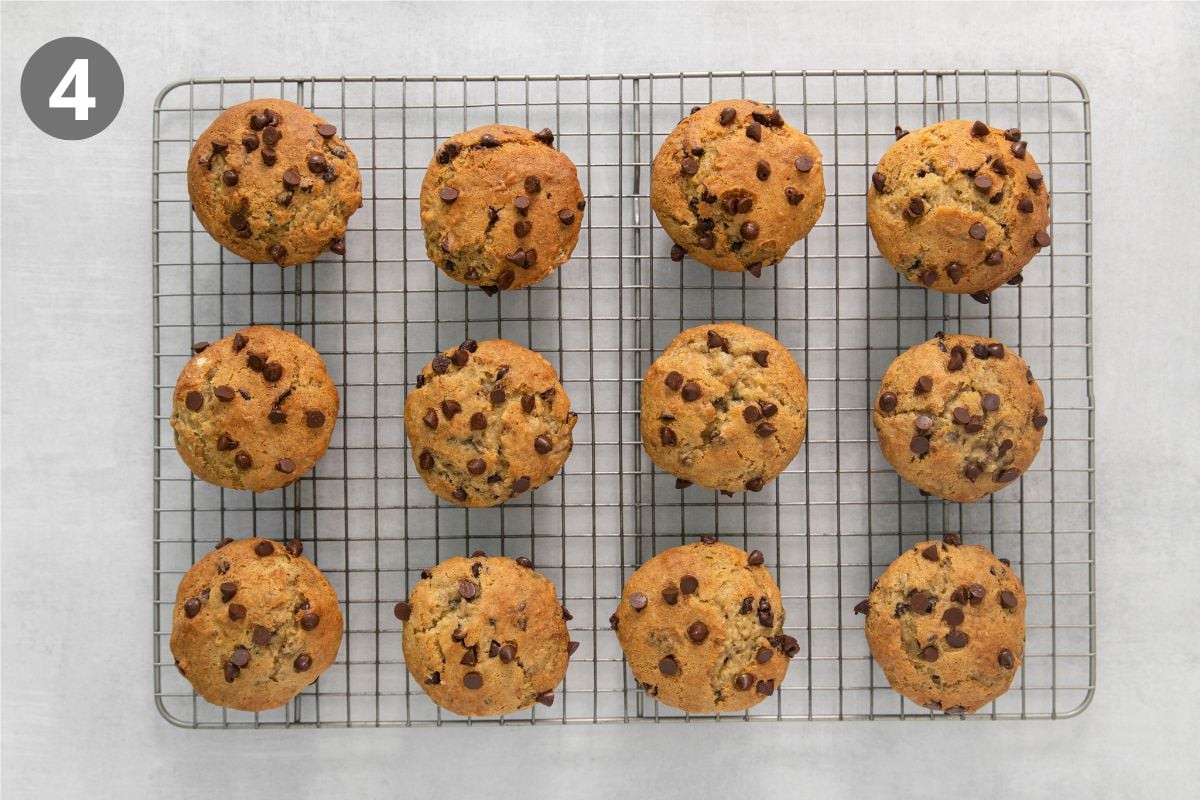
Bake and Cool: I use the high-low heat trick for the tallest muffin tops! The initial burst of heat helps the muffins rise quickly, then lowering the temperature allows the centers to finish baking evenly.
Make-Ahead/Storage/Freezing Instructions
To Make-Ahead: You can prepare the batter up to 1 day ahead. Just cover and refrigerate until you’re ready to bake!
To Store: Let the muffins cool, then store them in an airtight container. They’ll last 3 days at room temperature or 1 week in the fridge.
To Freeze: Place the cooled muffins in an airtight container or freezer bag and freeze for up to 3 months. I typically thaw them for a few hours at room temperature , but you can also microwave individual muffins for 20-30 seconds for quicker thawing.
What Do Gluten-Free Banana Muffins Taste Like?
These gluten-free banana muffins are soft, fluffy, and incredibly moist with sweet banana flavor in every bite. They aren’t overly sweet, making them perfect for breakfast or snacks, and they have a tender crumb that’s nearly impossible to tell is gluten-free. I like to add chocolate chips or chopped nuts for even more flavor and texture.
How Ripe Should Bananas Be For Banana Muffins?
Very ripe bananas are best! The peels should be heavily speckled or mostly brown. The riper the bananas, the sweeter and more flavorful the muffins.
Can I Make Mini Banana Muffins?
Yes! You can make these as mini muffins, but they will require a shorter baking time than standard muffins. Because this recipe uses a high-low heat method, I recommend following the same temperatures, but begin checking them early. They are done when a toothpick inserted in the center comes out clean.

Gluten-Free Muffin Recipes

Gluten-Free Banana Muffins (Easy with 1:1 Baking Flour!)
Video
Ingredients
DRY INGREDIENTS:
- 1 2/3 cups (250g) gluten-free measure-for-measure flour
- 1/2 cup (50g) almond flour
- 1 1/2 teaspoons baking powder
- 1 teaspoon baking soda
- 1/2 teaspoon kosher salt
WET INGREDIENTS:
- 1 1/2 cups (345g) mashed bananas, 3-4 bananas
- 1/2 cup (100g) granulated sugar
- 1/2 cup (100g) brown sugar
- 1/3 cup (75g) neutral oil, I use avocado or vegetable oil
- 1/4 cup (60g) sour cream
- 1 tablespoon milk of choice
- 2 large eggs
OPTIONAL:
- 1/2 cup mini chocolate chips or 1 cup larger mix-ins, like nuts
Instructions
- Line one 12-cup muffin tin with paper liners or lightly grease with cooking spray.
- In a large bowl, whisk together the dry ingredients. In another bowl, whisk together the wet ingredients.
- Add the wet ingredients to the dry and mix with a rubber spatula until just combined and no dry streaks remain. If adding any chocolate chips or nuts, fold them in when the batter is just about mixed to avoid over-mixing.
- Scoop the batter into the prepared muffin tin. Fill the tins all the way up! Refrigerate the muffins for 20 minutes before baking.
- Preheat the oven to 425°F. Bake for 10 minutes, then reduce the oven temperature to 350°F and bake for another 10-15 minutes, or until a toothpick inserted into the center of a muffin comes out clean and the muffins spring back when touched on top.
- Let cool for 3-5 minutes before transferring to a wire rack to cool completely. Enjoy!
Notes
Nutrition
This post was originally published in May 2020. It was updated with new photos and instructions in July 2026.


Ok I admit I was skeptical.
I didn’t have all the ingredients so I had to make tweaks.
They came out amazing. Sadly my oven runs out so they brown way more than I wanted but even still they were amazing. Have to get more over ripe bananas so I can make them again.
Tweaks I made:
No eggs used 2 flax eggs instead
Did not use a cup of sugar instead 1/4 of coconut sugar and little less than 1/4 of maple cream
Sub out almond flour for 1/2 cup of almond pulp left over from making almond milk and mixed it in with my wet ingredients.
Sub out extra 1/2 tsp of baking powder for the baking soda.
Mixed walnuts and dark chocolate no sugar chocolate chips
Still amazing soo good and actually still sweet enough.
Thank you will be making another batch soon
Hi Kelley, we’re so glad you enjoyed the recipe and that it worked well with those substitutions. We hope your next batch is even better! Happy baking!
These turned out absolutely amazing. They look and taste like something professional! Meaningful Eats is my go to for all gluten free recipes. But this is just a super delicious recipe. You could never guess they are GF!
I just made these muffins exactly as written and they were delicious. They looked like I bought them from a bakery and tasted even better. Thanks so much for an outstanding recipe.
Thank you for such kind feedback, Jenn! We’re so glad you enjoyed the recipe!
This is literally the BEST GF recipe I’ve ever made!!! It stays on repeat in our kitchen – for bdays, holiday brunches, you name it. Amazing texture and flavor and no one can even tell it’s GF.
We’re so happy to hear this recipe has been such a hit with your household! Thanks for sharing your kind feedback, Hailey!
I made these today, and they are some of the best tasting gluten free muffins i’ve ever had. The scale measurements really opened my eyes to how far “off” i typically am when using ingredients without the scale.
I did cook mine at 425 degrees for 10 minutes, and then only 7 minutes at 350 degrees and they turned out perfect.
Hi Brooklyn, we’re so glad you enjoyed the muffins! Thank you for taking the time to share your positive experience with us!
What can I use in place of Sour cream since I can only have lactose free sour cream and it’s hard to find?
Hi there, you can use dairy-free yogurt or dairy-free sour cream as a substitute in this recipe. We hope you enjoy!
So tasty! I used buttermilk instead of sour cream & added 50g of gf sourdough discard. I also used coconut sugar & maple syrup instead of white sugar. These have the texture of muffins that one would assume is full of gluten. Awesome recipe, I will be saving to make again.
We’re so glad the recipe was a hit, Alli! Thanks for sharing your experience with us!
These are perfect! I cut down the granulated sugar and didn’t add chocolate chips, so u can give these to my toddler as a snack after daycare. They are still sweet and delicious. I also appreciate that these are a big muffin. These will be a staple for us!
I recently created this muffin recipe for my daughter who has celiac disease. We are constantly searching for delicious and visually appealing muffin ideas that meet her dietary needs. For this batch, we skipped the chocolate chips and reduced the amount of granulated sugar by 1/4 cup and substituting monk fruit instead. The result was fantastic, and I would rate this recipe a perfect 10 out of 10!
Thank you for the high rating, Kristin! We appreciate your feedback and tips!
I have not tried them yet but I’m sure my family will love these muffins.
Thanks for the kind words, Lillian. We hope your family enjoys them!
First try with this recipe… simply amazing! So happy that I stumbled on a post by you on Instagram 🙂
Yay! We’re happy to hear you loved the muffins, Sandy! Thank you for the positive feedback!
These turned out so well and the best thing about them is that they keep their soft fluffy texture for days without any warming up, like most gluten free breads require. Thanks for the awesome recipe!
We love these muffins! My non gf husband couldn’t believe they were gf. They look and taste amazing!
Hi!
I’m just wondering, there seems to be a discrepancy in the recipe on two things. In your description you mention heating the oven at 400F and in the actual recipe you state 425F and in the description you mention 2 cups of mashed bananas but the actual recipe states 1 1/2 cups. Can you please let me know which is correct.
Hi Antoinette, thanks for bringing this to our attention! We’ve updated the recipe with the correct information. The oven should be preheated to 425F and the mixture should include 1 1/2 cups of mashed bananas. We hope you enjoy the muffins!
Hi. I’m fairly new to the GF world. I have tried many GF recipes over the past year and most have been so, so at best. I gotta hand it to you on this banana muffin recipe. It turned out great. I did replace the sugar with monk fruit and added chia seeds, flax seeds and protein powder. So I also had to add a little more milk to make the batter the correct consistency. Anyway I think these turned out great. Thank you for all your recipes.
Hi Karen, thank you for your feedback and tips. We’re happy to hear you enjoyed the banana muffins!
This was the first time I was successful with full, tall, fluffy, fully-cooked muffins! It was also the first time I weighed the flours. Putting them in the fridge prior to baking and then cooking them at a higher temperature first must have been the key tips! I tested them at 10 minutes (after the initial 10 minutes at the higher temp) and they were at 198 degrees; stuck them back in for 2-3 minutes more and they reached 200 degrees (the ideal temp from what I’ve heard). They are perfect. Also, thanks for not having us put the oven on as step 1.