

Erin’s Recipe Rundown

Texture: Buttery, flaky, and perfectly crisp on the outside.
Taste: Rich, cheesy, and slightly savory with a hint of fresh chives.
Ease: Surprisingly simple! A great recipe for both beginners and seasoned bakers.
Top Tips: For extra flaky scones, use frozen grated butter and don’t skip the chilling step. Baking at a high temperature first helps them rise beautifully.
Recommended GF Flour: A high-quality 1:1 gluten-free baking blend with xanthan gum works best. I love King Arthur Flour and Bob’s Red Mill for consistent results.
Would I make these again? Absolutely! These are a staple for breakfast, brunch, or a side dish to soup or salad.
xoxo erin

This post was originally published in May 2022. It was updated with new photos and instructions in March 2025.
These fluffy herb gluten free cheese scones taste amazing on their own, but they also make a great accompaniment to eggs and bacon, salads, or soup.
The texture of the scones is always light and fluffy, thanks to plenty of baking powder and high-quality gluten-free flour. It’s one of my favorite ways to change up your typical scone recipe and give it the sharp bite of cheddar cheese!
Featured Comment
From Lauren: “The scones are delicious. I sprinkled a little cheese on top as well. No one knew they are gluten free. Thank you for creating an option for GF people.“
Table of Contents
- Erin’s Recipe Rundown
- Ingredients You’ll Need
- How to Make Gluten-Free Cheese Scones
- Storage/Make Ahead/Freezing Instructions
- How do you get fluffy scones?
- Can you use a different type of cheese?
- Why do you need to freeze the butter?
- Can these scones be made dairy-free?
- Can these scones be made egg-free?
- Recipe Tips
- More Gluten-Free Recipes
- The Best Gluten-Free Cheese Scones Recipe
For more gluten-free appetizers, you also might like these deviled eggs with relish or gluten-free cheese breadsticks!
Ingredients You’ll Need
Here are a few notes on some of the key ingredients to make these gluten-free cheese scones. Jump to the recipe card below for the exact measurements.

- Baking powder: A full tablespoon of baking powder helps gluten-free scones turn out nice and light.
- Sour cream: Sour cream gives these scones richness but also helps them hold their shape during baking.
- Frozen grated butter: Frozen grated butter is KEY to creating light and flaky scones. The cold butter and breadcrumb-like mixture of flour melts as the scones bake, releasing steam and creating air pockets. These pockets are what create flaky scones with crisp edges.
- Cheddar cheese: Sharp cheddar cheese adds strong savory flavor and tang to these scones.
How to Make Gluten-Free Cheese Scones
Here’s an overview of how to make these gluten-free cheese scones. You can jump to the recipe for the full instructions!
Make the Scones

- Whisk dry ingredients. Mix together gluten-free flour, sugar, baking powder, and salt.
- Mix in grated butter. Grate the frozen butter, then add it to the flour mixture and combine until the mixture comes together in pea-sized crumbs.

- Whisk sour cream and egg. Whisk together the sour cream and egg in a separate bowl, then add to dry ingredients.
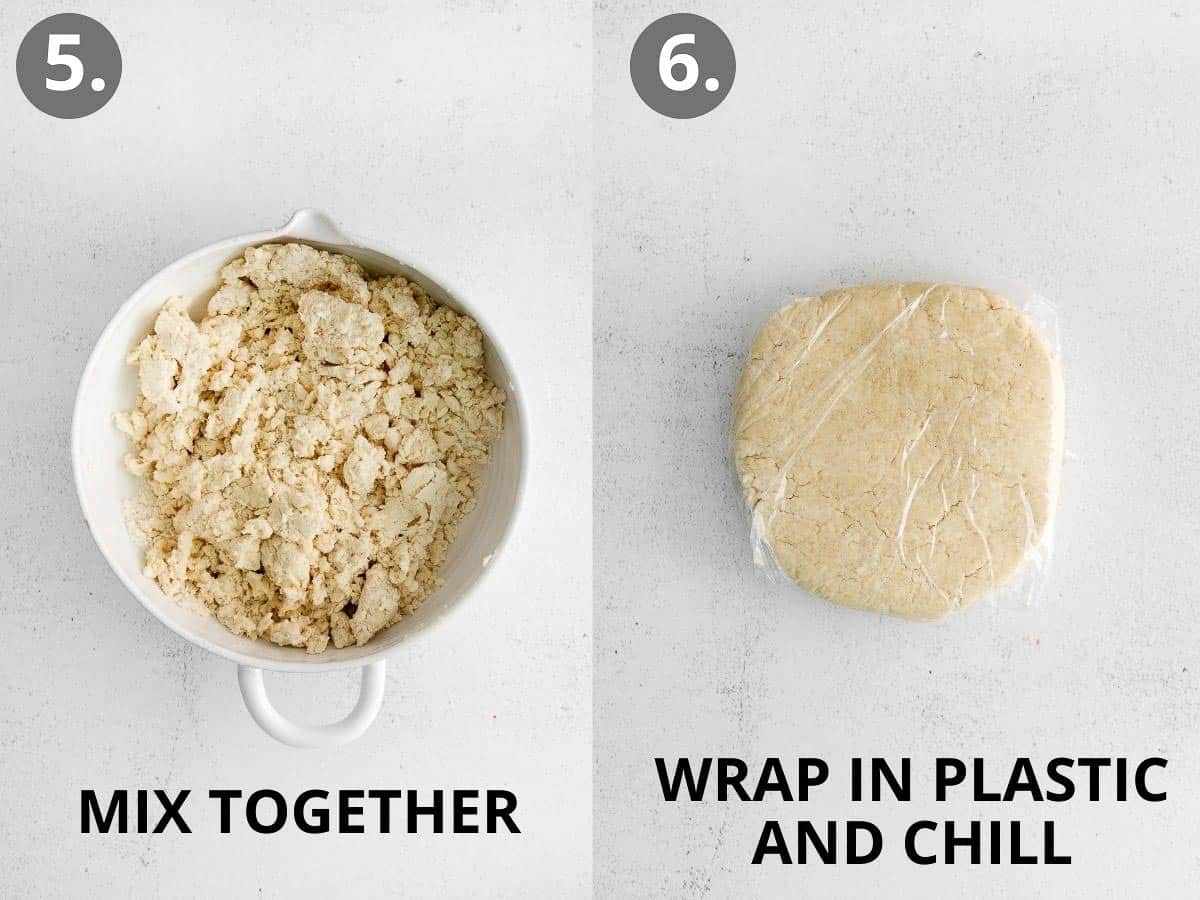
- Mix together. Stir the wet ingredients into the dry ingredients until no dry bits of flour remain.
- Wrap in plastic and chill. Transfer scone dough to parchment paper. Pat dough to form a 6-inch round that is 1-inch thick. Wrap tightly in plastic and refrigerate for 30 minutes. (Do not refrigerate longer than 30 minutes.)

- Place on baking sheet. Remove dough from the fridge. Spray a sharp knife with vegetable oil and cut the dough into 6 equal wedges. Arrange the scones on the prepared baking sheet.
- Bake. Lower the oven temperature to 425F and bake the scones for 12-14 minutes until golden brown. (You want the oven temperature to be hot to start so the scones turn golden brown as they cook through.)
- Cool scones. Transfer the scones to a cooling rack and let cook for 20 minutes before serving.
- Make the chive butter. Whisk the garlic chive butter ingredients together. Brush over the top of the scones after baking.

Storage/Make Ahead/Freezing Instructions
To Store: These savory gluten-free cheese scones are best enjoyed on the day they are baked. However, you can store them in an airtight container at room temperature for up to two days or in the refrigerator for up to five days.
To Make Ahead: Prepare the dough and shape it into a disc. Wrap tightly in plastic wrap and refrigerate for up to 24 hours before baking.
To Freeze: Freeze unbaked scones by placing them on a baking sheet until solid, then transfer them to a freezer-safe bag for up to three months. Bake straight from frozen, adding a few extra minutes to the baking time. Baked scones can also be frozen — just wrap them individually and reheat in a 300°F oven for 10 minutes before serving.
How do you get fluffy scones?
To get the perfect scone that is light and fluffy, be sure to use a full tablespoon of baking powder, like in this recipe. Double-check to make sure the baking powder is fresh (less than 6 months old), don’t over-knead your dough, and don’t add more flour than the recipe calls for.
Can you use a different type of cheese?
Absolutely! While sharp cheddar gives these scones a rich, classic flavor, you can swap it for asiago, parmesan, gruyère, or even a smoked cheese.
Why do you need to freeze the butter?
Frozen butter creates steam pockets as the scones bake, making them light and flaky. This is the key to getting that perfect tender texture with crisp edges.
Can these scones be made dairy-free?
Yes! For dairy-free, gluten-free scones, use dairy-free sour cream, dairy-free butter, and unsweetened dairy-free milk of choice.
Can these scones be made egg-free?
Yes — just replace the egg with a flax egg (1 tablespoon ground flaxseed + 3 tablespoons water, mixed and left to sit for 5 minutes). Note that the flax egg may slightly change the texture, but they’ll still be delicious.

Recipe Tips
- Rest the dough: Resting the scone dough for 30 minutes before baking allows the gluten-free flour to hydrate. (Gluten-free flour takes longer than regular flour to absorb moisture.)
- Customize the recipe: You can use any kind of cheese you like in this recipe! These scones are also delicious with asiago, parmesan or Manchego cheese.
More Gluten-Free Recipes
- Gluten-Free Blueberry Scones
- Gluten-Free Chocolate Chip Scones
- How to Make Gluten-Free Scones
- Easy Gluten-Free Drop Biscuits
- Gluten-Free Butter Dip Biscuits

The Best Gluten-Free Cheese Scones
Ingredients
- 1 ½ cups (225g) gluten-free measure-for-measure flour
- 1 tablespoon (12 g) granulated sugar
- 1 tablespoon baking powder
- ½ teaspoon kosher salt
- 8 tablespoons (113g) butter frozen
- ⅔ cup (160g) sour cream
- 1 large egg
- 1 cup sharp cheddar cheese
Chive Butter
- 2 tablespoons butter melted
- 1 tablespoon chopped fresh chives
- ¼ teaspoon garlic powder
Instructions
- In a large mixing bowl, whisk together the gluten-free flour, sugar, baking powder and salt.
- Grate the frozen butter using a box grater. Add the butter to the flour mixture and combine with a pastry cutter, two forks or your fingers until the mixture resembles pea-sized crumbs.
- Stir in the mix-ins to the flour mixture until evenly distributed. In a separate bowl, whisk together the sour cream and egg until combined.
- Stir the sour cream mixture into the flour mixture with a rubber spatula until just combined and no dry flour streaks remain. Fold in the cheddar cheese.
- Spread out a large piece of plastic wrap. Using wet hands, transfer the dough to the parchment paper. Clean and wet your hands again then pat the dough to form a 6-inch round that is 1-inch thick. Wrap the dough tightly in plastic and refrigerate for 30 minutes. (Do not refrigerate longer than 30 minutes.) Then, place in the freezer for 15 minutes while the oven preheats.
- Preheat the oven to 500F. Line a baking sheet with a silicone mat or parchment paper.
- After 15 minutes, take the dough out of the freezer. Spray a sharp knife with cooking spray and cut the dough into 6 equal wedges. Arrange the scones on the prepared baking sheet.
- Place the scones in the oven, then immediately lower the oven temperature to 425°F. (You want the oven temperature to start hot so the scones turn golden brown as they cook through.) Bake for 12-14 minutes, until golden brown.
- Remove from the oven. Transfer the scones to a wire rack and let cool for 20 minutes before topping with the garlic chive butter.
- Whisk the garlic chive butter ingredients together. After cooling for 20 minutes, brush the tops of each scone with the butter.
Notes
- Gluten-Free 1:1 Baking Flour: I like to use a high quality gluten-free flour blend like gluten-free measure-for-measure flour blend like King Arthur Flour in my baked goods. It works best to use a blend that contains xanthan gum in this recipe.
- Sour cream: Sour cream gives these scones richness, but also helps them hold their shape during baking.
- Frozen grated butter: Frozen grated butter is KEY to creating light, flaky, buttery scones. The cold butter and flour crumbs melt as the scones bake, releasing steam and creating air pockets. These pockets are what create flaky scones with crisp edges!
- Rest the dough: Resting the scone dough for 30 minutes before baking allows the gluten-free flour to hydrate. (Gluten-free flour takes longer than regular flour to absorb moisture.)
- Customize the recipe: You can use any kind of cheese you like in this recipe! These scones are also delicious with asiago, parmesan or Manchego cheese.
- Dairy-Free: Use dairy-free sour cream, dairy-free butter and unsweetened dairy-free milk of choice.
- Nut-Free: These scones are naturally nut-free.
- To Store: These savory gluten-free cheese scones are best enjoyed on the day they are baked. However, you can store them in an airtight container at room temperature for up to two days or in the refrigerator for up to five days.
- To Make Ahead: Prepare the dough and shape it into a disc. Wrap tightly in plastic wrap and refrigerate for up to 24 hours before baking.
- To Freeze: Freeze unbaked scones by placing them on a baking sheet until solid, then transfer them to a freezer-safe bag for up to three months. Bake straight from frozen, adding a few extra minutes to the baking time. Baked scones can also be frozen — just wrap them individually and reheat in a 300°F oven for 10 minutes before serving.


These are TOO good! Can’t wait to try with other additions like nuts, different herbs, bacon bits… so flaky!
Yay! It’s great to hear you enjoyed the scones so much. Thank you for sharing your positive feedback with us, Erin!