


Featured Comment
From Beverly: “I made this cake for a birthday dinner party for a friend with celiacs. I almost always tweak recipes, but since this is created and tested for gluten-free flour, I followed it exactly. It was amazing! We all agreed we liked it better than a traditional pineapple upside down cake. ★★★★★“
From Kara: “Requested this cake for my recent birthday. We make our desserts gluten free due to two kiddos who need it. I honestly like this cake better than the “trad” recipe I’ve used for years, and would not have been able to tell it was GF if I didn’t know it. Soooo delicious! Even used oat milk instead of regular milk and it turned out fine. Your website and recipes are seriously the BEST! ★★★★★“
Recipe Overview
⏱️ Time to Taste: 1 hour
✨ Texture: Soft, moist, and fluffy with a caramelized fruit topping
🥣 Ease: Easy
🌾 Flour Used: Gluten-Free Measure-for-Measure Flour
🍍 Key Feature: Classic pineapple rings + cherries baked into buttery brown sugar topping
🎂 Best For: Holidays, potlucks, family dinners, summer gatherings
❤️ Why You’ll Love It: Moist sour cream cake base, no-fail structure, and nostalgic upside-down presentation
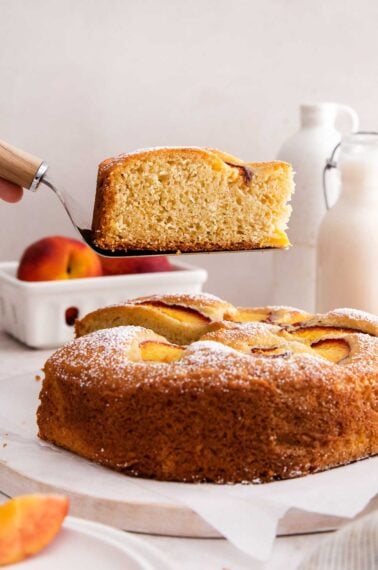
If you’re looking for a gluten-free pineapple upside-down cake reminiscent of the original classic, this recipe is it!
I love that this cake is made with basic pantry staples. No need to worry about buying fresh pineapple either—in fact, the classic canned pineapple slices work best. I promise this recipe will remind you of your grandmother’s pineapple upside-down cake, and you won’t even be able to tell it’s gluten-free!
Ingredients You’ll Need
Here are a few notes on some of the key ingredients to make this gluten-free pineapple upside-down cake. .Jump to the recipe card below for the exact measurements.
- Gluten-free flour: This gluten-free cake turns out best when you use a high-quality gluten-free measure-for-measure flour blend that contains xanthan gum. This is my favorite brand for this recipe.
- Sour Cream/Oil: Just like in this gluten-free birthday cake and this gluten-free red velvet cake, I use a combination of sour cream and oil instead of butter to keep the cake rich and the crumb light. I usually use vegetable oil or coconut oil.
- Baking Powder: I use a good amount in this recipe for the perfect rise.
How to Make Gluten-Free Pineapple Upside Down Cake
Here’s an overview of how to make this recipe. You can jump to the recipe for the full instructions!
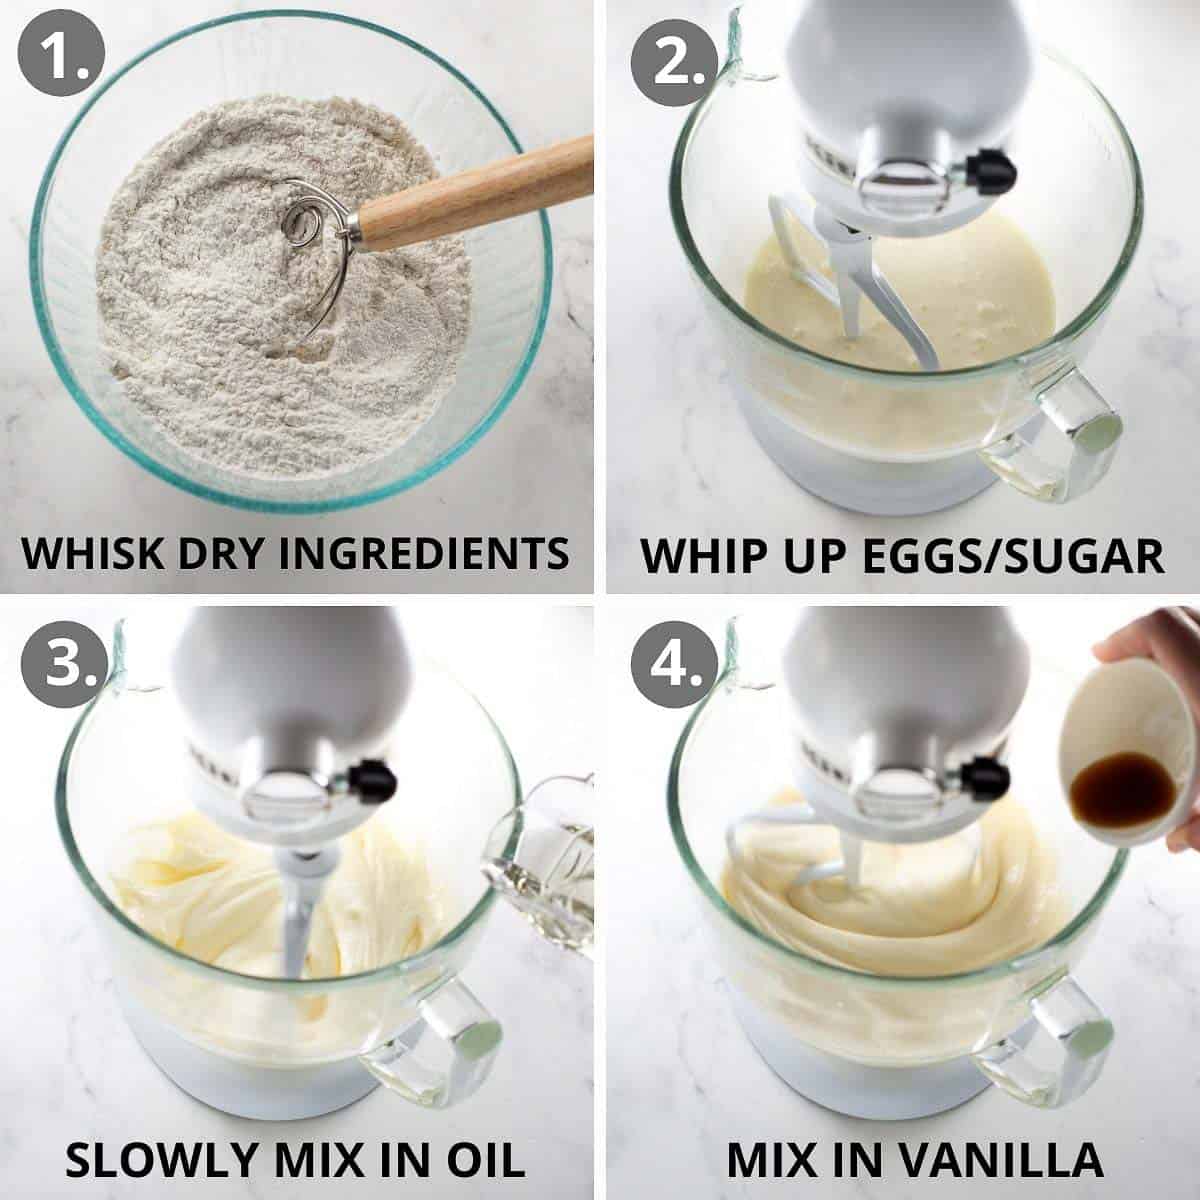
I like to start by mixing all of the dry ingredients together so they’re evenly combined before adding them to the batter later.
Then, I use my stand mixer to mix the sugar, egg whites, oil, and vanilla. I usually pause once or twice to scrape down the sides and bottom of the bowl to make sure everything is fully combined.
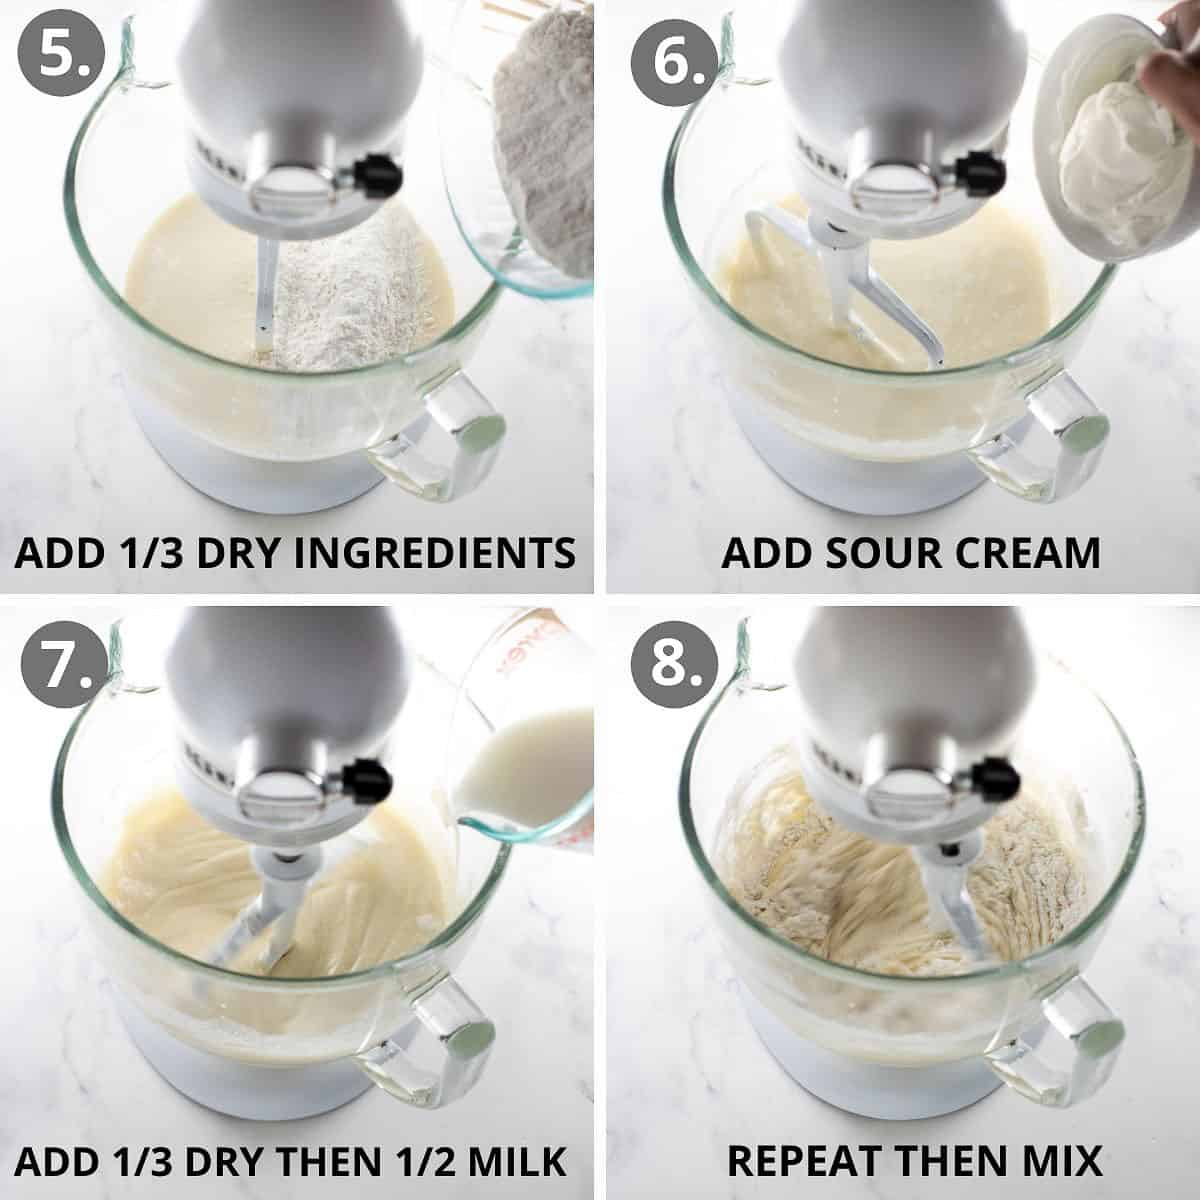
Next, I add the sour cream. I highly recommend adding the dry ingredients and milk incrementally. It’s a simple step that makes a big difference in the texture of the cake! This is especially important for gluten-free cakes since they can easily become dense if the batter isn’t mixed properly.
Note: Adding the dry ingredients alternately with the liquid ingredients ensures the gluten-free flour absorbs evenly into the batter. This helps prevent a grainy gluten-free pineapple upside-down cake, and keeps the crumb soft and light.
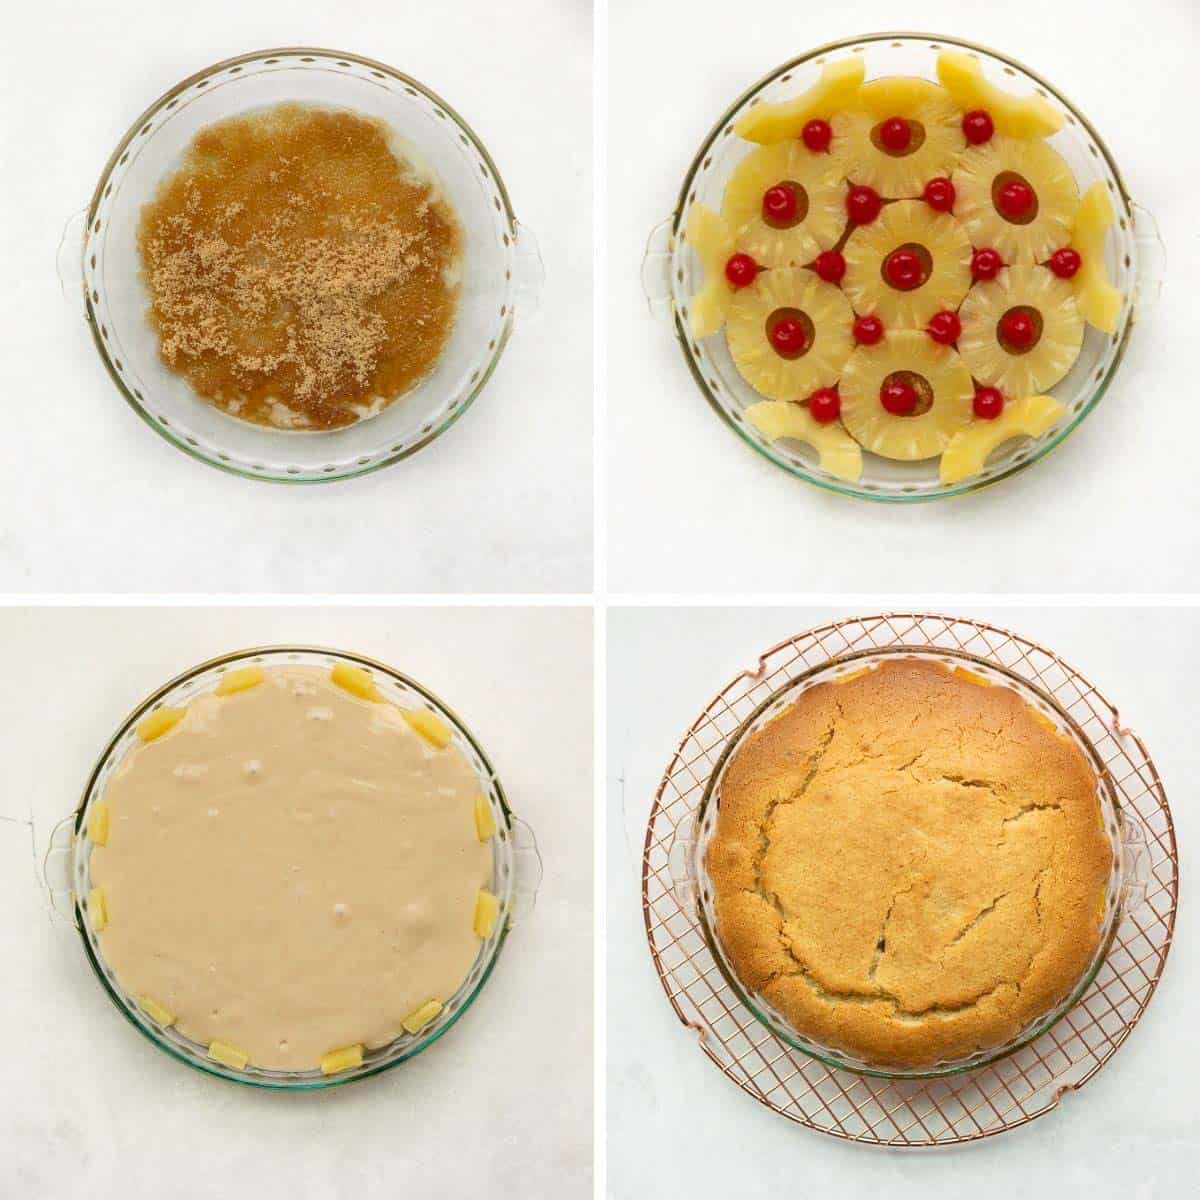
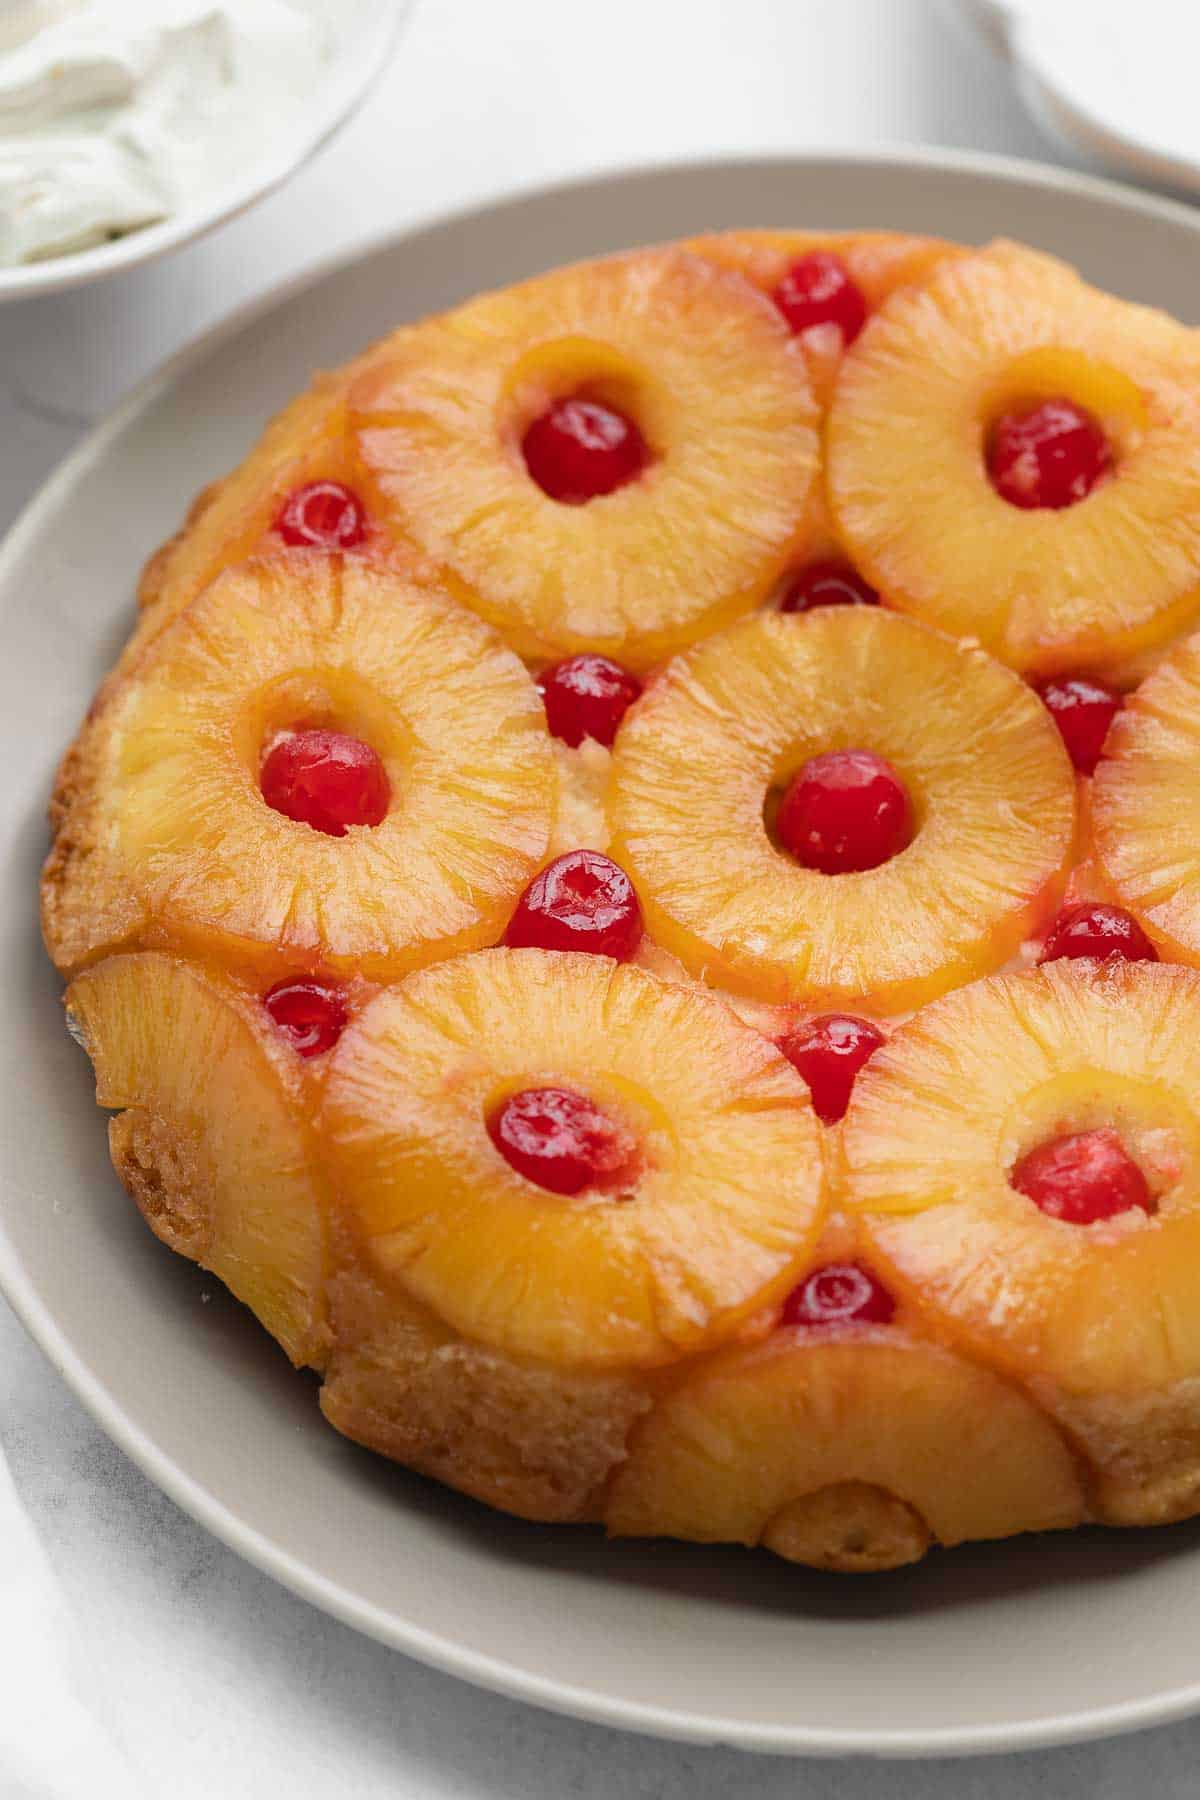
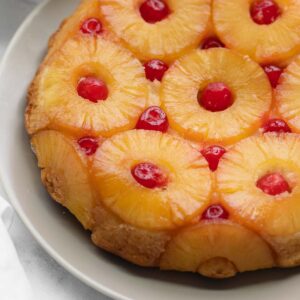
The butter and brown sugar create the signature glossy topping once the cake is inverted. I pat the fruit dry to prevent a soggy cake, then arrange whole pineapple rings across the bottom of the pan. Next, I use halved rings and cherries to fill in the design. I like to chill the pan to help everything stay in place!
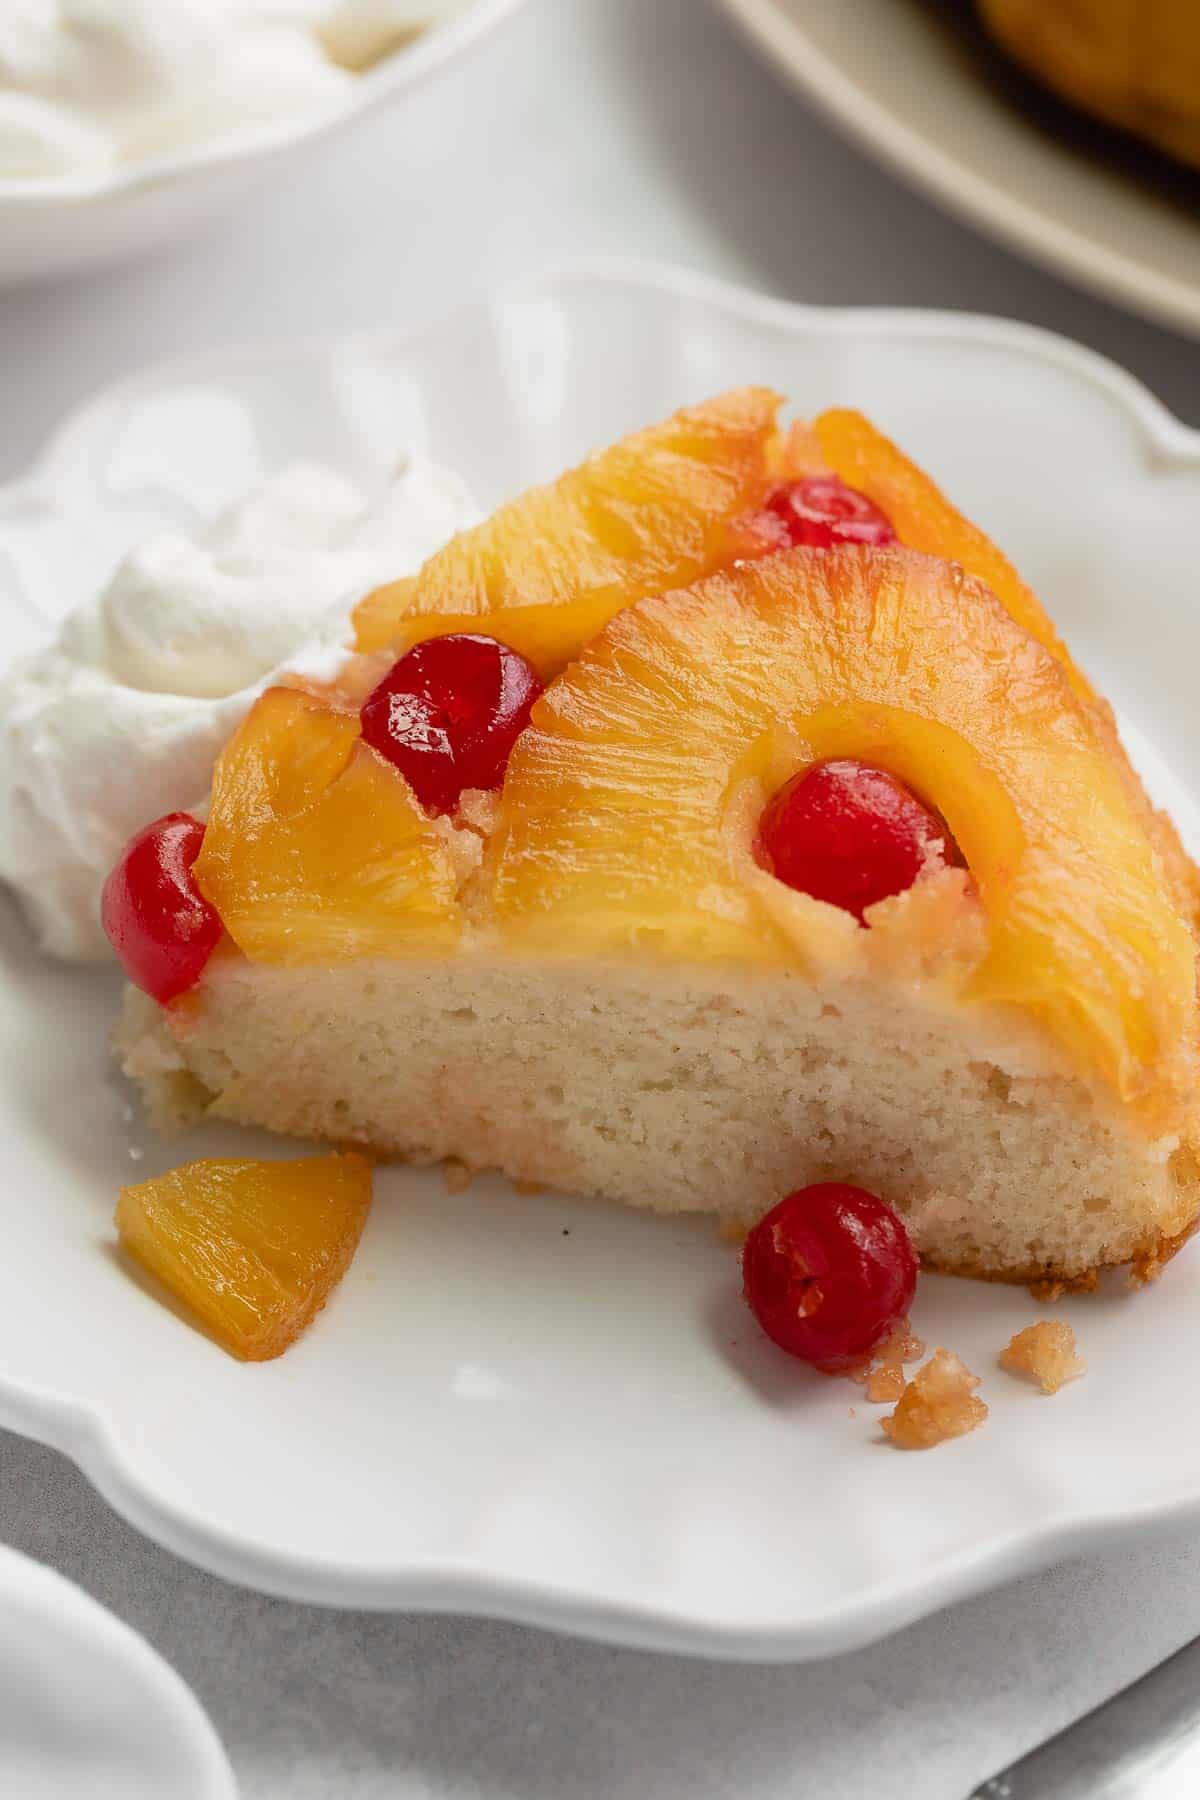
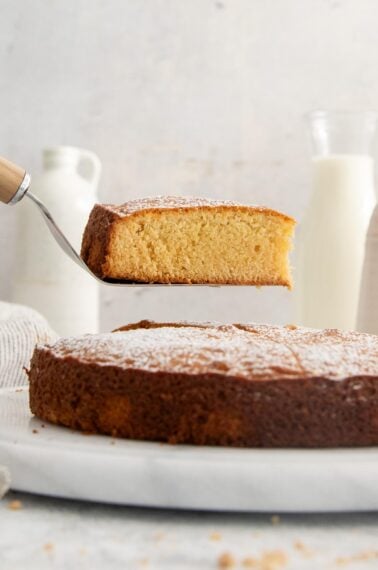
This cake is perfectly baked when it looks golden and a toothpick stuck in the center comes out clean. The cooling process is also important so that the cake releases cleanly. I love serving each slice with a dollop of whipped cream for the perfect finishing touch!
Gluten-Free Pineapple Upside-Down Cake Tips
- Important: Blot your pineapple and cherries dry before placing on the cake. Otherwise, your cake might be soggy!
- I recommend using one 20-ounce can of pineapple slices for this cake. It’s the perfect amount for the fruit arrangement!
- Let the cake cool for ONLY 20 minutes before turning it out onto the serving plate. Then let it cool completely before slicing.
- Do not place this cake in the fridge while it’s cooling—otherwise, the cake will be dense.
Can I Use Fresh Pineapple Instead Of Canned?
Yes, but fresh pineapple will give you slightly different results. They release more juice as they bake, which can make the cake a bit softer and less predictable. They also don’t hold the classic upside-down pattern quite as neatly since the slices vary in size and moisture.
Canned pineapple is recommended because it’s more consistent and gives the most reliable texture and appearance.
What Does Pineapple Upside-Down Cake Taste Like?
This cake is soft, buttery, and lightly vanilla-flavored with a rich caramelized brown sugar topping. The pineapple adds sweetness and moisture, while maraschino cherries provide a classic nostalgic finish.
More Gluten-Free Cake Recipes
Best Gluten-Free Pineapple Upside Down Cake
Ingredients
Topping
- 4 tablespoons (56g) butter, melted
- 1/2 cup (106g) brown sugar
- 8 –10 pineapple rings, patted dry
- 15 –20 maraschino cherries, patted dry
Dry Ingredients
- 1 cup + 2 tablespoons (169g) gluten-free measure-for-measure flour
- 1 tablespoon baking powder
- 1 teaspoon kosher salt
Other Ingredients
- 1 cup (200g) granulated sugar
- 2 large egg whites
- 1/4 cup (60ml) neutral oil
- 1 teaspoon vanilla extract
- 1/4 cup (60g) sour cream
- 1/2 cup (120ml) 2% milk
Instructions
- FOR THE TOPPING: Pour the melted butter into an ungreased 9×2-inch pie dish or 9-inch round cake pan. Sprinkle the brown sugar evenly over the butter.
- Pat the pineapple and cherries with paper towels until they’re very dry. (Wet fruit will make a soggy cake.) Arrange 6-7 pineapple rings and all the cherries on top of the brown sugar. Halve 3 pineapple rings and arrange them around the sides of the pan. Place the pan in the fridge to set the arrangement while you prepare the cake batter.
- FOR THE CAKE: Preheat the oven to 375°F. In a medium bowl, whisk together the gluten-free flour, baking powder and salt.
- In the bowl of a stand mixer, or using a hand mixer, beat together the sugar, egg whites, oil and vanilla until fully combined, scraping down the bottom and sides of the bowl as needed. Add the sour cream and beat until well-combined.
- With the mixer running on low, add ½ of the dry ingredients, followed by ½ of the milk. Mix to combine. Add the remaining ½ dry ingredients and ½ milk, then mix until just combined.
- Pour the batter on top of the pineapple arrangement. Bake for 40-45 minutes, until golden and a toothpick inserted into the center of the cake comes out clean.
- Remove the cake from the oven and let cool for 20 minutes before turning it out onto a serving plate. (Do not let the cake cool for more than 20 minutes before turning it out.) Allow the cake to cool completely before serving
Notes
dairy-free milk of choice. Nut-Free: This cake is naturally nut-free. To Make-Ahead: This cake is best the day it’s made. If made a few hours ahead, keep it covered at room temperature after it is completely cooled. To Store: Cover leftovers tightly or store in an airtight container, then refrigerate for up to 2 days. I recommend letting it come to room temperature before serving. To Freeze: I don’t recommend freezing this cake. The pineapple topping releases moisture as it thaws which can make the cake soggy and change the texture.


Hi Erin, can I use a bundt cake pan for this recipe or do you have a recipe using the bundt pan?
Hi Cassie! We haven’t tried this one in a Bundt pan. It may be possible though you’ll most likely need to bake it longer. If you decide to test it out, we’d love to hear how it goes!
It worked wonderfully in the pan, no issues at all!! Are you able to update the actual recipe to include what you have in the pictures way above ( mix Eggs and sugar until fluffy, then gradually add the oil and vanilla.) I was surprised to see it after I had already made the cake.
Hi Cassie! That’s wonderful! The recipe card includes the most updated version of the cake. It matches the recipe found in the cookbook, Let’s Bake Gluten-Free Volume 2. The images are from an older version that we’ve improved upon. We just don’t have new photos to share at this time. We hope this helps!
Hi, I made it today with the bundt cake pan and it turned out wonderfully, no issues at all.
I’m not sure if you know this but the pictures you gave with a summary of the recipe States to mix the egg whites and sugar until fluffy add then add the oil gradually and vanilla. However, in the actual recipe it states to mix the eggs, oil, vanilla (which does not become fluffy when mixed all together like this.)
We’re so glad the Bundt pan worked well, Cassie! Thank you for coming back and letting us know! Also, thank you for bringing this to our attention. It looks like we missed the opportunity to update the how to section to reflect the most updated version of the recipe (found in the recipe card). We’ve edited the section for clarity. Happy baking!
I’m one year in from a celiac disease diagnosis and was once an avid baker. No more. When I try, I often get something only edible, not delicious. I’ve begun collecting the recipes that actually work and also taste great and I’ll add this one to the list. I used Bob’s Red Mill 1 to 1 and while it isn’t wheat flour, the cake is moist, slid out of the pan easily after the prescribed wait time (without fighting to cut parchment first!), and tastes at least as good as the pineapple upside down cakes I’ve eaten before my diagnosis. Thank you!
Hi Kris! We definitely understand how hard it can be to switch to gluten-free baking. We’re so glad our recipes have gone well for you. Thank you for coming back and sharing your positive experience with the pineapple upside-down cake. We appreciate your feedback!
Is it possible to use a bundt pan instead of a cake pan?
Hi Maesan! We haven’t tried this one in a Bundt pan. It may be possible though you’ll most likely need to bake it longer. If you decide to test it out, we’d love to hear how it goes!
The cake turned out great! I used real pineapple instead of canned. Cake fell a bit while it was cooling but not much. Thank you for the recipe.
We’re so happy to hear you enjoyed the recipe and that the fresh pineapple worked well for you. Thank you for your kind feedback, Martha!
? Will non dairy milk work as well
Hi Linda! Yes you can use unsweetened dairy-free milk in this recipe along with dairy-free butter and dairy-free sour cream to make it totally DF. We hope you love it!
What would the weight of the egg whites be?
Hi Carol! It should be 60g. Thank you for your question!
This looks delicious! Would this also work in a bundt pan?
Hi Penny! We haven’t tried this one in a Bundt pan. It may be possible though you’ll most likely need to bake it longer. If you decide to test it out, we’d love to hear how it goes!
I don’t have a stand mixer. Your recipes often call for that. Will a hand mixer work?
Hi Peggy! Yes, you can use a hand mixer for this cake. Some recipes (think thick doughs) may be too much for hand mixers and require a sturdy spoon and elbow grease to replace the stand mixer, but most of Erin’s recipes can be made without the stand mixer…it just makes the job easier (and faster)! We hope this helps and you enjoy the recipe!
Your 175g weight for the flour is off for 1C+2T. One cup flour is approximately 130g, then the additional 2T would add approximately 16g, making for a total of 146g. Which should we use?
Hello! The measurements in the recipe are correct despite the GF flour’s label. We find that 1 cup of GF flour weighs much closer to 150-160 grams. At the end of the day a cup measurement is subjective and we think the manufacturer doesn’t realize GF flour is denser than traditional wheat flour (traditional wheat flour is 120 grams/cup) so they provide that generalized measurement that really isn’t accurate for GF flour. Erin likes to make her recipes so they will turn out for both people using cup and gram measurements. Her measurement for the flour is consistent across all of her recipes, even though it’s not the same as the labels. Happy baking!
I have never ever made this cake before, gluten free or not. I was diagnosed with celiac disease in 2018 and have been learning as I go. I made this on Saturday (2 days ago), and it came out fabulous! It’s almost gone between my husband and myself. Thank you so much! I printed it and will keep it forever.
We love to hear this, Jessica! Thank you for taking the time to share your positive baking experience with us. Happy baking!
I’m excited to find this recipe. My best friend made it for my Birthday and it was delicious! It was so moist and fluffy. Perfect cake texture and topping. I want to try and make it myself but I only have a hand held mixer, will that work?
I made this cake for a birthday dinner party for a friend with celiacs. I almost always tweak recipes, but since this is created and tested for gluten-free flour, I followed it exactly. It was amazing! We all agreed we liked it better than a traditional pineapple upside down cake.
Hi Beverly, that’s the best compliment! Thanks so much for sharing and leaving a great review, it means a lot!