
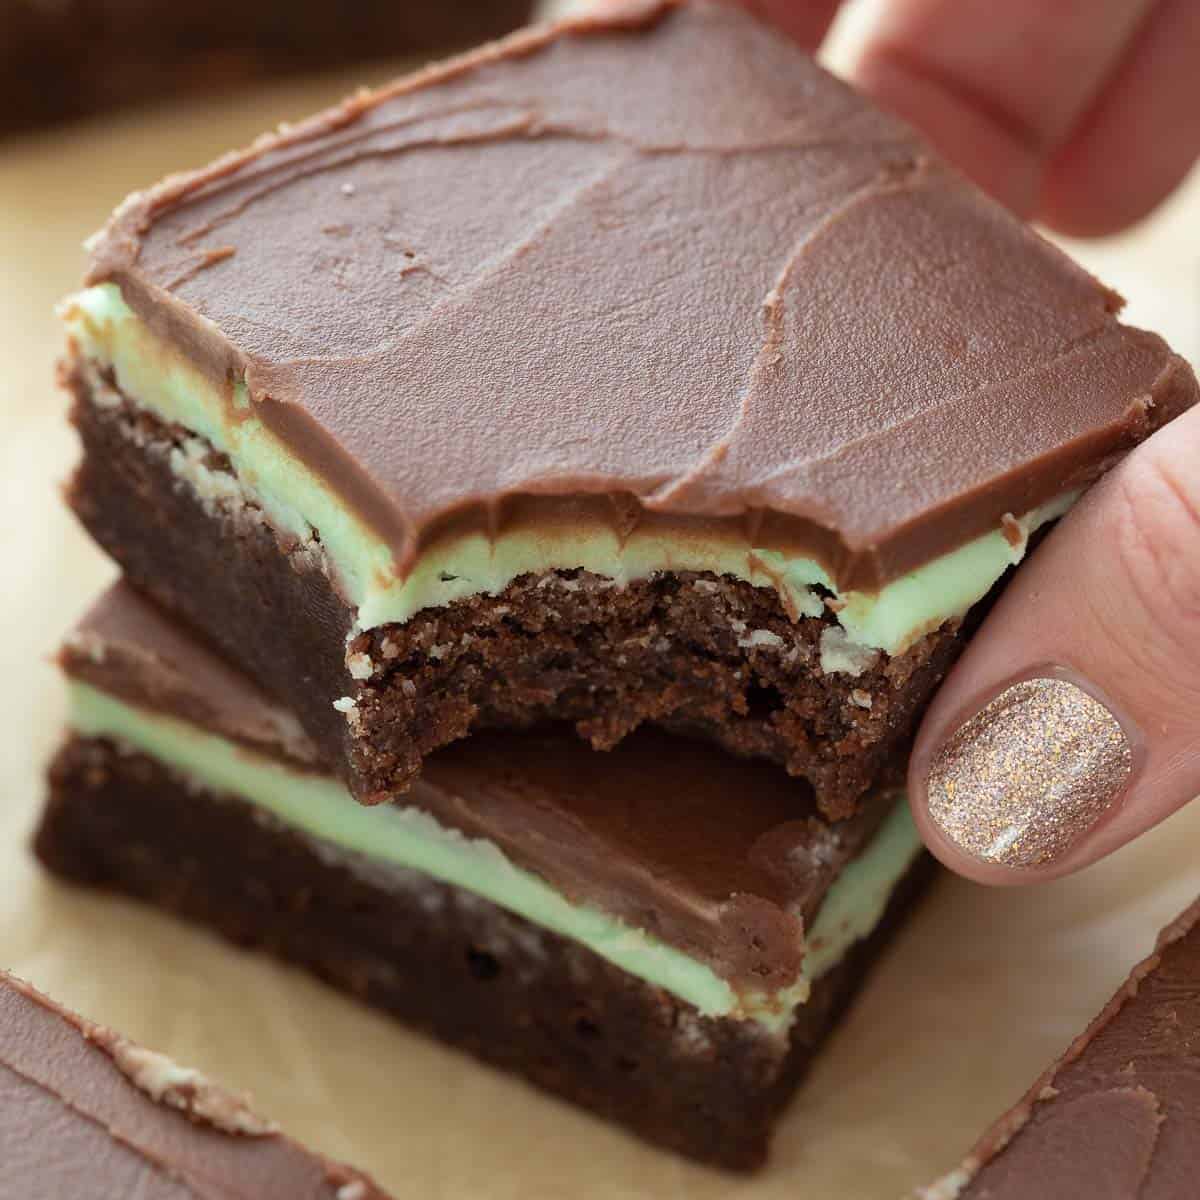

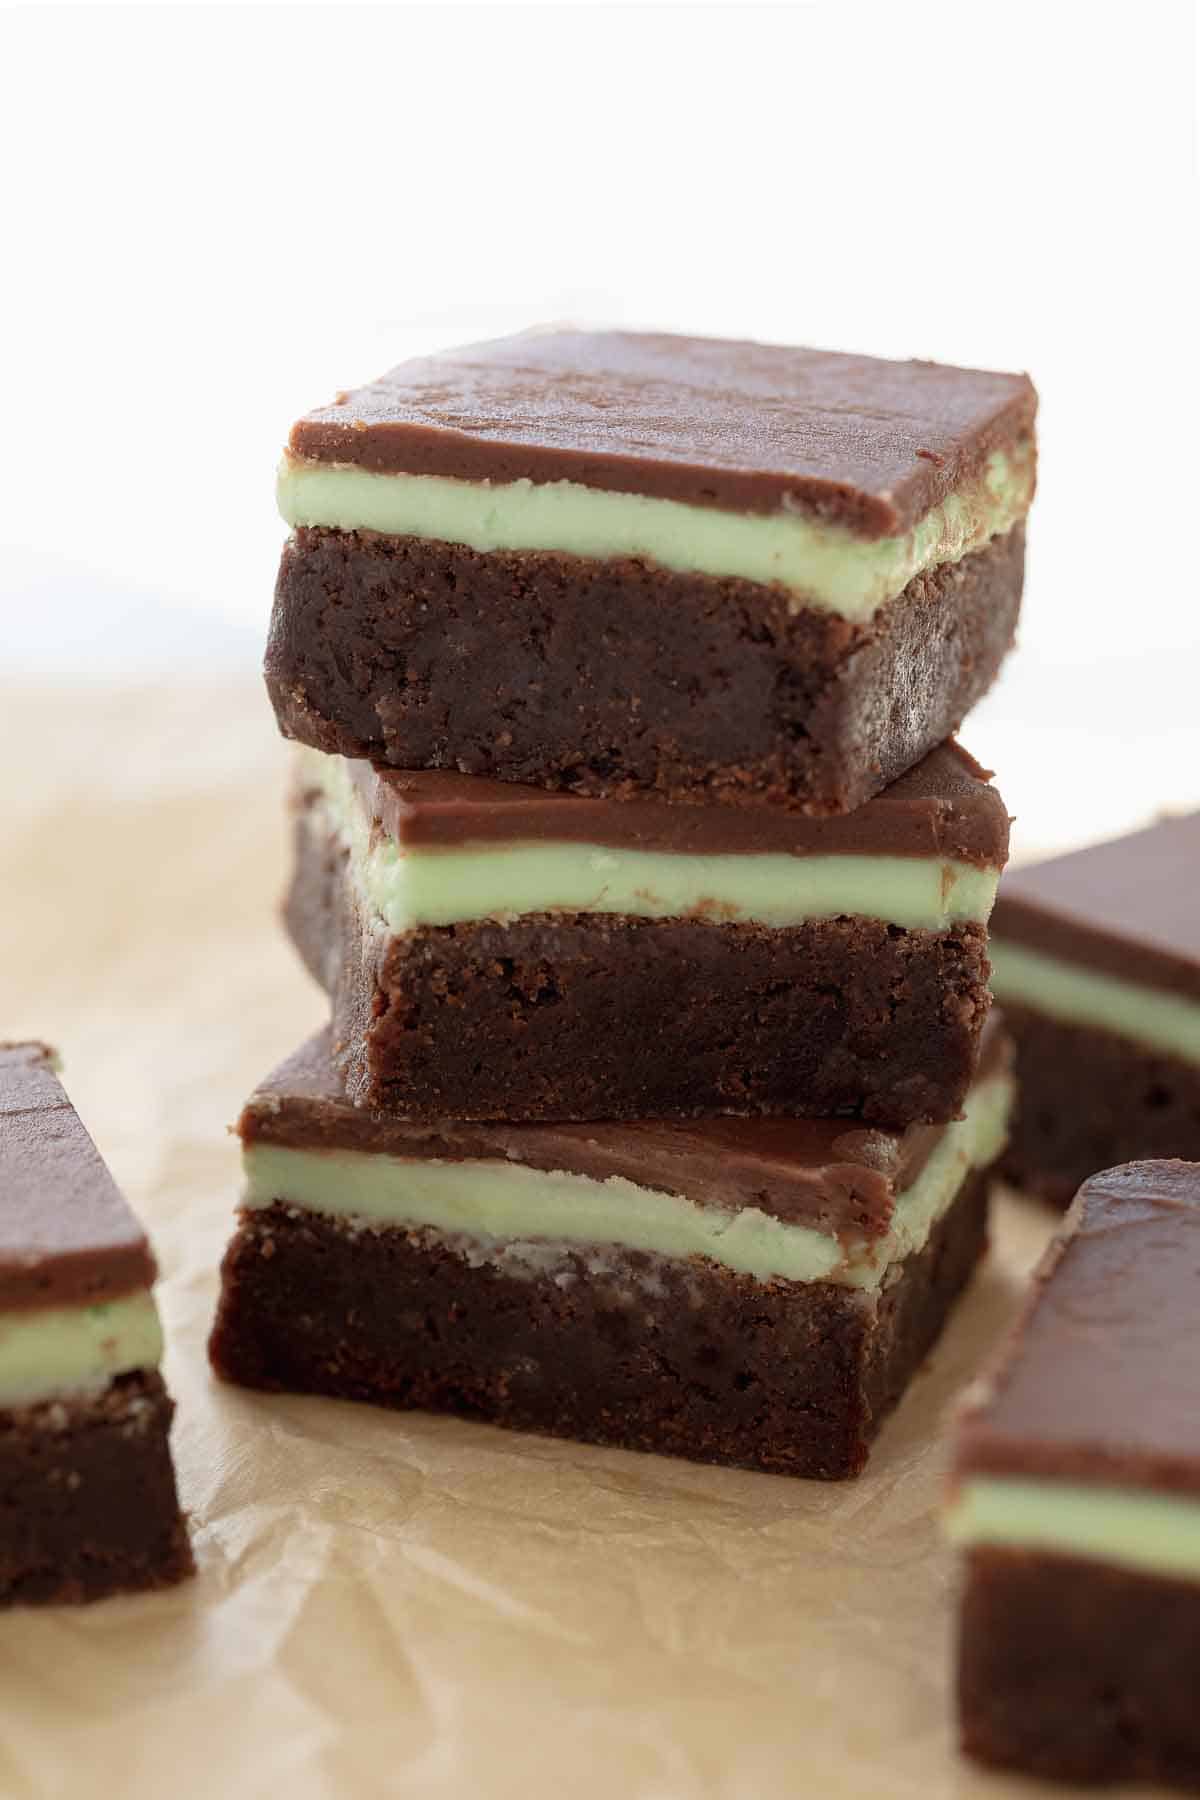
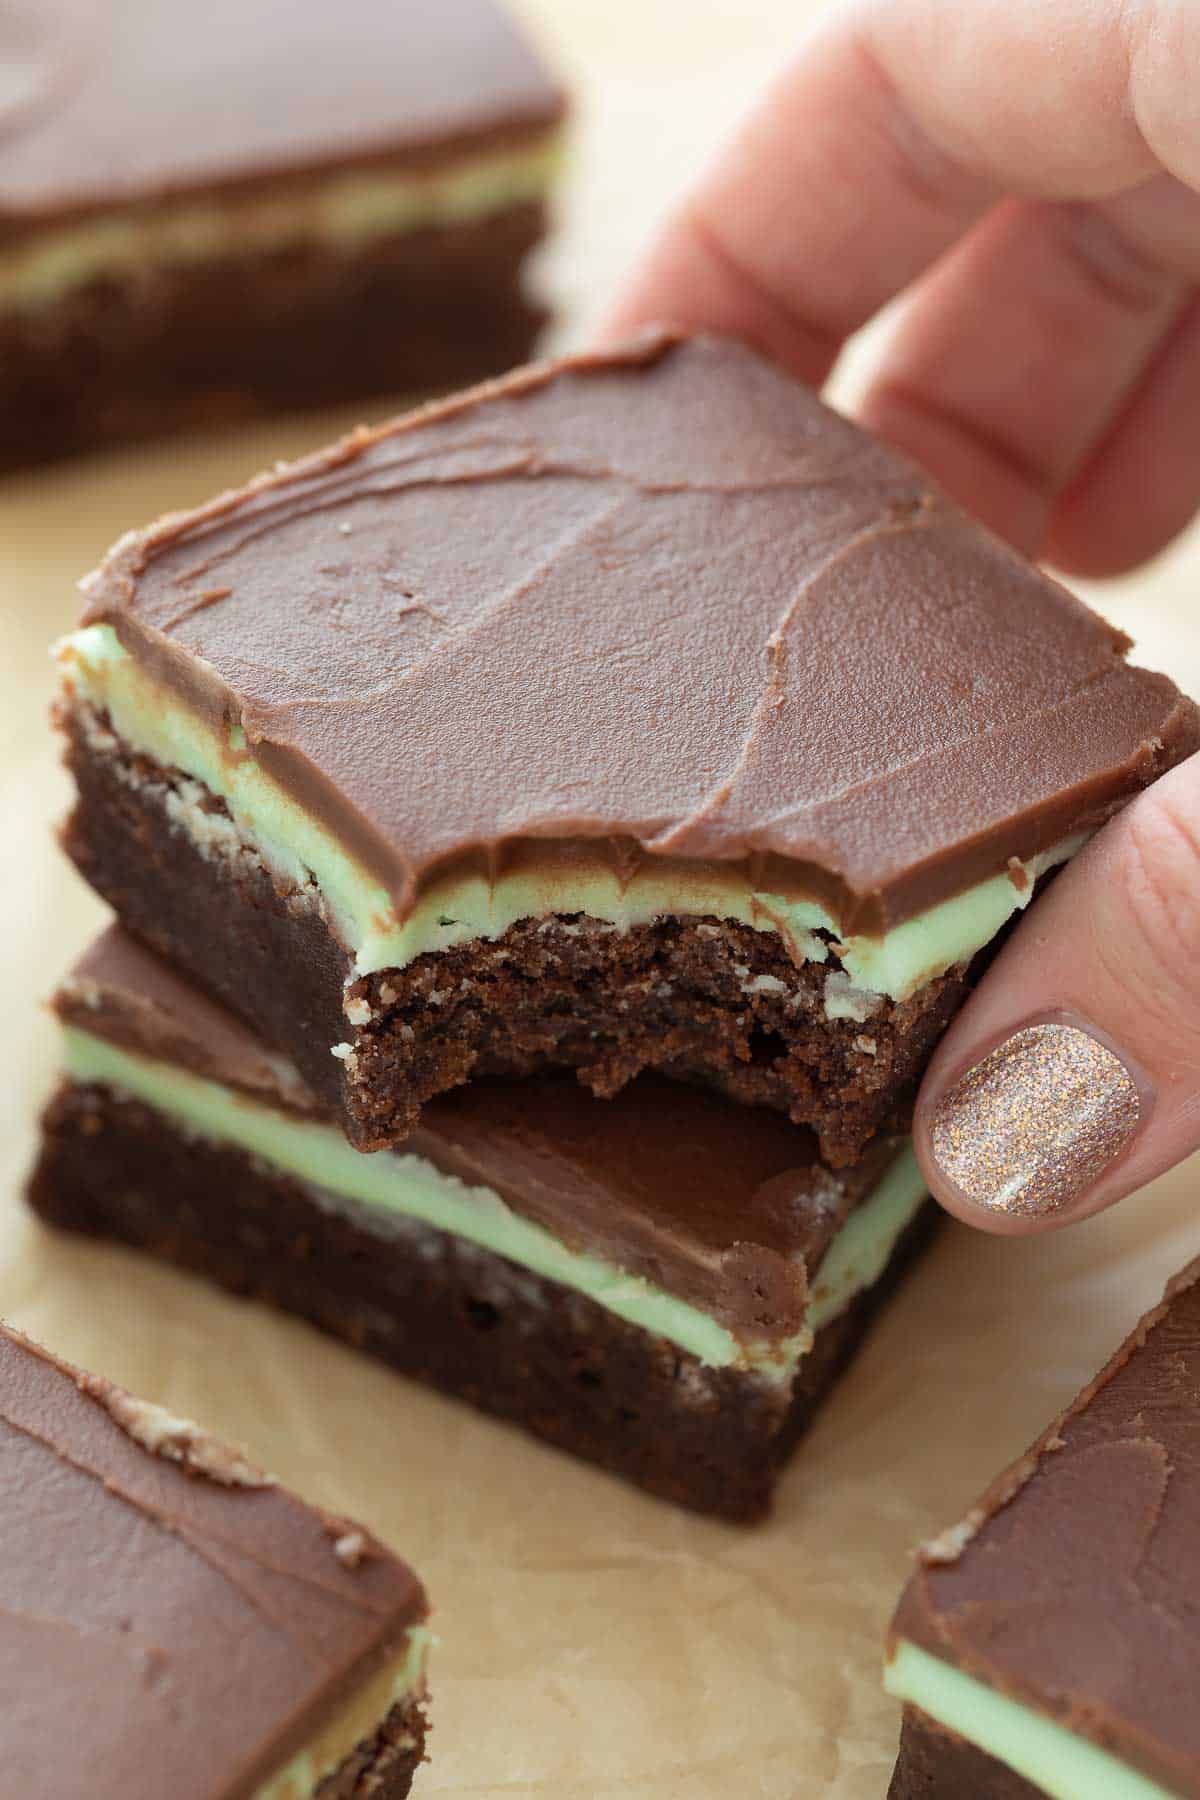
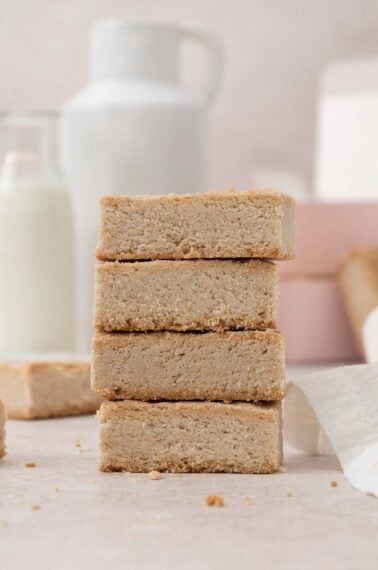
These thick and fudgy gluten-free brownies are topped with a double layer of mint & chocolate frosting.
This recipe makes a large 9×13 pan of brownies so they’re perfect for parties and get-togethers. Nobody will be able to tell they’re gluten-free!
Mint brownies are the best of all brownies if you ask me. This is one of my family’s go-to desserts to feed a crowd. They always disappear fast and people are shocked to find out they’re gluten-free!
They also make a great addition to holiday cookie platters. If you like this recipe you also might like my ultimate fudgy gluten-free brownies, chewy gluten-free brownies, gluten-free peanut butter brownies, oat flour brownies, gluten-free peppermint cookies, or these gluten-free chocolate mint cookies.
How to Make Gluten-Free Mint Brownies
These brownies start with my all-time favorite brownie base (taken from this recipe for gluten-free peanut butter crunch brownies). It only takes minutes to mix together and is better than any boxed gluten-free brownie I’ve tried.
Make the Brownies
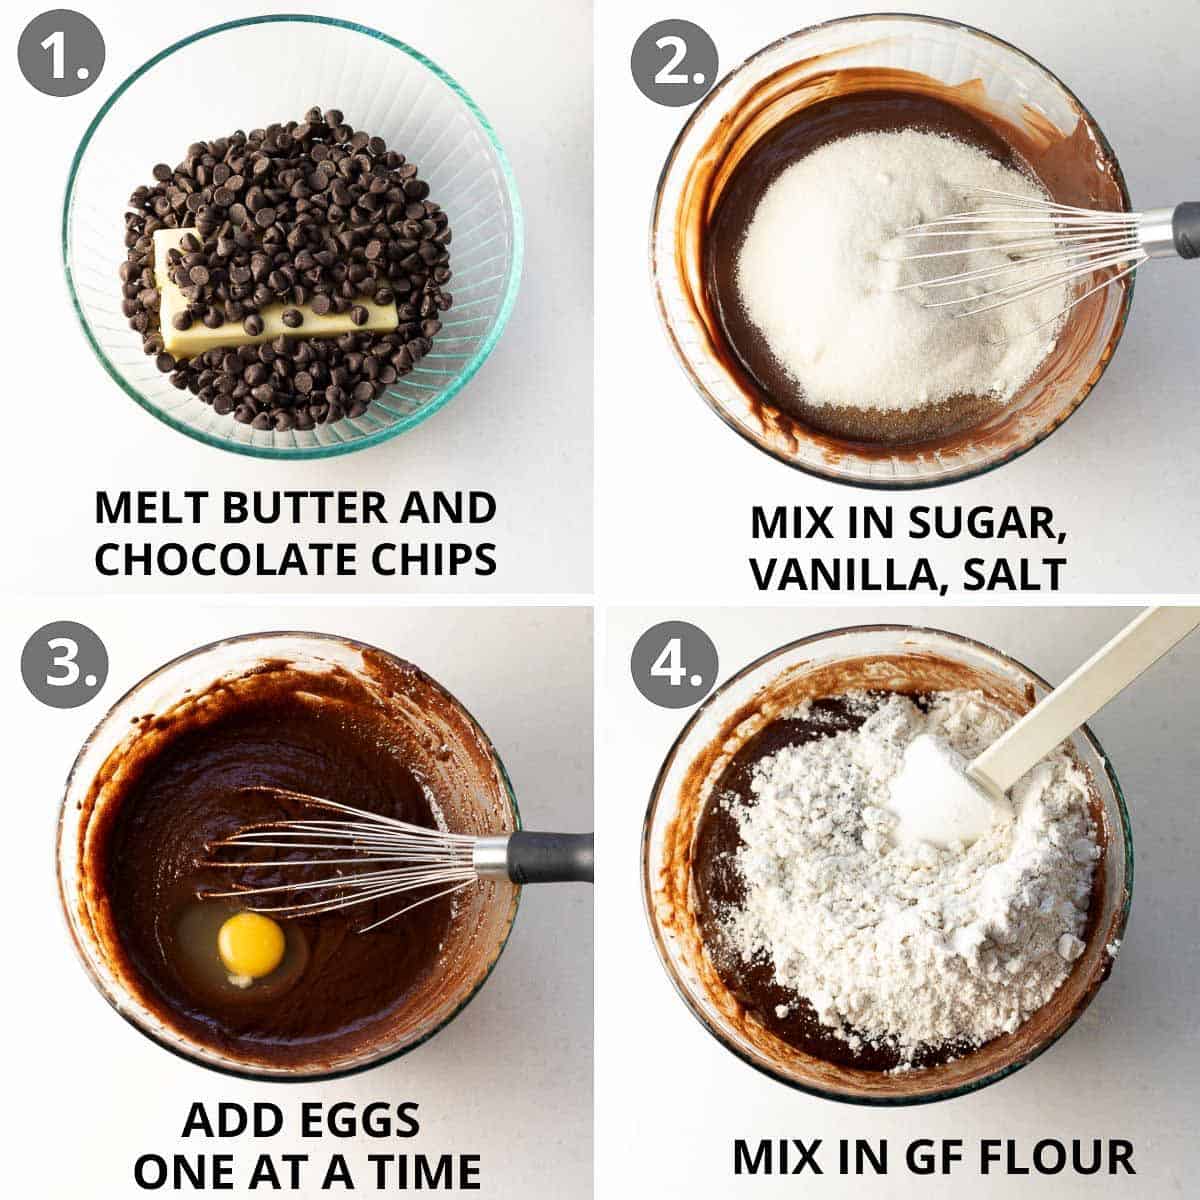
- Place the chocolate chips and butter in a medium-sized microwave safe bowl. Microwave on 50% power for 2-3 minutes, stopping every 30 seconds to stir until completely smooth and melted. You can also melt the butter and chocolate together over low heat on the stove.
- Add the sugar, vanilla and salt to the chocolate mixture. Whisk to combine.
- Add the eggs one at a time, whisking until fully incorporated after each egg.
- Stir in the gluten-free flour until fully combined.
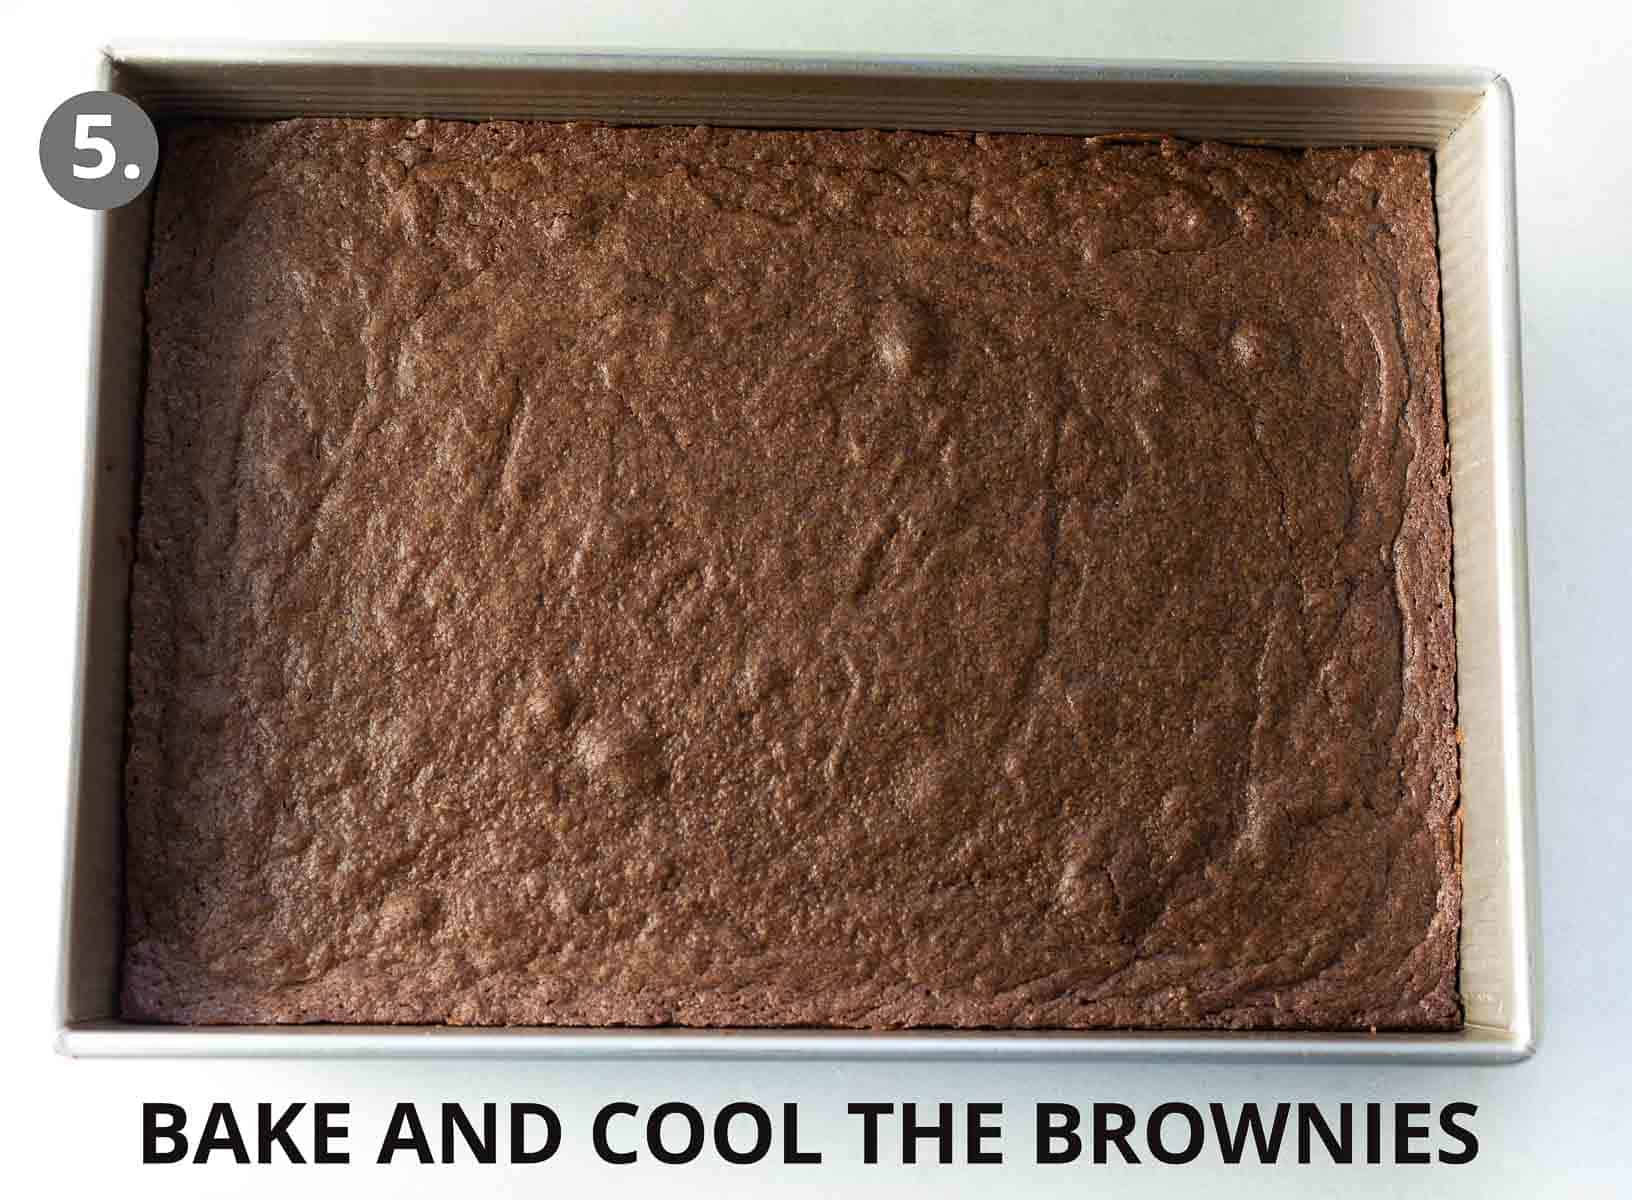
- Pour the batter into the prepared baking pan. Smooth into an even layer. Bake for 30-35 minutes until set and a toothpick inserted into the center of the brownies comes out clean. Let the gluten-free brownies cool completely.
Make the Mint Frosting
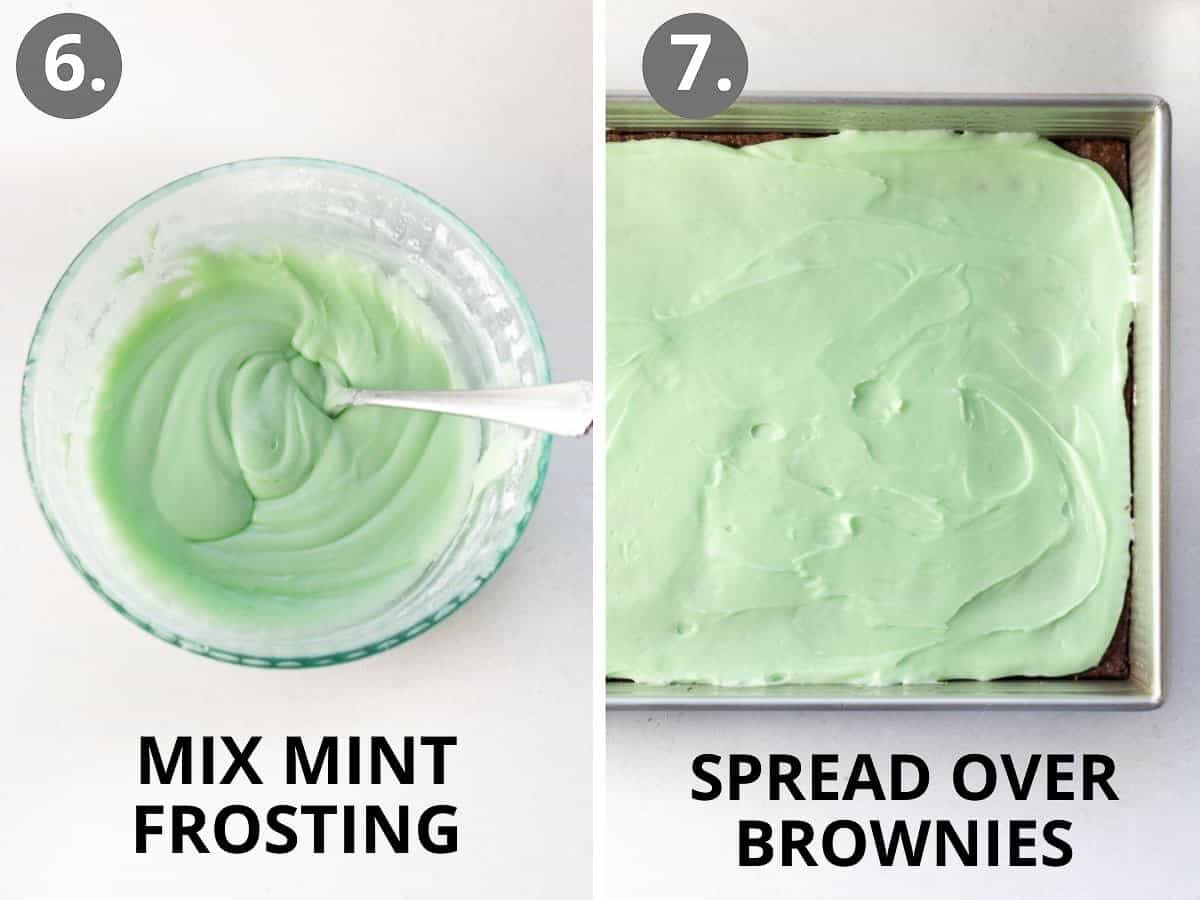
- Combine all the ingredients and whisk until smooth.
- Spread over the cooled brownies. Chill in the refrigerator for 30 minutes (or freeze for 10 minutes) before topping with the chocolate frosting.
Make the Chocolate Frosting
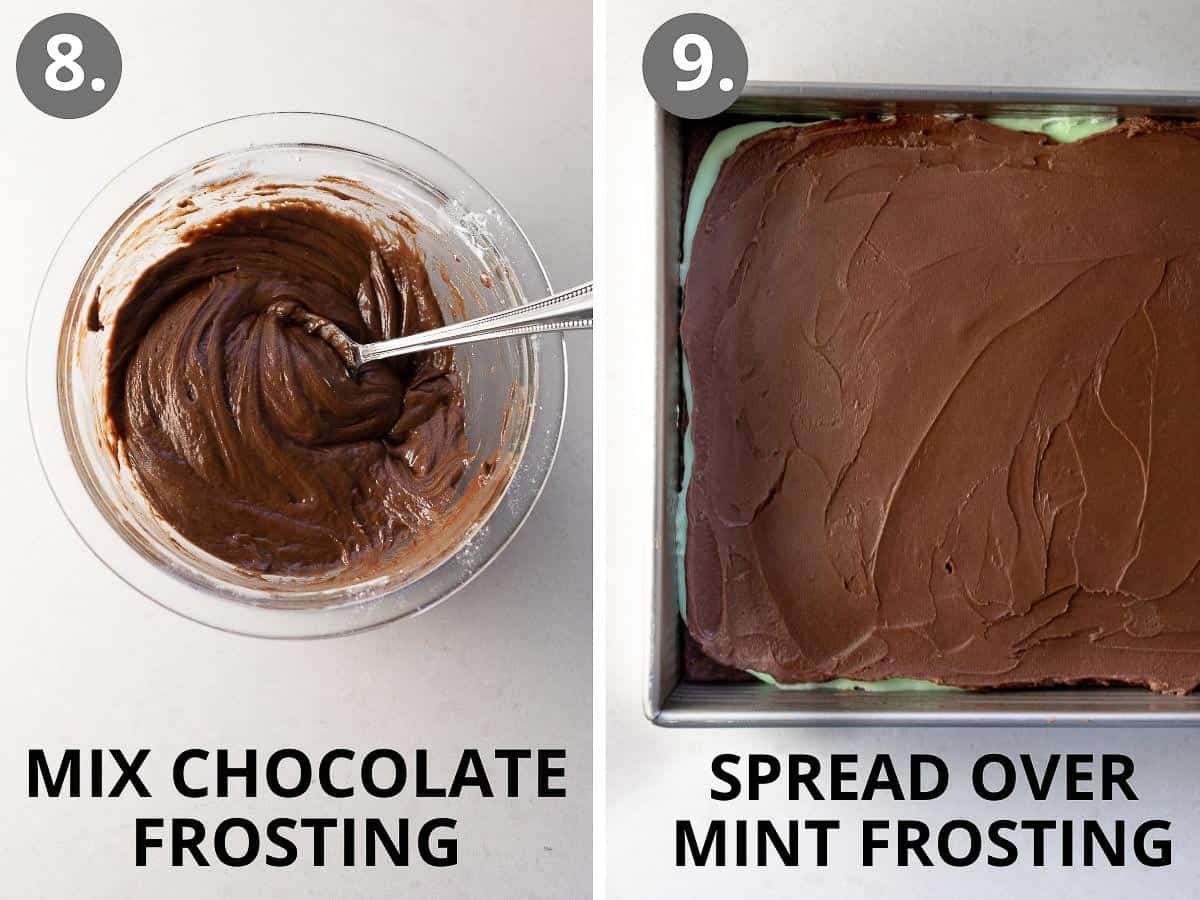
- Combine the butter, chocolate chips and milk in a bowl. Microwave for 45 seconds. Add powdered sugar and whisk until smooth.
- Spread the chocolate frosting carefully over the mint frosting. Chill in the refrigerator for 30 minutes (or freeze for 10 minutes) before slicing. Enjoy!
Gluten-Free Mint Brownie Storage Tips
To Store
I prefer to keep these brownies tightly covered or in an airtight container in the refrigerator. The brownies will keep for up to 5 days.
To Freeze
These gluten-free mint brownies freeze great! Be sure to cool them completely before freezing.
- You can freeze the entire rectangle of brownies, or cut them into 24 slices and freeze them individually. Wrap them in parchment paper then store them in a large ziplock freezer bag for best results.
- You can also bake the brownies in a disposable foil pan and top with the frostings as instructed – then cover the whole pan with foil to freeze. The brownies will keep frozen for 2-3 months.
More Gluten-Free Baking Recipes


I hope you like these gluten-free mint brownies as much as we do! If you try them be sure to leave me a comment/rating below. I’d love to hear from you!

Gluten-Free Mint Brownies
Video
Ingredients
For the Brownies:
- 1 12oz bag semi-sweet chocolate chips 340 grams
- 1 cup butter 226 grams
- 1 1/2 cups granulated sugar 300 grams
- 1 teaspoon vanilla
- 1/2 teaspoon salt
- 4 large eggs
- 1 1/3 cups gluten-free 1:1 baking flour 205 grams
For the Mint Frosting:
- 6 tablespoons butter melted 85 grams
- 1/4 cup milk
- 3 cups powdered sugar 390 grams
- 1/2 teaspoon mint extract
- 2-3 drops green food coloring
For the Chocolate Frosting:
- 6 tablespoons butter 85 grams
- 1/2 cup chocolate chips 85 grams
- 1/4 cup milk
- 2 cups powdered sugar 260 grams
Instructions
- Preheat the oven to 350F. Line a 9×13 baking pan with parchment paper or tin foil. Grease with cooking spray and set aside.
Make the Gluten-Free Brownies:
- Place the chocolate chips and butter in a medium-sized microwave safe bowl. Microwave on 50% power for 2-3 minutes, stopping every 30 seconds to stir until completely smooth and melted. You can also melt the butter and chocolate together over low heat on the stove.
- Add the sugar, vanilla and salt to the chocolate mixture. Whisk to combine. Add the eggs one at a time, whisking until fully incorporated after each egg. Stir in the gluten-free flour until fully combined.
- Pour the batter into the prepared baking pan. Smooth into an even layer. Bake for 30-35 minutes until set and a toothpick inserted into the center of the brownies comes out clean. Let the brownies cool completely.
Make the Mint Frosting:
- Combine all the ingredients and whisk until smooth. Spread over the cooled brownies. Chill in the refrigerator for 30 minutes (or freeze for 10 minutes) before topping with the chocolate frosting.
Make the Chocolate Frosting:
- Combine the butter, chocolate chips and milk in a bowl. Microwave for 45 seconds. Add powdered sugar and whisk until smooth. Spread the chocolate frosting carefully over the mint frosting. Chill in the refrigerator for 30 minutes (or freeze for 10 minutes) before slicing. Enjoy!
Notes
- You can freeze the entire rectangle of brownies, or cut them into 24 slices and freeze them individually. Wrap them in parchment paper then store them in a large ziplock freezer bag for best results.
- Another option is to bake the brownies in a disposable foil pan, cool and top with the frostings as instructed – then cover the whole pan with foil to freeze. The brownies will keep frozen for 2-3 months.
Nutrition
This post was originally published in April 2017. It was updated with a recipe and new photos in December 2021.


Have you tried with an egg replacement?
Hi Meagan, we don’t typically bake with egg substitutes. Brownies are especially hard to adapt for egg-free. If you decide to give it a try, we’d love to hear how it goes!
I made these for Christmas and they were the best fudgy brownies! A little involved for those who don’t normally bake but totally worth it. No one knew they were GF. I received many compliments. If it’s helpful to know- I used King Arthur GF 1 to 1 baking flour with great results
Thank you for sharing your positive feedback with us, Kelsey! We’re so happy to hear the recipe was such a hit!
I am planning on making this for a non-gluten-free group. Can I just use regular flour in place of the one for one?
Hi Jennifer, we haven’t tried regular flour ourselves, but it should work as a 1:1 swap. We’d love to hear how it goes! Happy baking!
I made these using a combination of brown rice flour and tapioca starch. They turned out great. Thanks for the delicious recipe!
We’re so glad you loved the recipe, Melanie! Thank you for your kind review!