


Erin’s Recipe Rundown

Texture: Fudgy, smooth, and silky layers.
Taste: The perfect balance of rich salty-sweet decadence.
Ease: Simple steps to achieve one stunning dessert!
Top Tips: I like to chill the brownies before slicing for clean, even squares.
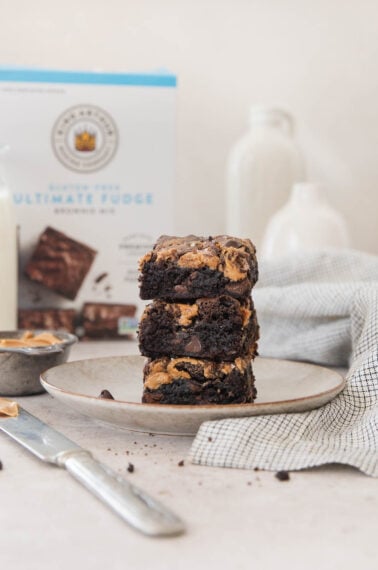
Recommended GF Flour: Use a high-quality flour that contains xanthan gum. My favorite for this recipe is King Arthur Gluten-Free Measure-for-Measure Flour.
Would I make these again? 100% yes! These gluten-free peanut butter brownies are the perfect treat for any Reese’s fans out there. They’re always a favorite at parties!
xoxo erin

These gluten-free peanut butter brownies are like your favorite fudgy brownie and a Reese’s cup combined into one dream dessert!
The layers make them look fancy, but these brownies come together so easily. This is one stress-free recipe that will wow any crowd!
Featured Comment
From Jessica: “I really enjoyed how these turned out! I was impatient and tried them before they fully chilled. The recipe is really easy and forgiving, I even eyeballed my peanut butter measurement for the topping (which I don’t necessarily encourage haha). Would definitely make again!”
Table of Contents
- Erin’s Recipe Rundown
- Ingredients You’ll Need
- How to Make Gluten-Free Peanut Butter Brownies
- Make-Ahead/Storage/Freezing Instructions
- Can these gluten-free peanut butter brownies be made dairy-free?
- Can I use natural peanut butter for the fudge layer? What about crunchy peanut butter?
- Why did my ganache turn grainy or separate?
- More Gluten-Free Brownie Recipes
- Gluten-Free Peanut Butter Brownies Recipe
Ingredients You’ll Need
Here are a few notes on some of the key ingredients to make these gluten-free peanut butter brownies. See the recipe card below for exact measurements.

- Gluten-free flour: To achieve the best texture, use a high-quality flour that contains xanthan gum. I recommend King Arthur Gluten-Free Measure-for-Measure Flour.
- Chocolate chips: Using a high-quality brand will ensure a richer, more complex flavor for these brownies. I like to use semi-sweet to get the right balance between sweet and bitter chocolate too. Guittard is my favorite! For dairy-free, opt for dairy-free chocolate chips.
- Eggs: The four eggs may seem like a lot, but they are key to getting the perfect chewy brownies. They act as a binder while adding structure and moisture. It’s important to add them in one at a time to keep the brownies from becoming dense or flat.

- Peanut butter: Creamy peanut butter works best to create a soft, smooth consistency with the fudge.
- Powdered sugar: The powdered sugar both sweetens and thickens the fudge so that it holds its shape as the middle layer of the dessert, while remaining melt-in-your-mouth soft.
- Butter/milk: The dairy-products loosen up the consistency so that each layer is smooth and spreadable. For dairy-free, use an unsweetened dairy-free milk of your choice and dairy-free butter.
How to Make Gluten-Free Peanut Butter Brownies
Here’s an overview of how to make this recipe. You can jump to the recipe for the full instructions!

- In a medium microwave-safe bowl: Place the butter (cut into tablespoon-sized pieces) and chocolate chips into the bowl. Microwave for 30 seconds, stir, and then repeat in 15-second intervals, stirring each time, until it’s all completely melted and combined.
- Add ingredients: Whisk the sugar, vanilla, and salt into the chocolate mixture, then add 1 egg at a time, whisking until each one is fully incorporated.

- Using a rubber spatula: Mix the gluten-free flour into the mixture until fully combined.
- In a prepared baking pan: Smooth the batter into an even layer and bake until the brownies are set (30-35 minutes). Insert a toothpick into the center of the brownies, if it comes out clean, they’re done!

- In a medium microwave-safe bowl: Place the butter (cut into tablespoon-sized pieces) and peanut butter in the bowl and microwave for 30 seconds, then stir. Repeat this process in 15-second intervals, stirring after each interval, until it’s all melted and well-combined. Stir in the vanilla, then gradually add in the powdered sugar until the mixture is smooth. Add 1 teaspoon of milk at a time until it becomes fudgy. You want it to be firm enough to mold, soft enough to spread easily!
- On the cooled brownies: Drop large spoonfuls of the peanut butter fudge onto the brownies and spread out into an even layer. Refrigerate for 30 minutes before adding the ganache. For quicker chilling, you can also freeze it for 10 minutes.

- In a small microwave-safe bowl: Melt the butter (cut into tablespoon-sized pieces) and chocolate chips starting with 30 seconds, stirring, and then heating in 15-second intervals until fully melted and smooth. Make sure you stir after each interval!
- Add the top layer: Spread the chocolate ganache carefully over the peanut butter fudge. Refrigerate the dessert for 1 hour (or you can freeze it for 20 minutes!), then slice the brownies. Enjoy!
Make-Ahead/Storage/Freezing Instructions
To Make-Ahead: The brownies can be fully prepared up to 3 days in advance. Just store them in the fridge uncut and slice fresh when ready to serve.
To Store: Cut brownies should be stored in an airtight container. They will keep for up to 5 days in the fridge or they can stay out at room temperature for 1 day (they may be softer set if kept at room temperature).
To Freeze: Wrap brownies in plastic wrap and store in a freezer bag or airtight container. Freeze for up to 2 months. Thaw in the fridge overnight or on the counter for 1-2 hours.
Can these gluten-free peanut butter brownies be made dairy-free?
Yes! This recipe will work with dairy-free butter, milk, and chocolate chips. You can use your favorite dairy-free brands!
Can I use natural peanut butter for the fudge layer? What about crunchy peanut butter?
Natural peanut butter is usually too runny for this recipe and crunchy peanut butter will make it harder to spread. No-stir, creamy peanut butter works best to achieve the creamy, fudge-like consistency.
Why did my ganache turn grainy or separate?
This is usually a sign of overheating. It’s important to melt the chocolate chips and butter in short intervals. I recommend 30 seconds the first time and 15 seconds each time after that, stirring between each interval.

More Gluten-Free Brownie Recipes

Gluten-Free Peanut Butter Brownies
Ingredients
Brownies
- 1 cup (226g) butter
- 12 ounces (340g) high-quality semi-sweet chocolate chips
- 1½ cups (300g) granulated sugar
- 1 teaspoon vanilla extract
- ½ teaspoon kosher salt
- 4 large eggs
- 1⅓ cups (200g) gluten-free measure-for-measure flour
Peanut Butter Fudge
- 6 tablespoons (85g) butter
- 1½ cups (375g) creamy peanut butter
- 1 teaspoon vanilla extract
- 1⅔ cups (200g) powdered sugar
- 1 tablespoon milk of choice
Chocolate Ganache
- 6 tablespoons (85g) butter
- 1½ cups (255g) high-quality semi-sweet chocolate chips
Instructions
- Preheat the oven to 350°F. Line a 9×13-inch baking pan with foil or parchment paper and spray with cooking spray.
For the brownies:
- Cut the butter into tablespoon-sized pieces. Add the butter and chocolate chips to a medium microwave-safe bowl. Microwave for 30 seconds, then stir. Repeat for 15-second intervals, stirring each time, until the chocolate and butter are completely melted and well-combined.
- Add the sugar, vanilla and salt to the chocolate mixture. Whisk to combine.
- Add the eggs one at a time, whisking until each one is fully incorporated.
- Using a rubber spatula, mix in the gluten-free flour until fully combined.
- Pour the batter into the prepared baking pan. Smooth into an even layer. Bake for 30-35 minutes, until set and a toothpick inserted into the center of the brownies comes out clean.
- Remove from the oven and place the pan on a wire rack to cool completely before topping.
For the peanut butter fudge:
- Cut the butter into tablespoon-sized pieces. Add the butter and peanut butter to a medium microwave-safe bowl. Microwave for 30 seconds, then stir. Repeat for 15-second intervals, stirring each time, until the butter and peanut butter are completely melted and well-combined.
- Add vanilla and stir until combined. Gradually add the powdered sugar, stirring until the mixture is smooth and fully combined. Add the milk, 1 teaspoon at a time, until it reaches a fudgy consistency—firm enough to mold but soft enough to spread easily.
- Drop large spoonfuls of the peanut butter mixture over the cooled brownies, then spread into an even layer.
- Refrigerate for 30 minutes (or freeze for 10 minutes) before adding the chocolate ganache.
For the chocolate ganache:
- Cut the butter into tablespoon-sized pieces. Add the butter and chocolate chips to a small microwave-safe bowl. Microwave for 30 seconds, then stir. Repeat for 15-second intervals, stirring each time, until completely melted and smooth.
- Spread the chocolate ganache carefully over the peanut butter fudge layer. Refrigerate for 1 hour (or freeze for 20 minutes) before slicing the brownies.


Can I use natural peanut butter in this recipe?
Hi Cheryl, we prefer no-stir creamy peanut butter for the best results due to its thicker consistency. We’ve had at least one reader share that they used natural peanut butter successfully! Just be prepared for a looser consistency depending on the brand used. We hope you enjoy the recipe!
Now this is my go-to gf brownie recipe! Pb and chocolate are magical together, and this recipe combines them perfectly! I only ever have runny peanut butter on hand, and I was concerned it would make the pb fudge too soft, but it was amazing. Thank you!
Hi Sheena, we’re so happy to hear how much you loved the recipe! It’s good to know the runny peanut butter worked well too. Thank you for such kind feedback!
I made these for a family gathering and they were a huge hit – even after I told everyone they were Gluten free (my not so secret trick so people avoid eating the yummy food and I can have more LOL). Thank you for this and all your other recipes! And thanks for using King Arthur 1:1 – I always have it on hand but find that recipes don’t always turn out if I use a different flour than the one listed in the recipe
We’re so pleased to hear the brownies were such a hit, Stephanie! Thank you for taking the time to share your positive experience with us. Happy baking!
This was legit so amazing. This will definitely be a holiday staple so easy to follow and such professional looking results! Enjoying every last crumb
Yay! We’re so excited to hear how much you loved the recipe, Tiara! Thank you for such kind feedback!
I really enjoyed how these turned out! I was impatient and tried them before they fully chilled. The recipe is really easy and forgiving, I even eyeballed my peanut butter measurement for the topping (which I don’t necessarily encourage haha). Would definitely make again!
Yay! We’re so pleased you enjoyed the recipe, Jessica! Thank you for taking the time to share your positive baking experience with us!
Brownies for the win!! There isn’t a recipe of yours that I’ve tried that isn’t amazing. We had this and your banana pudding for Mother’s Day . Both were a hit.