


Meet your new favorite competition-winning Christmas cookie! These gluten-free peppermint sour cream sugar cookies are full of peppermint crunch and topped with sour cream frosting. Serve them chilled for the best texture!
You also might like these recipes for gluten-free cut-out cookies or gluten-free chocolate mint cookies.

This is my version of a “swig cookie” made for Christmas! Picture a soft, sour cream sour cookie full of peppermint bark chunks and a sour cream frosting. You’ll have to taste them to believe how good they are!
These thick, chewy cookies with slightly crispy edges are dotted with delicious candy cane pieces and topped with thick, chilled frosting.
You can skip the rolling pin and cookie cutter with these easy sugar cookies. Just flatten the gluten-free peppermint cookies dough with a glass cup to get perfectly imperfect, edges and then pop them in the oven.
You also might like this collection of gluten-free recipes.
Why I Love This Recipe
- Deliciously soft and chewy: Sour cream + underbaking gives these gluten-free peppermint cookies the BEST texture.
- Perfect holiday cookie: Who doesn’t LOVE a delicious peppermint flavor dessert at a holiday party? They’ll fill everyone with holiday cheer!
- Great for gifting: Your friends, family, and neighbors will be thrilled with this holiday treat!
- Served chilled: Seriously, the chilled cookie and cool, thick frosting are irresistible!
- No rolling required: No rolling out the dough — just form balls, smash them down with a glass, and you’re ready to pop them in the oven!
Ingredients You’ll Need
Here are some notes on the key ingredients in these gluten-free peppermint cookies!
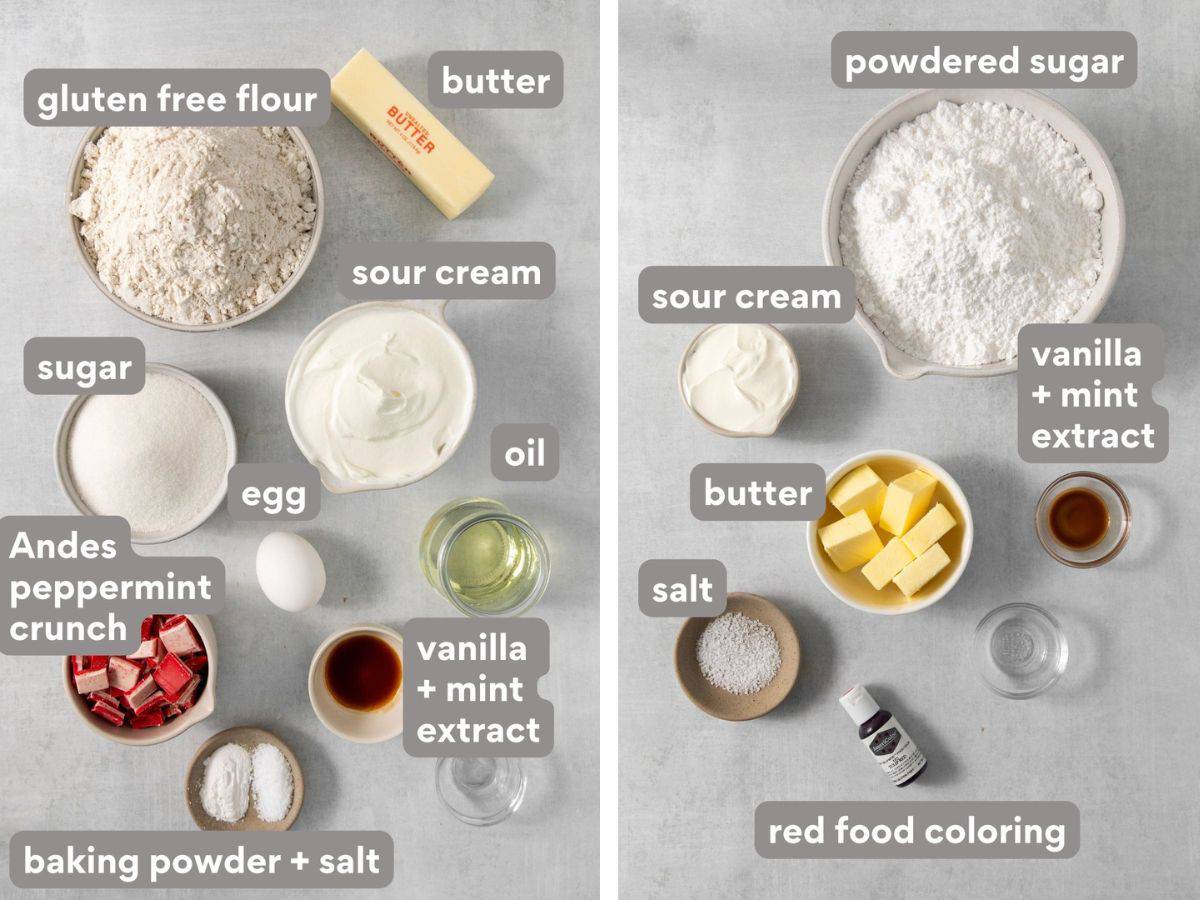
- Gluten-free flour: It’s important to use high-quality gluten-free flour blends with xanthan gum for this gluten-free peppermint cookie recipe. I tested this recipe with King Arthur Gluten-Free Measure-for-Measure Flour.
- Combination of oil/sour cream: These two ingredients give the cookies an amazing texture. They’re moist, rich and almost creamy in the middle. Be sure to use full-fat sour cream.
- Andes peppermint crunch: You want to use the RED Andes peppermint crunch variety for these cookies, not the green. You can use the Andes Peppermint Crunch Baking Chips that come in a bag, or use the Andes Peppermint Crunch Thins and chop them up until you have about 1 cup.
How to Make Gluten-Free Peppermint Cookies
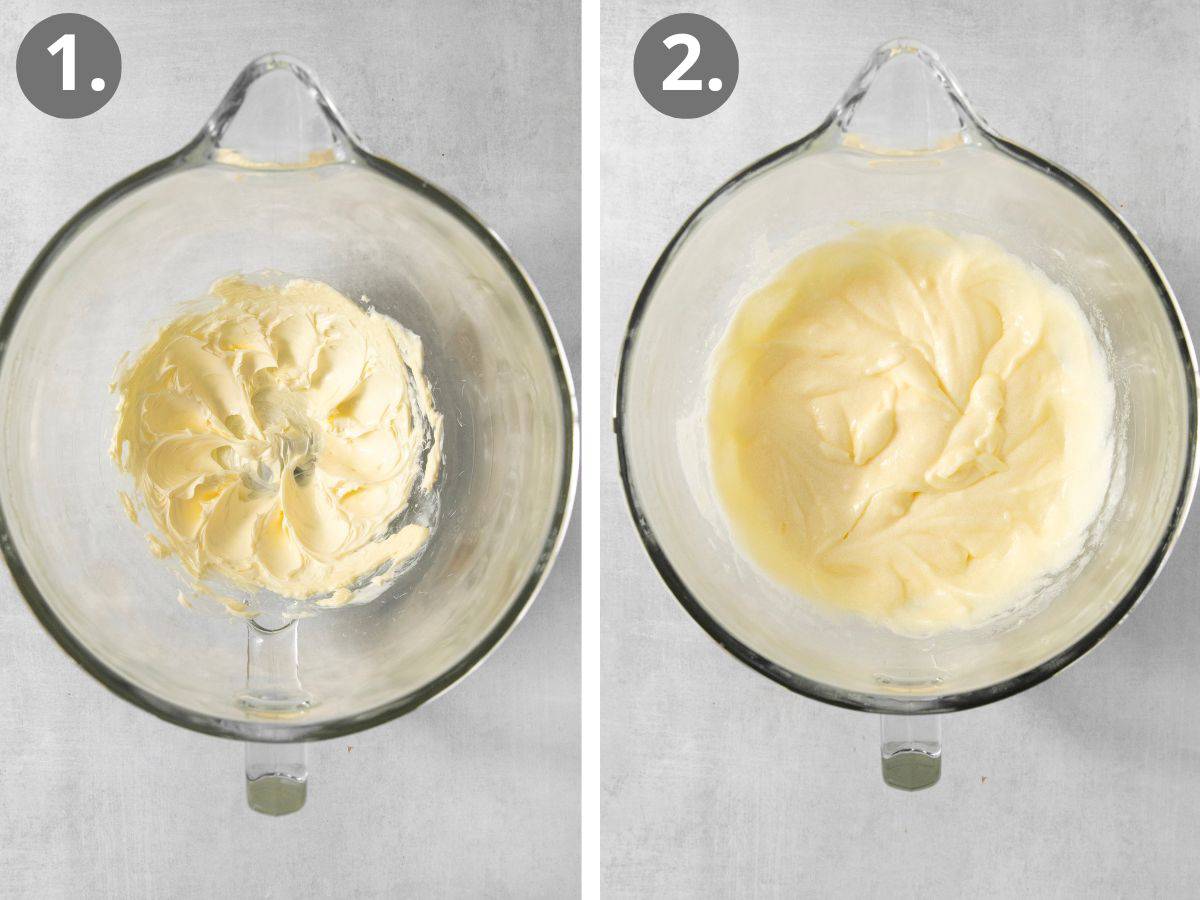
Make the Wet Ingredients: In the bowl of a stand mixer (or in a large bowl with an electric hand mixer), add the butter and mix on medium speed for 2-3 minutes, until light and fluffy.
Add the wet ingredients, starting by mixing the oil for another 1-2 minutes. Add the sour cream, egg and granulated sugar, vanilla extract and peppermint extract and mix on medium-low speed until well combined.
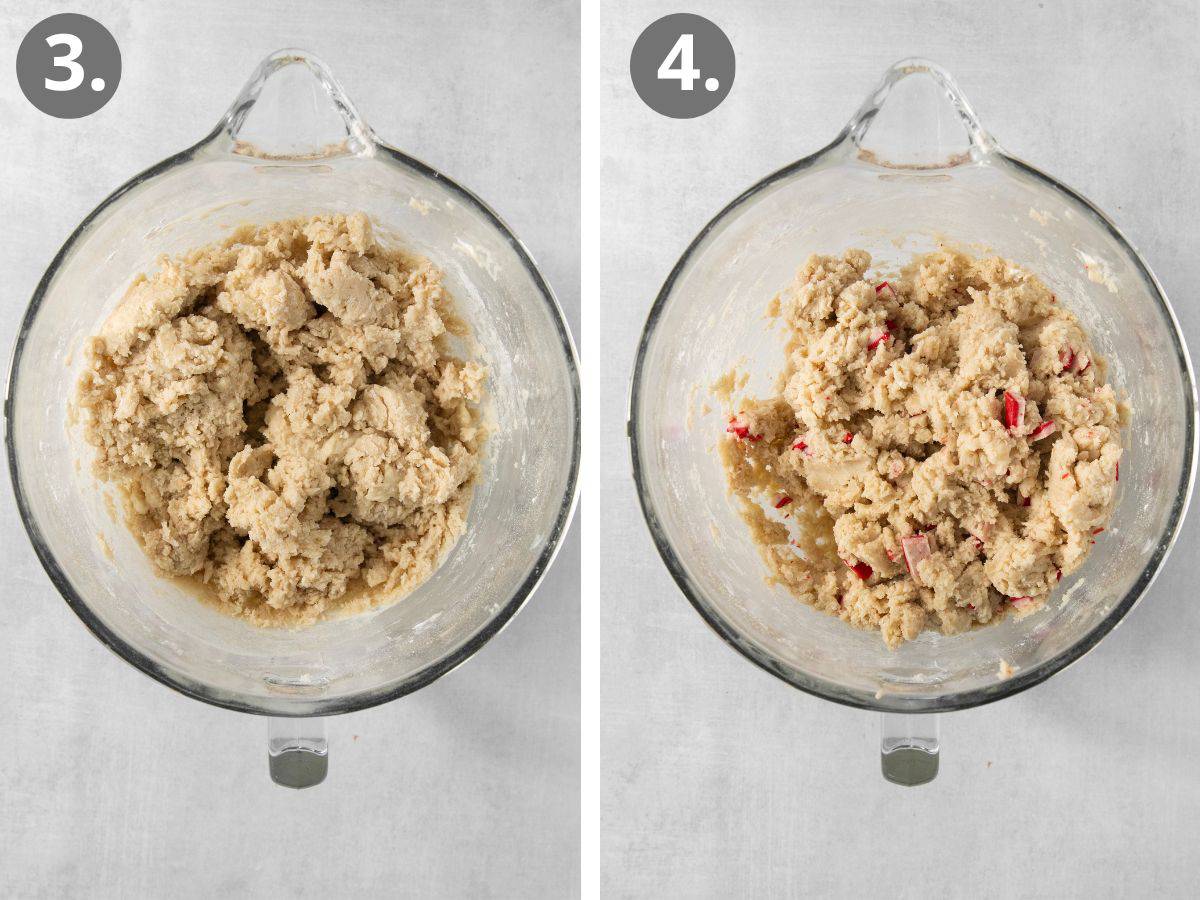
Add the Dry Ingredients: Add the baking powder, salt and ⅓ of the flour. Mix until well combined. With the mixer running on low, slowly add the rest of the flour and mix until evenly combined. Mix in the Andes Peppermint Crunch Chips.
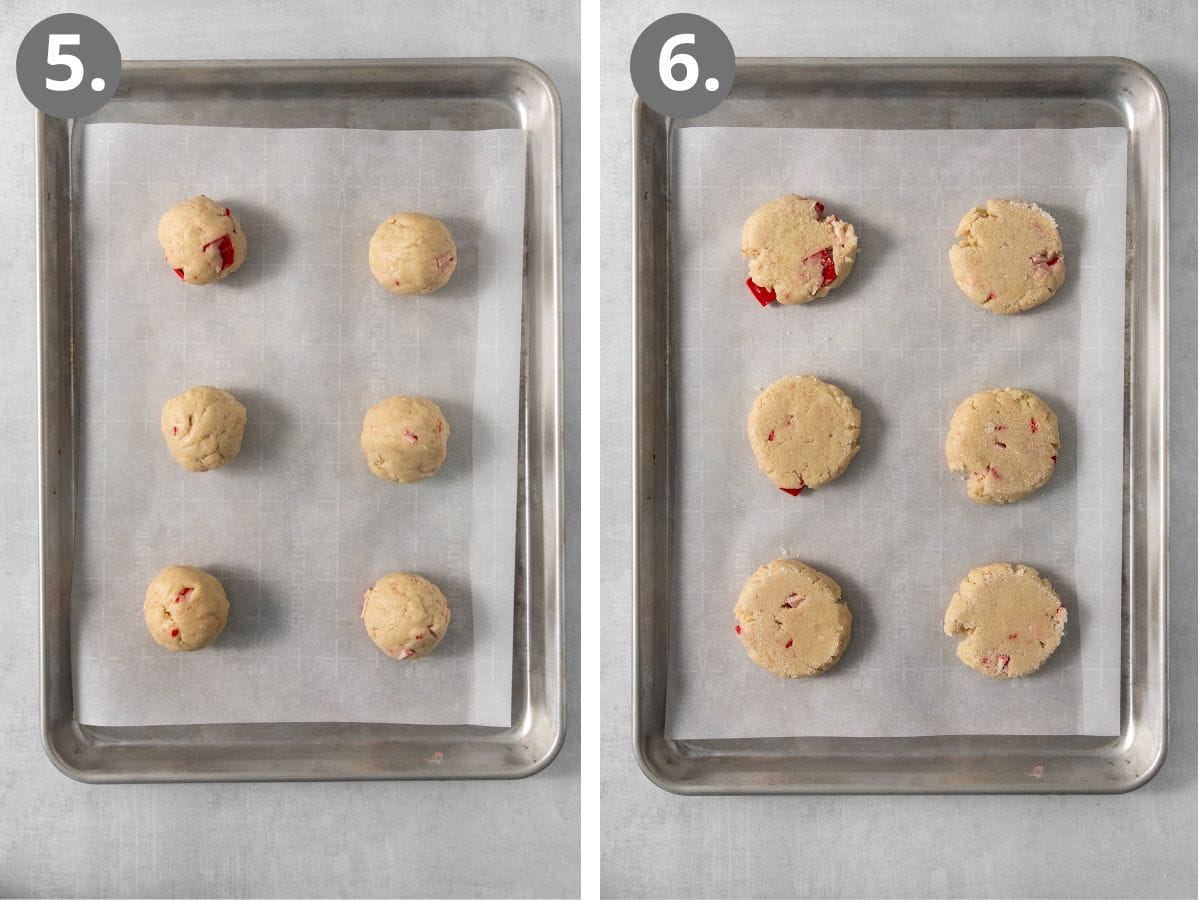
Shape the Cookies: Use a cookie scoop to make ¼ cup-sized portions and roll the cookie dough into balls. Place the gluten-free peppermint cookies several inches apart on the prepared cookie sheet – I do 6 gluten-free peppermint cookies per baking sheet.
Add about 1/2 cup granulated sugar to a shallow dish or bowl. Lightly spray the bottom of a ¼ or ⅓ cup measuring cup (or small glass) with cooking spray and dip the bottom of the measuring cup into the sugar.
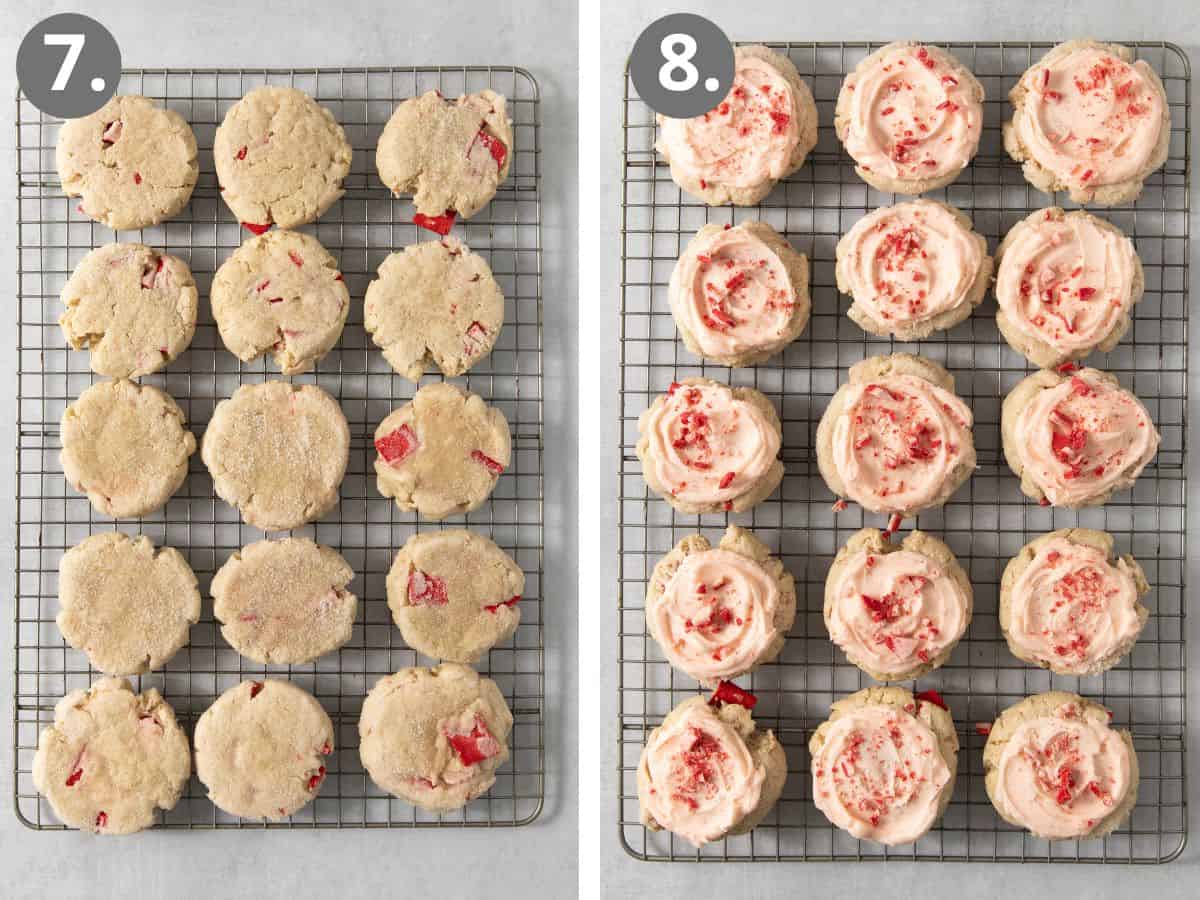
Press cookie dough into an even thickness dipping the bottom of the glass into the sugar between each press (no need to spray it again with cooking spray after the first time). The edges of the gluten-free peppermint cookies will ruffle out in an uneven way (imperfect is what you want!) They should be about 1/2-inch thick.
Bake/Frost the Cookies: Bake for 6-8 minutes. DO NOT OVERBAKE! These gluten-free peppermint cookies should not turn golden. You want them to be slightly underbaked from a normal sugar cookie so they’re soft and creamy when chilled.
Let the gluten-free peppermint cookies cool almost completely on the baking sheet before transferring to a wire cooling rack.
Frost the gluten-free peppermint cookies. For best results chill for at least 1 hour (or up to 2 days) before serving. Cookies are best served chilled right out of the fridge!
Storage Instructions
Store these cookies in an airtight container in the fridge for up to five days.

Recipe Tips
- DO NOT OVERBAKE these cookies! These gluten-free peppermint cookies should not turn golden brown at all, otherwise they will lose moisture in the fridge and turn out dry and crumbly. You want them to be slightly underbaked so they’re soft and creamy when chilled.
- Use RED Andes peppermint crunch. Don’t use the green Andes mints for these gluten-free peppermint cookies — red is what you want. You can use the Andes Peppermint Crunch Baking Chips that come in a bag, or chop up Andes Peppermint Crunch Thins until you have one cup.
- Spread out your cookies. These are generously sized gluten-free peppermint cookies that will spread a bit as they bake, so be sure to give them plenty of room on the baking sheet. I like to do six per baking sheet.
- Dip the glass in sugar. Don’t forget to dip the glass in sugar before you press out the gluten-free peppermint cookies dough balls. The layer of sugar adds great texture and sweetness!
- Serve chilled cookies. For best results, you need to serve these gluten-free peppermint cookies chilled! Although I don’t recommend serving them at room temperature, they would of course still be delicious.
More Gluten-Free Holiday Cookies
I hope you love this recipe as much as we do! If you try these gluten-free peppermint cookies, be sure to leave me a comment/rating below. I’d love to hear from you!

Gluten-Free Peppermint Sour Cream Sugar Cookies
Ingredients
For the Cookies:
- 1/2 cup (113g) butter, softened
- 1/2 cup (110g) vegetable oil
- 1 cup (240g) sour cream, full fat
- 1 large egg
- 1 ½ (300g) cups granulated sugar, plus more for rolling
- 1 teaspoon vanilla extract
- 1/2 teaspoon peppermint extract
- 1 teaspoon baking powder
- 1 teaspoon salt
- 3 3/4 (560g) cups gluten-free measure-for-measure flour (add up to 1/4 cup more if dough is too sticky)
- 1 cup Andes Peppermint Crunch Baking Chips or Andes Peppermint Crunch Thins, chopped
For the Frosting:
- 6 tablespoons (84g) butter, softened
- 1/3 cup (80g) sour cream
- 4 cups (450g) powdered sugar
- 1/2 teaspoon peppermint extract
- ½ teaspoon vanilla extract
- pinch of salt
- 1 tiny drop red food coloring
Instructions
Make the Cookies
- Preheat the oven to 350F. Line 2 large baking sheets with parchment paper or silicone baking mats.
- In the bowl of a stand mixer (or in a large bowl with an electric hand mixer), add the butter and mix on medium speed for 2-3 minutes, until light and fluffy.
- Add the oil and mix for another 1-2 minutes.
- Add the sour cream, egg and granulated sugar, vanilla extract and peppermint extract and mix on medium-low speed until well combined.
- Add the baking powder, salt and ⅓ of the gluten-free flour. Mix until well combined. With the mixer running on low, slowly add the rest of the gluten-free flour and mix until evenly combined. (Check the dough texture here: Depending on your flour brand you may want to add up to 1/4 cup flour if the dough is too sticky.) Mix in the Andes Peppermint Crunch.
Scoop the Cookies
- Scoop the dough into about ¼ cup-sized portions and roll into balls. Place several inches apart on the prepared baking sheets – I do 6 per baking sheet.
- Add about 1/2 cup granulated sugar to a shallow dish or bowl. Lightly spray the bottom of a ¼ or ⅓ cup measuring cup (or small glass) with cooking spray and dip the bottom of the measuring cup into the sugar.
- Press each cookie into an even thickness dipping the bottom of the glass into the sugar between each press (no need to spray it again with cooking spray after the first time). The edges of the cookie will ruffle out in an uneven way (imperfect is what you want!) They should be about 1/2-inch thick.
Bake/Frost the Cookies
- Bake for 6-8 minutes. DO NOT OVERBAKE! The cookies should not turn golden. You want them to be slightly underbaked from a normal sugar cookie so they’re soft and creamy when chilled.
- Let the cookies cool almost completely on the baking sheet before transferring to a wire rack.
- FROSTING: Using a hand mixer, mix together the butter, sour cream, powdered sugar, salt, peppermint extract, vanilla extra and 1 drop of red food coloring. Mix in a tablespoon or so of milk (or the liquid from the sour cream!) to get the frosting consistency you want. (I usually add 1-2 tablespoons.)
- Frost the cookies. For best results chill for at least 1 hour (or up to 2 days) before serving. Cookies are best served chilled right out of the fridge! Enjoy 🙂
Notes
- You want to use the RED Andes peppermint crunch variety for these cookies. You can either use the Andes Peppermint Crunch Baking Chips that come in a bag, or chop up 1 cup of the Andes Peppermint Crunch Thins.
- Don’t be tempted to overbake these cookies! They should not be golden at all. You want them to be slightly underbaked so they’re soft and creamy when chilled.


These are the best cookies I’ve ever made! I love love love them! So yummy! I hope to make them a holiday tradition from here on out. They are so rich and special- my whole extended family enjoyed them as a special treat this past holiday season. I highly recommend you give them a try!
Aw so glad you all enjoyed them! Thanks for the review!
Can these be frozen for later.
Could his be made with Greek yogurt rather than sour cream? I often substitute but have never done so in baking
Hi Tracy, we haven’t tried that, but it should work if you use full-fat! Would love to hear how they turn out for you!
Another great recipe. Full of flavor and easy to make. Thanks Erin.
It did make more then 18.
My daughter doesn’t like peppermint. Can I use the green crème de menthe baking chips? Since she was diagnosed with celiac disease we have not found a good sugar cookie recipe. I came across this recipe and would like to try it.
Hi Kerrie, you can certainly try that! It probably won’t affect the results at all!
These are perfection! I used regular flour and had to add a bit extra to get the right dough consistency, but maybe they were supposed to be on the wet side? Either way, they’re delicious. Please make these!
Hi Emily, sounds like adding a bit of extra flour was the right call! So glad you enjoyed them and thanks for the review!
How many days in advance can you make these?
Hi Mandy, good question! You can bake these 2-3 days in advance and store frosted in the fridge.
I absolutely love these cookies. I was wondering is it possible to make them not gluten free? Would it matter to use normal flour?
Hi Kelly, thanks for the review and glad you enjoyed them! We don’t recommend making these with all-purpose flour, since they’re specifically designed for gluten-free flour. You can find similar recipes if you search Google. I recommend the one from A Bountiful Kitchen! 🙂
I made these for our Christmas cookie baking day and they turned out amazing! Gluten and Nongluten family absolutely LOVED them! They just melt in your mouth! Perfect texture and taste. The only change I made was I used avocado oil because that’s what we always have on hand. I did chill the dough for 12 hours to prep ahead for our baking day. I’m wondering if I could leave the peppermint oil and Andes out to keep them a plan sour cream sugar cookie… Thanks!
Hi Megan, we’re so happy to hear you loved them! That’s the ultimate compliment when they please a diverse crowd! Yes, you can leave the peppermint out and replace it with vanilla. Almond extract would be delicious too!