


Erin’s Recipe Rundown

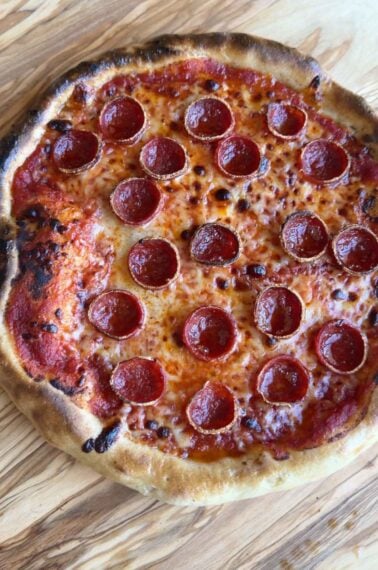
Texture: Chewy, crisp on the bottom and light. This crust has a great chew to it which is often hard to come by with gluten-free pizza!
Taste: Flavorful and golden thanks to olive oil a little almond flour.
Ease: So easy to make! You can have pizza on your table in less than 90 minutes. Great beginners recipe.
Top Tips: I like to parbake the pizza crust without toppings, then slide it onto a pizza steel to finish baking with the toppings. This ensures a crispy bottom crust!
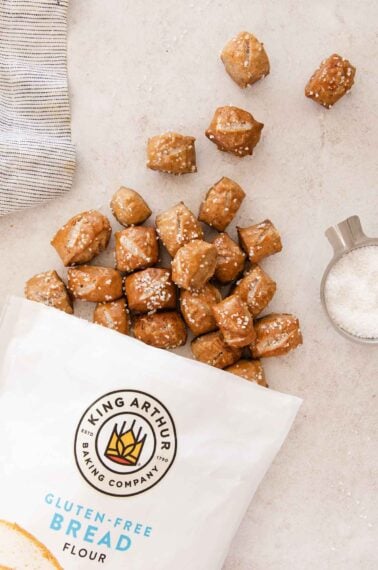
Recommended GF Flour: Works great with many gluten-free flour blends. Use a high-quality flour that contains xanthan gum. I like King Arthur Flour and Bob’s Red Mill.
Would I make these again? Absolutely! This is our go-to homemade gluten-free pizza crust.
xoxo erin

I’ve tried a lot of gluten-free pizza crust recipes over the years and this is my favorite. It’s easy to make and makes a crust that is both crispy and chewy.
So many gluten-free pizza crusts are thin crusts that turn out crunchy like a cracker. If you’re wanting a gluten-free crust with a good chew, this is it!
This pizza crust has the perfect amount of chew and bakes up crispy on the bottom. Plus it’s easy-to-make with gluten-free measure-for-measure flour!
Featured Comment
From Diane: My 7 year old granddaughter has coeliac disease and l have tried numerous gf pizza base recipes for her with no luck. She absolutely loves this one, we double the recipe every time so she always has one in the freezer. Her little brothers also love it. Thank you for a wonderful recipe!
Table of Contents
Ingredients You’ll Need

Here are a few notes on some of the key ingredients to make this gluten-free pizza crust. See the recipe card below for the measurements.
- Gluten-Free 1:1 Baking Flour: I like to use a high quality gluten-free measure-for-measure flour blend like King Arthur Flour in my baked goods. This blend has a mixture of brown rice flour, white rice flour, potato starch and tapioca starch. This recipe works well with most types of gluten-free all purpose flour!
- Almond Flour: Adding a little almond flour is one of my favorite tricks in gluten-free baking (I include it in these gluten-free chocolate chip cookies!) . The extra protein/fat in the almond flour this pizza crust gives it great flavor and helps it brown up nice and golden. To make this gluten-free pizza crust nut-free, you can simple replace the almond flour with more gluten-free flour.
- Psyllium Husk Powder: Don’t skip this ingredient! It had elastic properties that give the crust a springy, bready consistency. I’ve tried many brands of psyllium husk powder over the years and highly recommend this one.
- Baking Powder: This is an unusual ingredient in pizza crust but it lightens up the dough.
- Instant Yeast: Saf yeast is my favorite. Gluten-free doughs don’t need an extra rise, so instant yeast works great! You also might like these gluten-free cinnamon rolls.
How to Make Gluten-Free Pizza Crust
Here’s an overview of how to make gluten-free pizza crust. You can jump to the recipe for the full instructions.
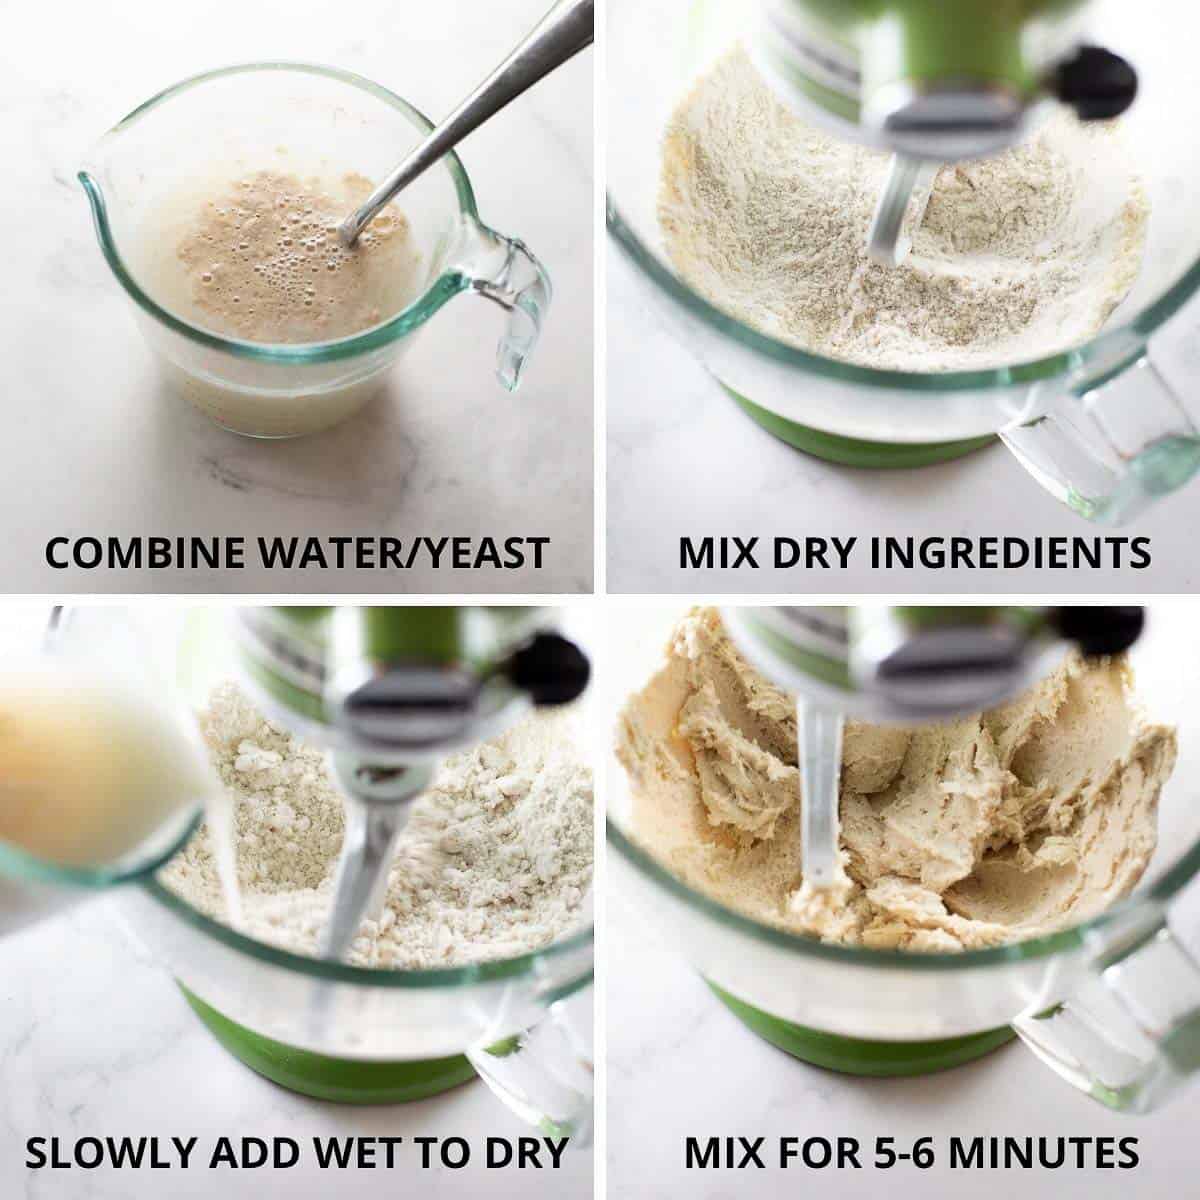
- Yeast: I like to use instant yeast for this gluten-free pizza crust. You’ll mix it together with some sugar and water and let it sit until it’s nice and bubbly.
- Dry Ingredients: I think this dough comes together best in a stand mixer fitted with a paddle attachment. Add all the dry ingredients to the bowl of the mixer and mix to combine.
- Wet Ingredients: With the mixer running on low, slowly pour in the yeast mixture followed by the olive oil. Then mix on medium-high speed for about 5 minutes.
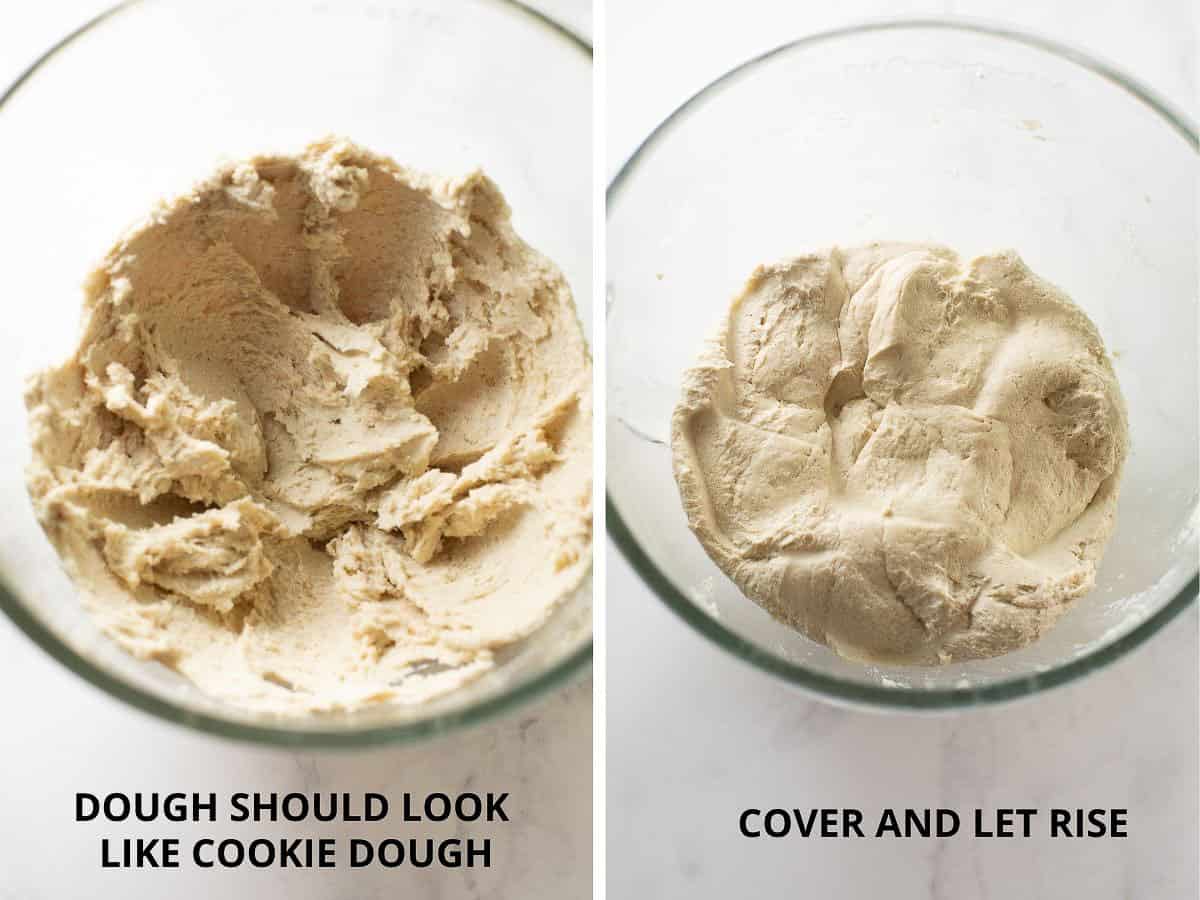
Gluten-Free Pizza Dough Consistency
Your dough might be more runny depending on what gluten-free flour blend you use. All gluten-free flour blends are slightly different and even how you measure the flour can cause differences. See the video in the recipe card below to get a visual on the texture you’re going for.
The dough should be more like cookie dough than runny batter. I would suggest mixing the dough for 3-4 minutes first, then adding more flour if needed (just a little at a time!) to thicken it up slightly.

- Press the dough onto the pizza pan and let rise for 10 minutes.
- I like to parbake the crust before adding the toppings for best results. If you have a pizza stone or steel – even better. I usually slide my pizza off the parchment/pan and bake it directly on the pizza steel for the second bake with the toppings.
Tips for the Best Gluten-Free Pizza
- One thing I’ve noticed at a lot of restaurants that serve gluten-free pizza is that the pizza never gets crispy on the bottom. Gluten-free things generally need to be baked longer than regular baked goods.
- I par-bake the pizza on these pans that I line with parchment paper rounds for 15-20 minute before adding the toppings. Then I like to slide the pizza onto a pizza steel and bake it for another 10-15 minute with the toppings on for perfectly crispy, chewy pizza!
- Another great thing about this crust recipe is that it works with basically any gluten-free flour blend. It turns out wonderfully with King Arthur Flour and Bob’s Red Mill gluten-free flours. You can use what you have on hand.

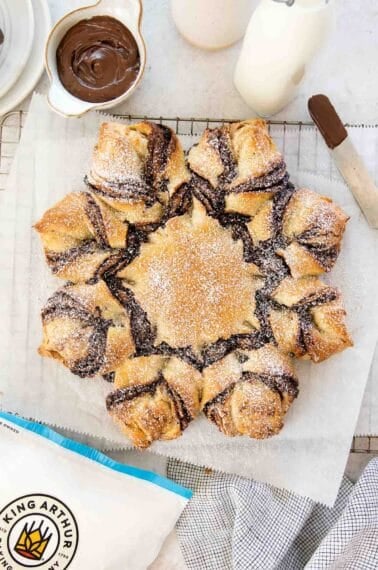
More Gluten-Free Recipes

Gluten-Free Pizza Crust (5-Star Recipe!)
Video
Ingredients
Yeast Mixture:
- 1 cup (240ml) warm water about 110°F
- 1 tablespoon granulated sugar
- 1 1/2 teaspoons instant yeast
Other Ingredients:
- 1 1/2 cups (225g) gluten-free measure-for-measure flour
- 1/4 cup (25g) almond flour
- 1 tablespoon psyllium husk powder
- 1 teaspoon baking powder
- 3/4 teaspoon kosher salt
- 2 tablespoons olive oil
Instructions
- In a measuring cup, combine the warm water, sugar and yeast in a glass measuring cup. Whisk to combine. Let proof for 5-10 minutes.
- In the bowl of a stand mixer fitted with the paddle attachment, add the gluten-free flour, almond flour, psyllium husk powder, baking powder and salt.
- With the mixer running on low, add the yeast mixture along with the olive oil. Increase the speed to medium-high and mix for 5 minutes. The dough will resemble thick cookie dough, this is normal.
- Using an oiled rubber spatula, scrape down the bottom and sides of the bowl and mix again until well-combined.
- Scoop the dough into the prepared pan and smooth the top with wet hands. Cover with oiled plastic wrap and let rise in a warm place for 45-60 minutes.
- Place a pizza steel or pizza stone in the oven. Preheat the oven to 425°F. Line a 12-inch round pizza pan with a circle of parchment paper. Spray the parchment paper with cooking spray.
- Using oiled or wet hands, press the dough into the pan. The dough will shrink slightly as it bakes, so press the dough as thin as you can to cover the pan. Let rise for another 10 minutes.
- Bake the crust without toppings for 15-20 minutes. Remove from the oven and add your desired toppings.
- Slide the pizza off the parchment paper and pan directly onto the pizza steel. Bake for another 10-15 minutes until the toppings are bubbly and cooked to your liking.
- Remove from the oven and let cool for 5 minutes before slicing.
Notes
- One thing I’ve noticed at a lot of restaurants that serve gluten-free pizza is that the pizza never gets crispy on the bottom. Gluten-free things generally need to be baked longer than regular baked goods.
- With this recipe I parbake the crust for 15-20 minute before adding the toppings. Then bake it for another 10-15 minute with the toppings on and you’ll have perfectly crispy, chewy pizza!
- I bake on a pizza pan, then transfer it to a wooden cutting board to slice up. Any cookie sheet will work but I recommend greasing the sheet with shortening (not olive oil) so it doesn’t stick. You can also use parchment paper if you prefer.
- Another great thing about this crust recipe is that it works with basically any gluten-free flour blend. It turns out wonderfully with King Arthur Flour and Bob’s Red Mill gluten-free flours. You can use what you have on hand
Nutrition
I hope you love this recipe as much as we do! If you try it be sure to leave me a comment/rating below. I’d love to hear from you!
Recipe adapted from King Arthur Flour
**This post contains affiliate links to the products I always use.


I made this for dinner tonight and it was easy and soooooo good!! It will be perfect for the whole family even those that don’t eat gf.
So happy to hear you liked it! 🙂
Thanks for sharing , yes I made this crust
using a flour blend I get at a bulk food place . I skipped the psyllium (allergy) and I added a small egg .. Worked out very well . So far one of the best crusts for gluten free . thanks .
I would like to know can I make the dough and freeze it into balls { making personal size pizza for one } I would vacuum pack them individual. Thanks Francine
It doesn’t work to freeze the dough unfortunately! However, it works great to freeze the par-baked crusts. Just stop at the step before you would put the toppings on. Let the crusts cool and then wrap in a layer of plastic wrap followed by tin foil. They will keep in the freezer for up to a month. You can bake them directly from frozen on a hot pizza stone or baking sheet. You can definitely make them individual-sized! Let me know if you have any other questions!
The only question I have is, how can I mix the dough without a standing mixer? I have a hand mixer and that’s it but I’m done shying away from recipes because of the standing mixer. Although the one time I made something without it, all I could taste was the flour. Help please! 🙂
The stand mixer just makes it easier to mix but isn’t necessary at all! A hand mixer should work great. I hope you like it!
I just made this last night. I read the reviews like I often do and had so much hope and fortunately this recipe does not disappoint!! It is everything that is says it is, crunchy, chewy and crusty like a real pizza crust should be! I “almost” can’t tell the difference. I used King Arthur Gluten Free Flour 24oz (NOT the “measure for measure” type which isn’t as good for yeasted bakes). I added Trader Joe’s Almond flour and instead of Psyllium Husk I used ground flax seed because that’s what I had on hand. It seemed to work fine. The mixture was never like a cookie dough for me, much more like a cake batter. I second guessed whether I had put the correct amount of flours in as I was using a 1/4 cup measure because it fits easier into the bag of flour. I therefore added about an 1/8 of a cup of coconut flour which is very absorbent. It never looked like a proper ball because it was too loose to have a real shape or form. Don’t worry, it’s o.k. if it is, it will still turn out just fine! We went on a walk and let it proof for more like an hour and it was huge and puffy almost like a real pizza dough would rise. I poured oil olive drizzle into the pan, swirled it around with my fingers and make sure both hands were oiled and plopped it out in the center of the pan. It was easy to work and not sticky at all because of the oil. My pan was a bit small for this recipe as I like a thiner crust. Maybe next time I’ll use a bigger pan or take out part of the dough. I really enjoyed the taste and texture of this crust. It was better than any product I’ve had that I’ve bought off the shelf and this recipe is spot on and better than most GF recipes I’ve tried!
Help, I made your flour blend and weighed the ingredients to do it. But, when I made the pizza dough it was super runny. I didn’t have psyllium so I used gelatin as that is supposed to be a gum substitute. I continued to add another cup of flour mix to thicken it but it was still pourable though. I then poured it into a pan and prebaked it. In the end, it seemed ok, rather heavy, but eatable and good flavour.
Can you please tell me if it was the gelatin that did it, or was there a misprint tin the cups of flour?
Can this be made without a mixer?
If you boil 3/4 cup water with 2 tbsp olive oil and add that to the flour mix first, let it cool for 20 minutes and then prepare 1/4 cup water sugar and yeast, let that cure for 15 minutes then add yeast mixture to the cooled flour mixture it will gelatinous and make the dough more like wheat dough and you won’t need the husk.
Erin, this is heaven on a plate!
Can I make the dough and freeze it? Will it still come out okay when I finally bake it?
I would recommend par-baking the crust and then freezing it (so bake just 15-20 minutes). Then let the crusts cool and wrap them in a layer of plastic wrap and tin foil. You can then place toppings on the pizza straight from the freezer and then bake for 20 minutes at 425F. I hope this helps!
Or maybe I’m expecting it to be like a regular flour dough and it is supposed to have a different consistency?
Yes this definitely doesn’t have the consistency of regular dough. It won’t turn out if you add flour to make it like that. It should be the consistency of cookie dough but not as thin as pancake batter.
I just tried this too and found the consistency like pancake batter. I did not measure flour by weight, and did use Bob’s Red Mill 1:1 flour. I think the 1C water to 1 1/2 C flour ratio is pretty high and am surprised it has turned out for other people! Or maybe our water in the north is wetter? 😉
I just made the pizza for lunch and my husband loved it. I did not use more flour eventhough the mixture was soft and I made the dough and left it to rest overnight. I sprinkled maize flour on the grease proof paper and rolled it out. Perfect best dough ever. Thanks.
Great! Yes it’s tempting to add more flour because the dough isn’t like regular pizza dough – but better not to add more flour for sure. Glad you liked it!
I’m dying for your “favorite dairy-free pizza (recipe coming soon!) with caramelized onions, bell peppers, and prosciutto.” Any chance this will be posted soon? Pizza has been what I miss the most since cutting gluten, dairy, and eggs out of my diet.
Thanks!
Steph
Hi Stephanie! Ok here is what I do for that topping combination – I use Trader Joe’s (or any kind you like) pizza sauce. I saute 1/2 a red onion, 1 red bell pepper, 1 yellow bell pepper (all 3 of those thinly sliced) in some olive oil (about 2 tablespoons) over medium /medium-low heat until they are very soft and almost caramelized. Add a few sliced of chopped prosciutto and cook until warmed through. Then I top the precooked pizza crust with the sauce, some red pepper flakes, the caramelized pepper mixture and some of the dairy-free parmesan on my site. I usually bake it for another 10-15 minutes with the toppings. So good! I hope you like it!
I haven’t had luck with anything yeast ed since going gf years back. However, our family all thought thus was the best gf pizza crust we’ve had since going gf. I didn’t have psyllium husk, so I just added a bit more flour. I, too, had thick pancake batter, but went with it. Just spread it out. It came out perfect. I added extra flour to another batch, and it came out thick, chewy, and doughy.
Do you know if this can be made ahead of time and stored (fridge, or freezer)? And has anyone tried cooking it on the stove (I saw elsewhere that someone took dough camping and it turned out great, but they didn’t elaborate on the prep, or cooking).
Thanks!
Just made this tonight. The flavor was great. I did have to add almost 2 additional cups of the flour though! I made the flour blend you link to and it turned out very runny with this recipe. So I added 1/5 of a cup at a time until it was the right consistency. 8 scoops later it was finally more dough like. It ended up not being quite enough yeast to make it rise well but overall it was good! The flavor was seriously amazing. Next time, I’ll add the extra flour in the first place and add another teaspoon of yeast. Anxious to try again!! Thank you!!
Do you mean you used my grain-free flour blend? I’ll have to try this with my blend again to double check the recipe. I have made it with both Bob’s Red Mill 1:1 and my blend (the flavor with my blend is so good I agree!) and know it takes more flour with my blend – but it sounds like a lot more! Thanks for letting me know. I know the amount should be correct if using Bob’s Red Mill 1:1 but I will re-test with my blend!
I also had to add more than 1 cup of Bob’s Red Mill 1;1 gluten free flour and it was still somewhat liquid-y. I thought I did something wrong. I double checked and all my measurements were correct. The dough was hard to work with (very sticky and more viscous), but I managed to add enough flour on top to flatten it down with my hands. Despite having different consistency, the crust still came out great. I’m glad you have the video and next time I will try to get closer to the ‘cookie dough’ consistency.
I’m glad the video was helpful! How you measure the flour can make a big difference here. If you pour the flour into the measuring cup rather than scooping it you can end up with less. You did it right by adding more flour to get the consistency of cookie dough!