
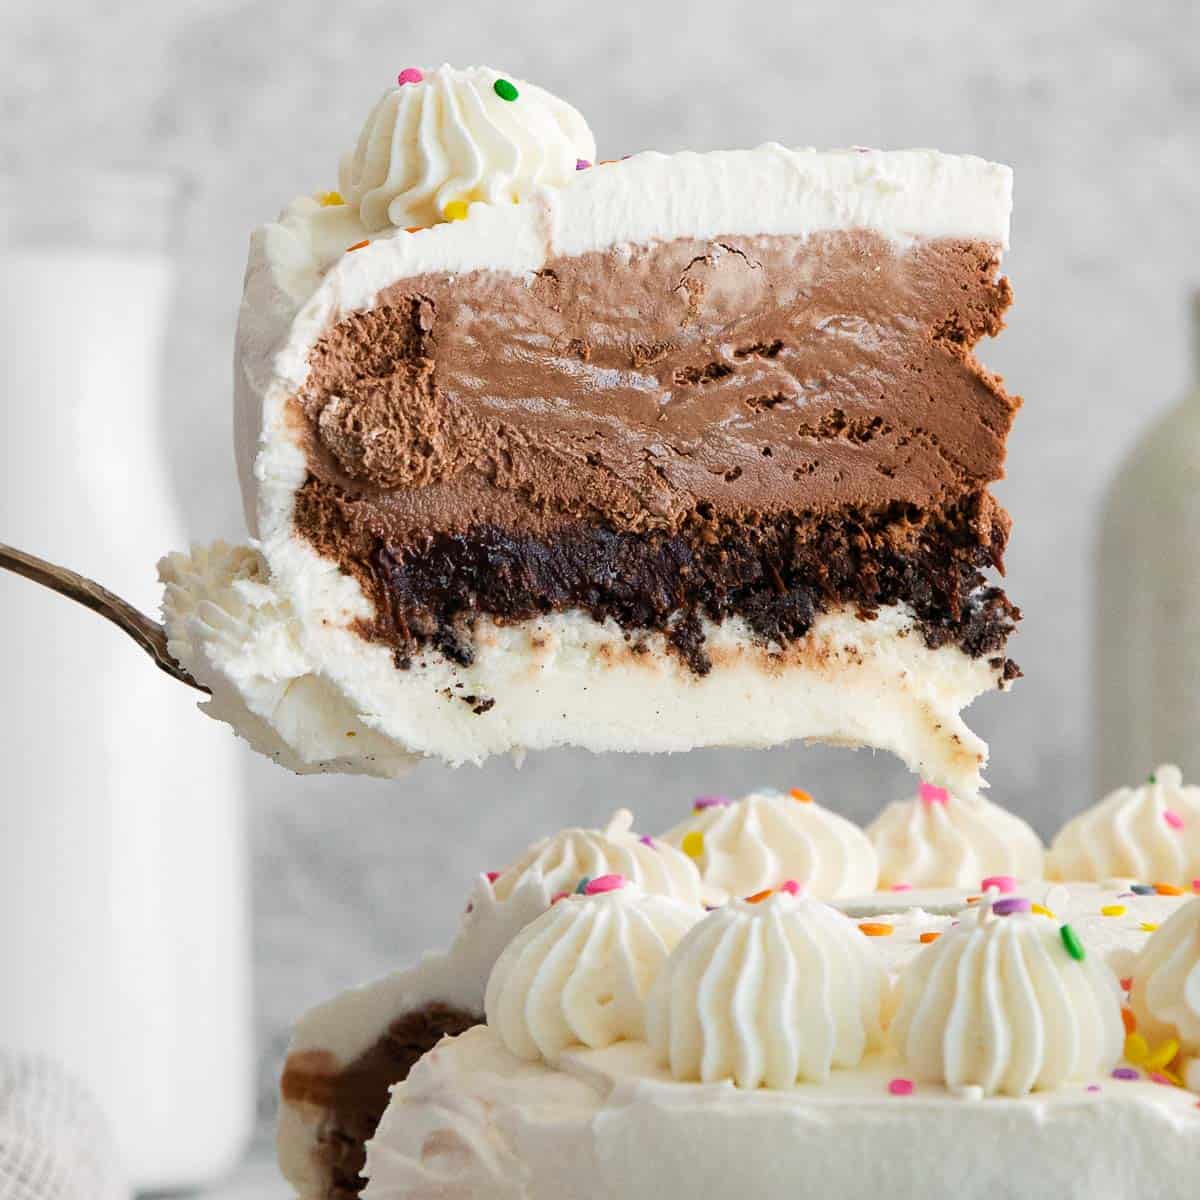

You won’t believe how EASY it is to make a homemade gluten-free ice cream cake! Use your favorite ice cream flavors and make it all summer long.
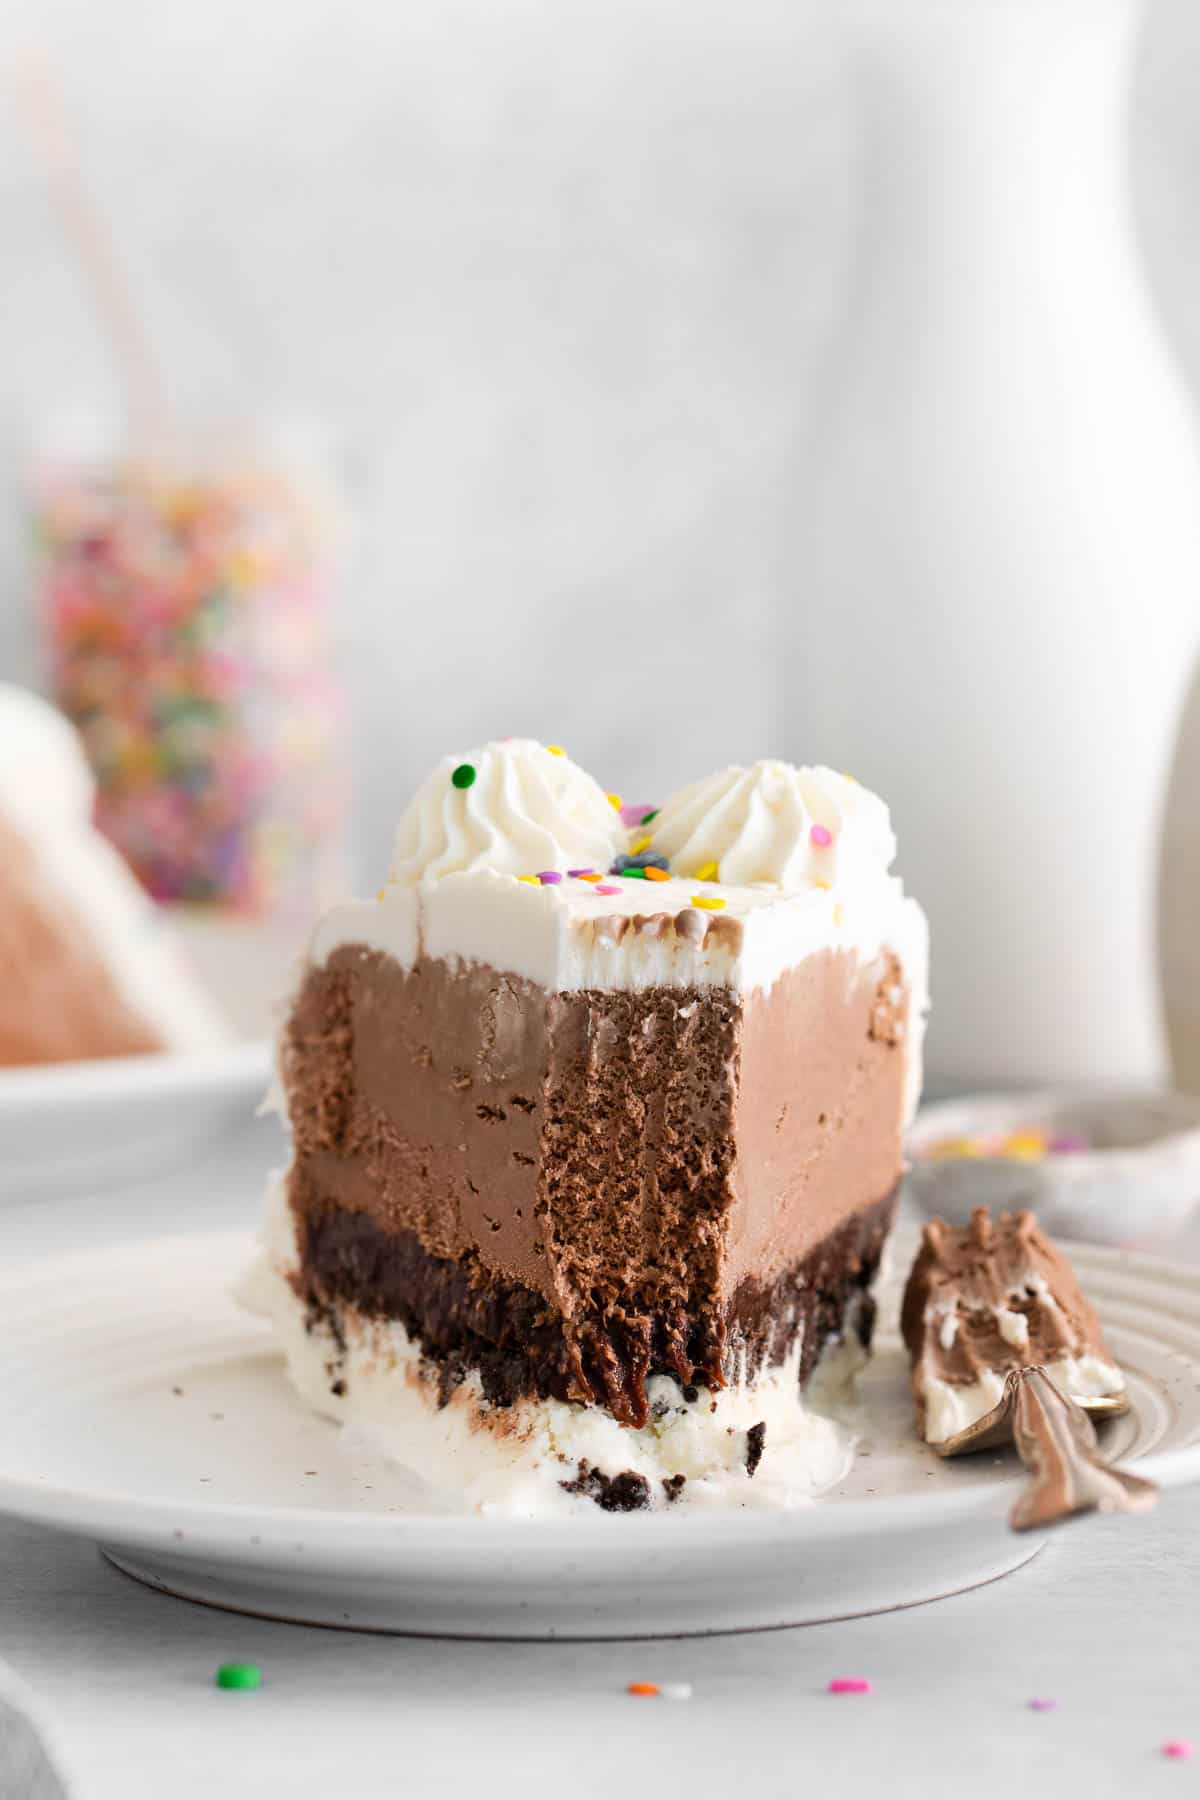
With a fudgy cookie-crunch filling, it’s just like the ice cream cake you ate growing up. Nobody will guess it’s gluten-free!
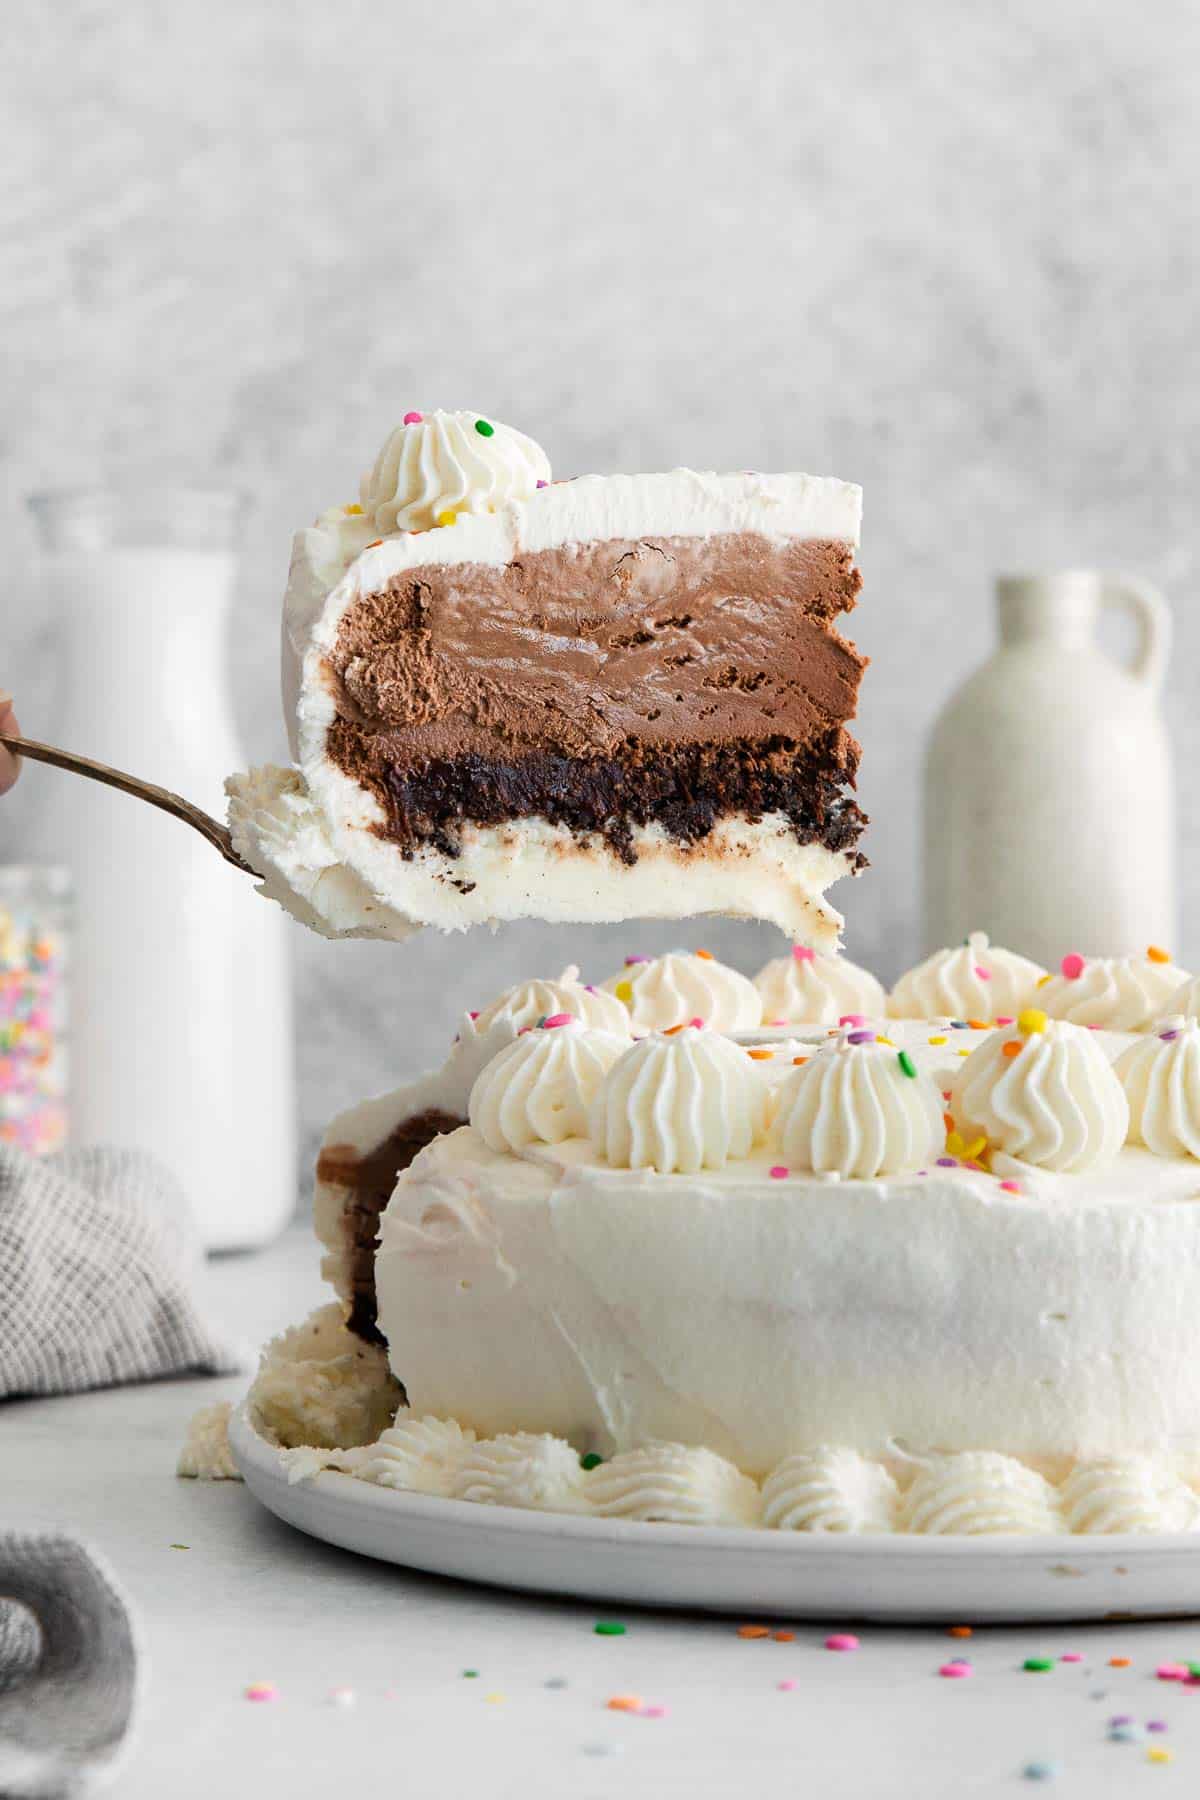
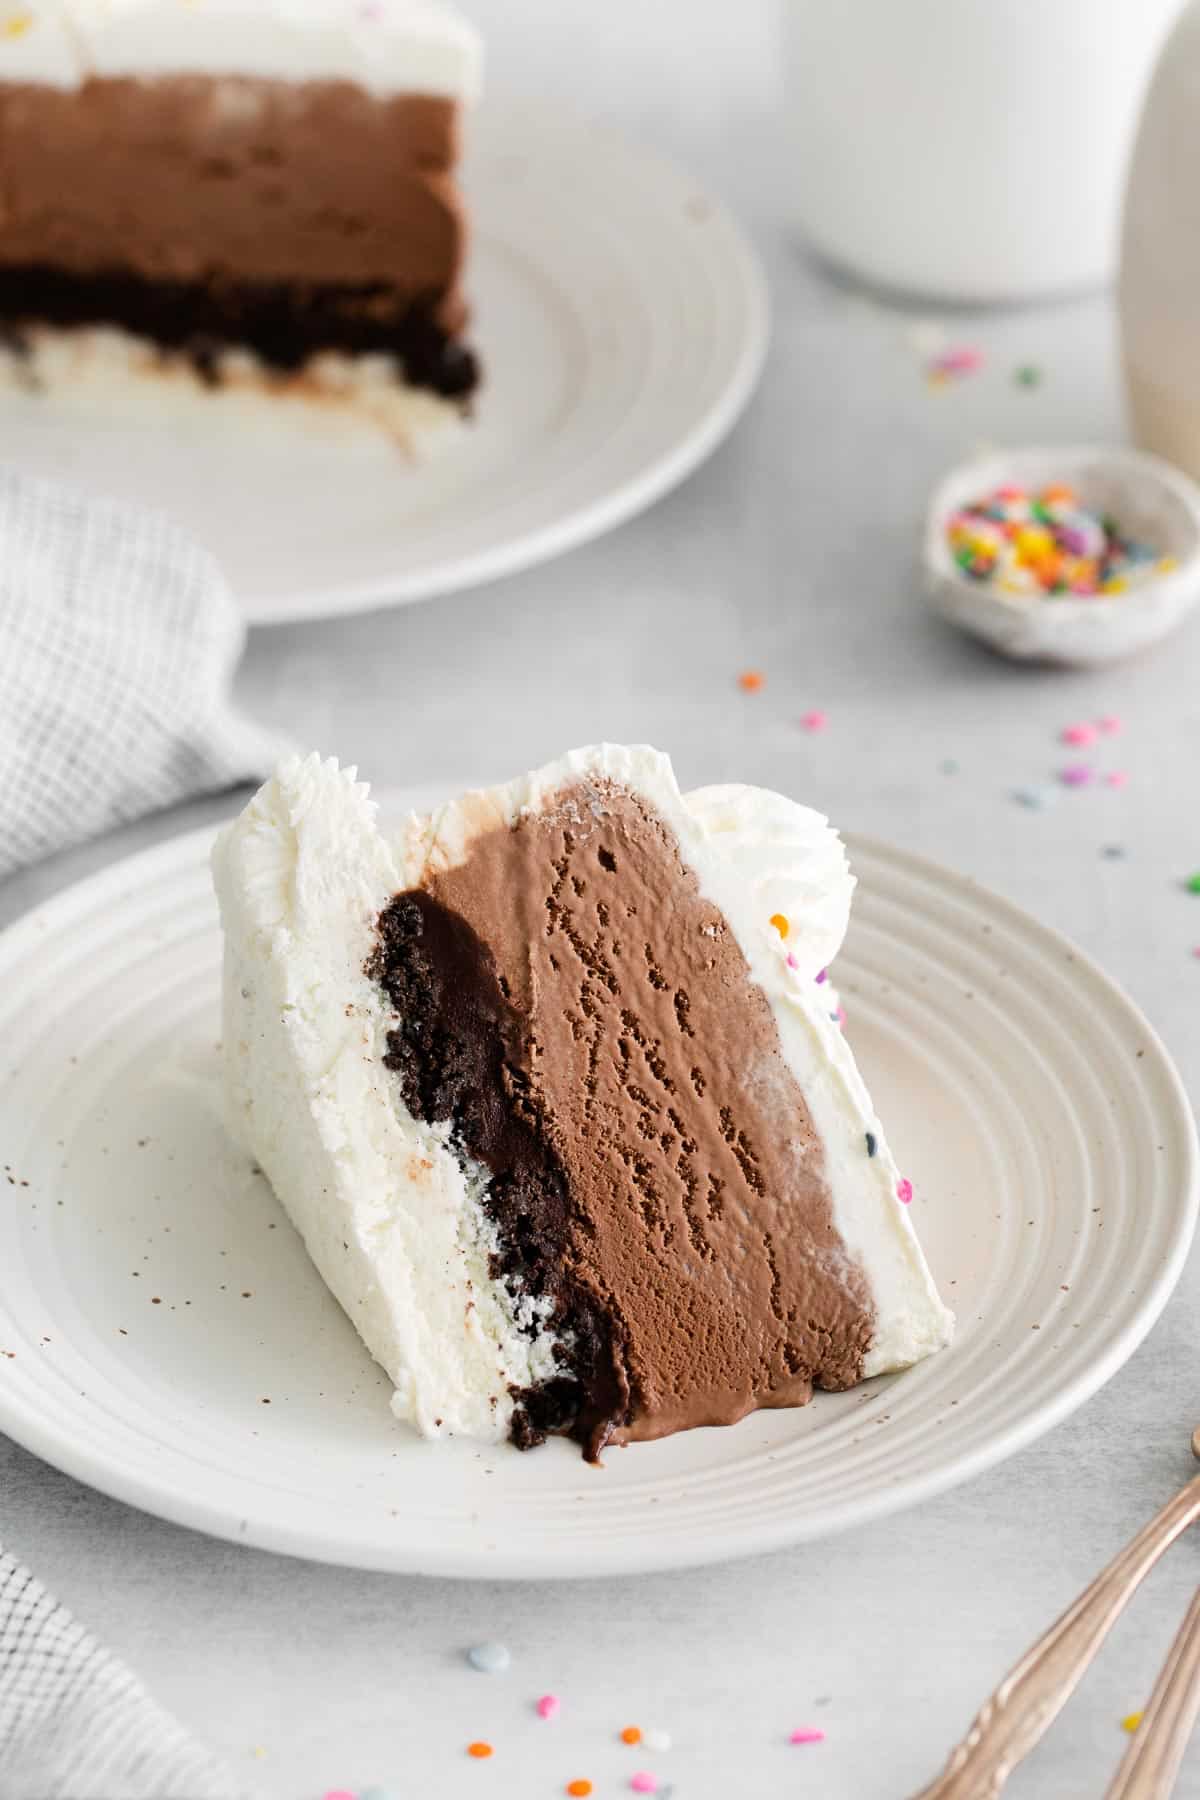
No matter how old you are, there’s something about ice cream cake that instantly makes you feel like a kid again. Cold, creamy, fudgy, and downright fun, this gluten-free ice cream cake is the best of every dessert—wrapped up in one impressive package!
It’s special enough that you’re not eating it all the time, so any time you do get to indulge in an ice cream cake, it’s a moment to really savor!
And while this ice cream cake looks extra impressive, it’s actually easier to put together than it seems. Sure, there are quite a few steps, but it’s mostly just time spent assembling the cake.
In fact, you don’t even have to actually bake a cake or make a traditional frosting for this recipe!
The cookie crunchies layer and the chocolate fudge layer are the perfect accompaniment to the ice cream layers. Then, the whipped cream topping comes in as the light and fluffy finishing touch.
I love making this layer cake for my kids’ birthdays, or even for the birthday celebration of a friend. Trust me when I say everyone is going to LOVE this cake!
For more show-stopping desserts, try this gluten-free chocolate mousse cake, gluten-free vanilla cake, gluten-free cheesecake and gluten-free birthday cake!
You also might like this article on are oreos gluten-free.
Why You’ll Love this Recipe
- Great for birthdays or a special occasion
- Extra impressive
- Cold, creamy, and fudgy
- No traditional cake baking required
- Perfect summer dessert
You also might like these gluten-free chocolate cupcakes or this flourless chocolate torte.
Ingredients You’ll Need
Here’s what goes into this homemade ice cream cake to make it so delicious!
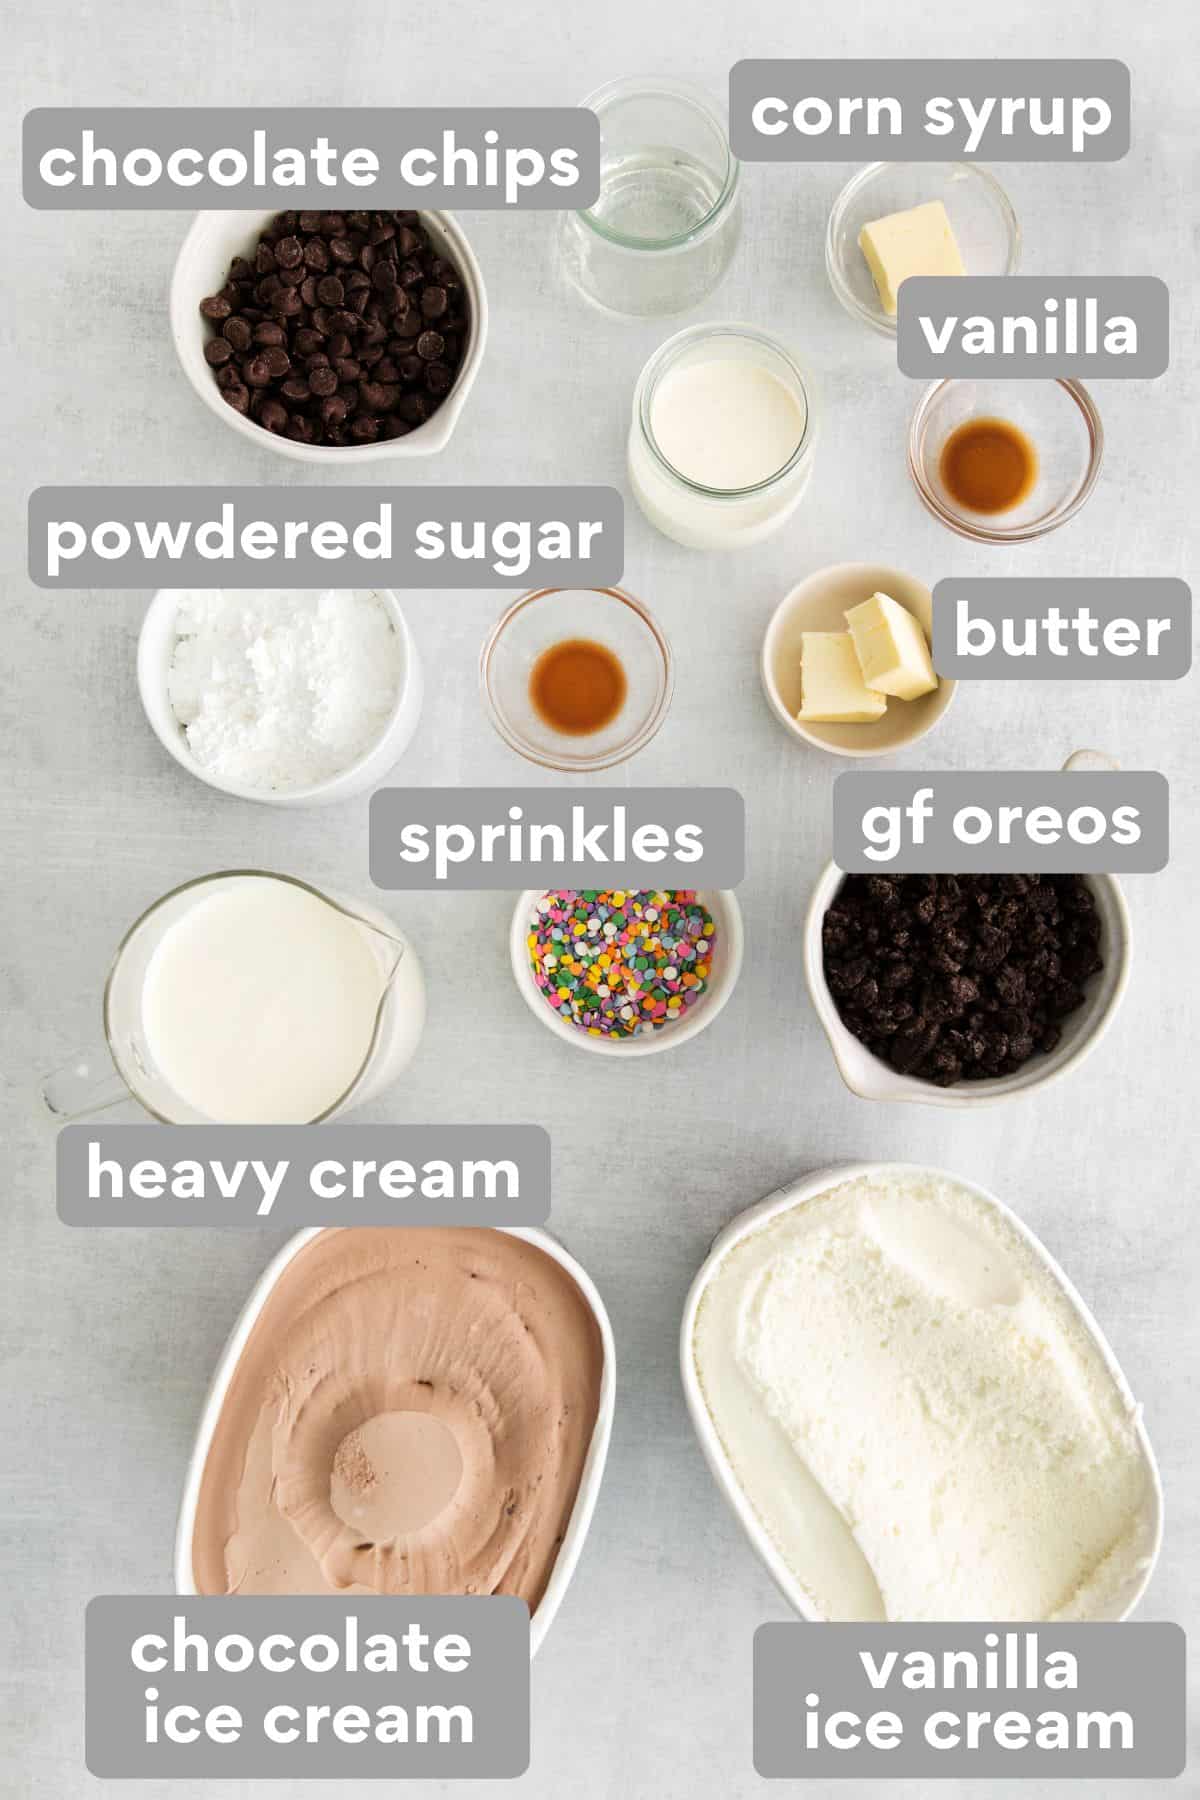
- Chocolate chips: Choose high-quality chocolate chips like Guittard or Ghiradelli, since you’ll be using them to make the chocolate sauce fudge layer of the cake.
- Corn syrup: Corn syrup helps thicken the fudge layer until it’s the perfect consistency!
- Vanilla: Use pure vanilla extract in the fudge layer for a richer flavor.
- Powdered sugar: Powdered sugar creates a smooth, light, and fluffy homemade whipped cream layer. I don’t recommend using granulated sugar, but you can if you’re in a pinch.
- Butter: Butter adds richness and helps bind the gluten-free chocolate cookies layer together.
- Sprinkles: Sprinkles make this cake look more fun and festive. Choose your favorite color scheme to fit the occasion!
- Gluten-free Oreos: Not all Oreos are gluten-free, so make sure you’re buying the gluten-free version at the grocery store.
- Heavy cream: Use heavy whipping cream to make a more flavorful whipped cream—and more overall delicious cake. I don’t recommend using Cool Whip for this cake!
- Chocolate ice cream: Choose your favorite brand of gluten-free chocolate ice cream, or consider changing the recipe to include a difference ice cream flavor.
- Vanilla ice cream: Choose your favorite brand of gluten-free vanilla ice cream, or consider changing the recipe to include a difference ice cream flavor.
How to Make this Ice Cream Cake
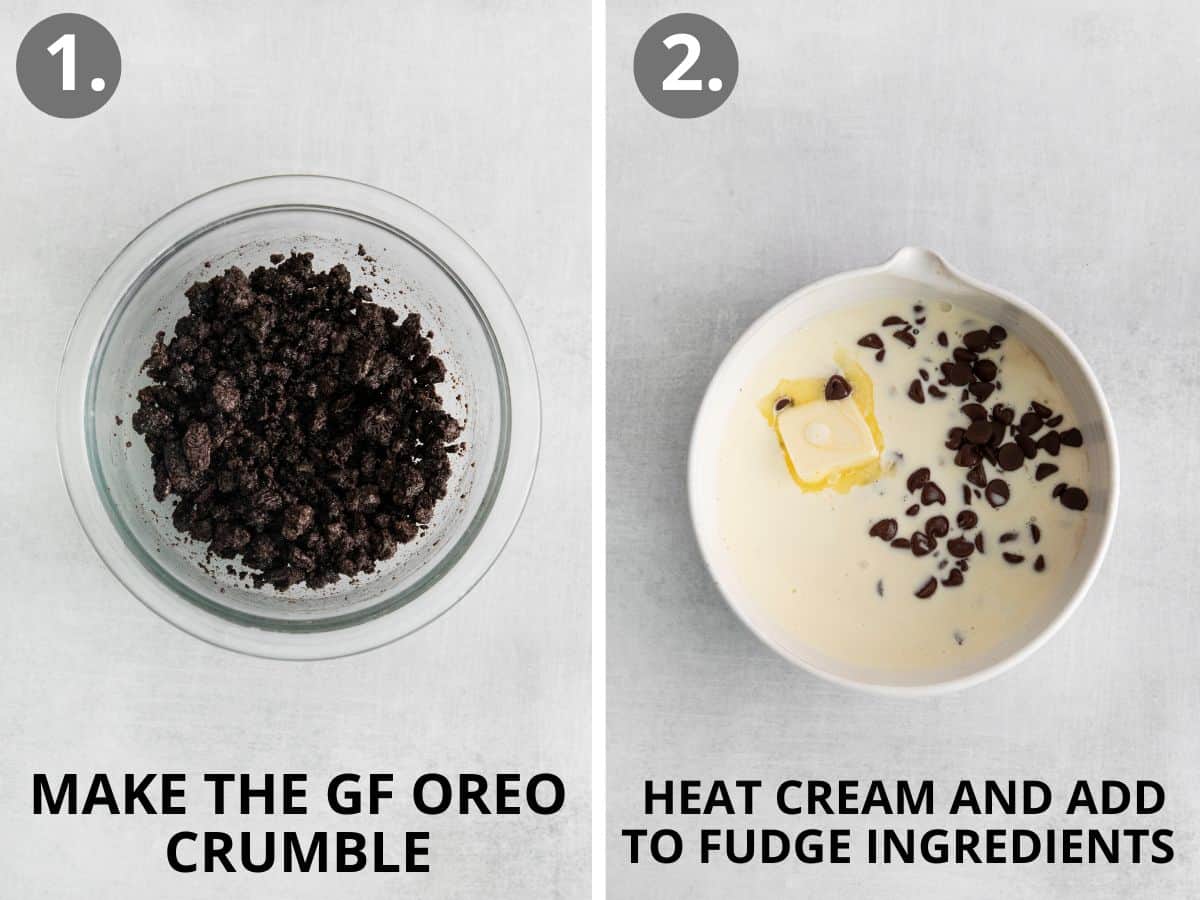
Make the Cookie Crunchies
- TIP: Now is a good time to set out the chocolate ice cream (not the vanilla) so it can soften for 20 minutes before making the cake layers.
- Preheat the oven to 350 degrees. Line a baking sheet with parchment paper or a silicone baking mat.
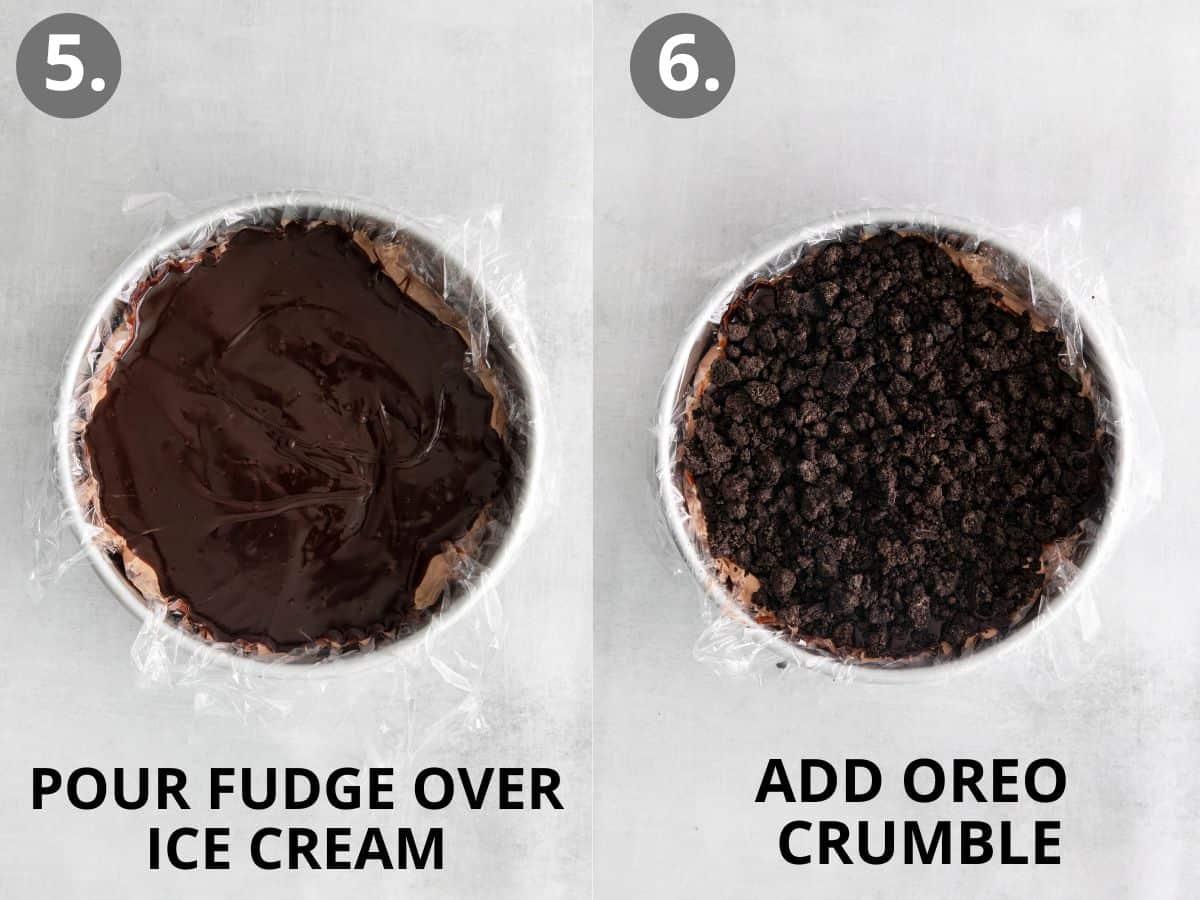
- In a small bowl, mix together the gluten-free Oreo crumbs and melted butter until well combined. Spread the crumbs evenly onto the prepared baking sheet. Bake for 8-10 minutes, then cool completely to room temperature. Break up any big clumps into smaller ones and set aside.
You also might like this gluten-free oreo cheesecake.
Make the Chocolate Fudge
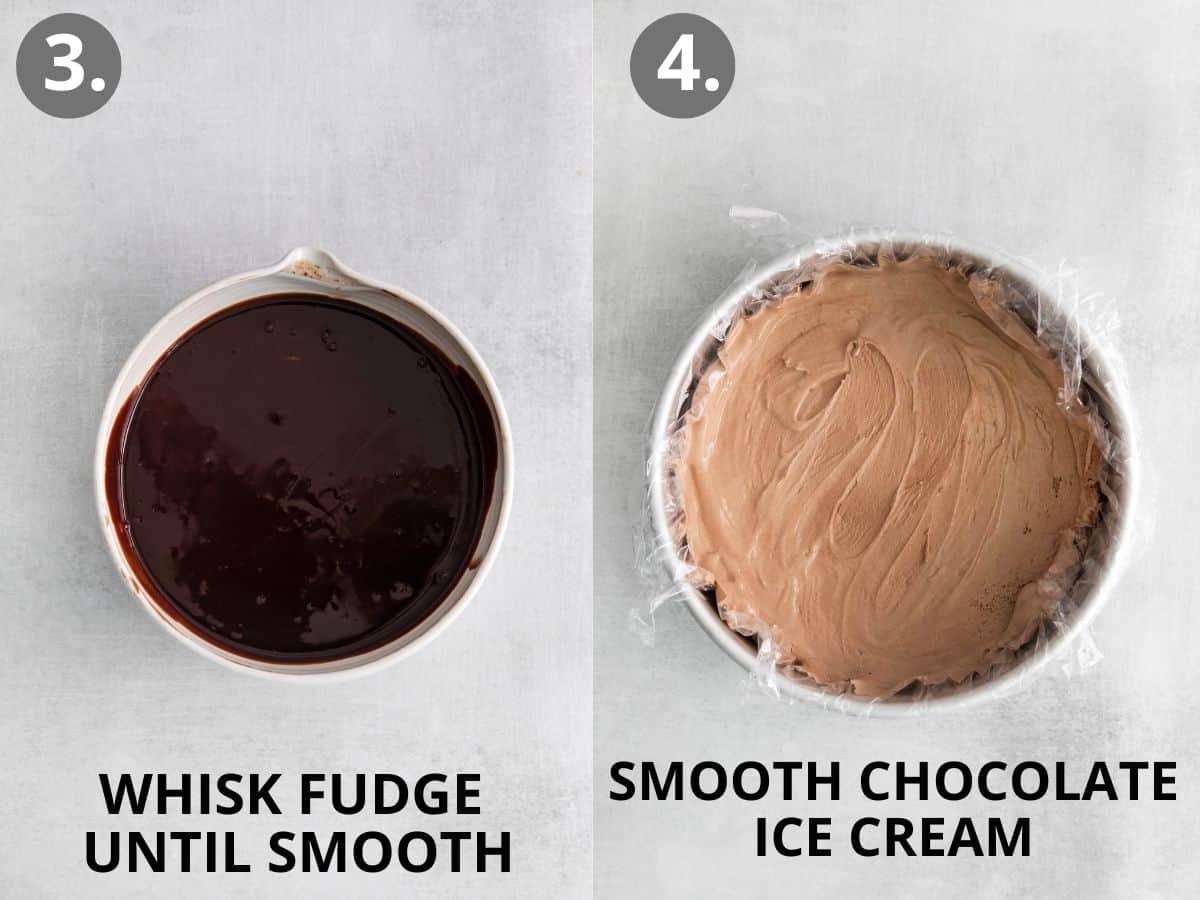
- Add the chocolate chips, corn syrup, butter, vanilla and salt to a medium sized bowl.
- Microwave the heavy whipping cream for 45 seconds to 1 minute until just starting to boil. Pour the hot cream over the chocolate chips mixture. Let sit for 2-3 minutes, then whisk until smooth. Set aside at room temperature.
Make the Ice Cream Cake
- Line a 8×3 cake pan with a generous layer of plastic wrap to cover the bottom and sides of the pan. (You can also use an 8-inch springform pan.)
- Spread the softened chocolate ice cream into an even layer. (If you want a thicker chocolate layer use the whole carton. If you want even layers of chocolate and vanilla ice cream use ⅔ of the container.) Freeze for 30 minutes. Set out the vanilla ice cream to soften while the chocolate ice cream layer freezes.
- Remove the cake from the freezer. Spread the chocolate fudge in an even layer over the chocolate ice cream. Sprinkle the cookie crumbs over the fudge. Freeze for 10 minutes to set the fudge layer.
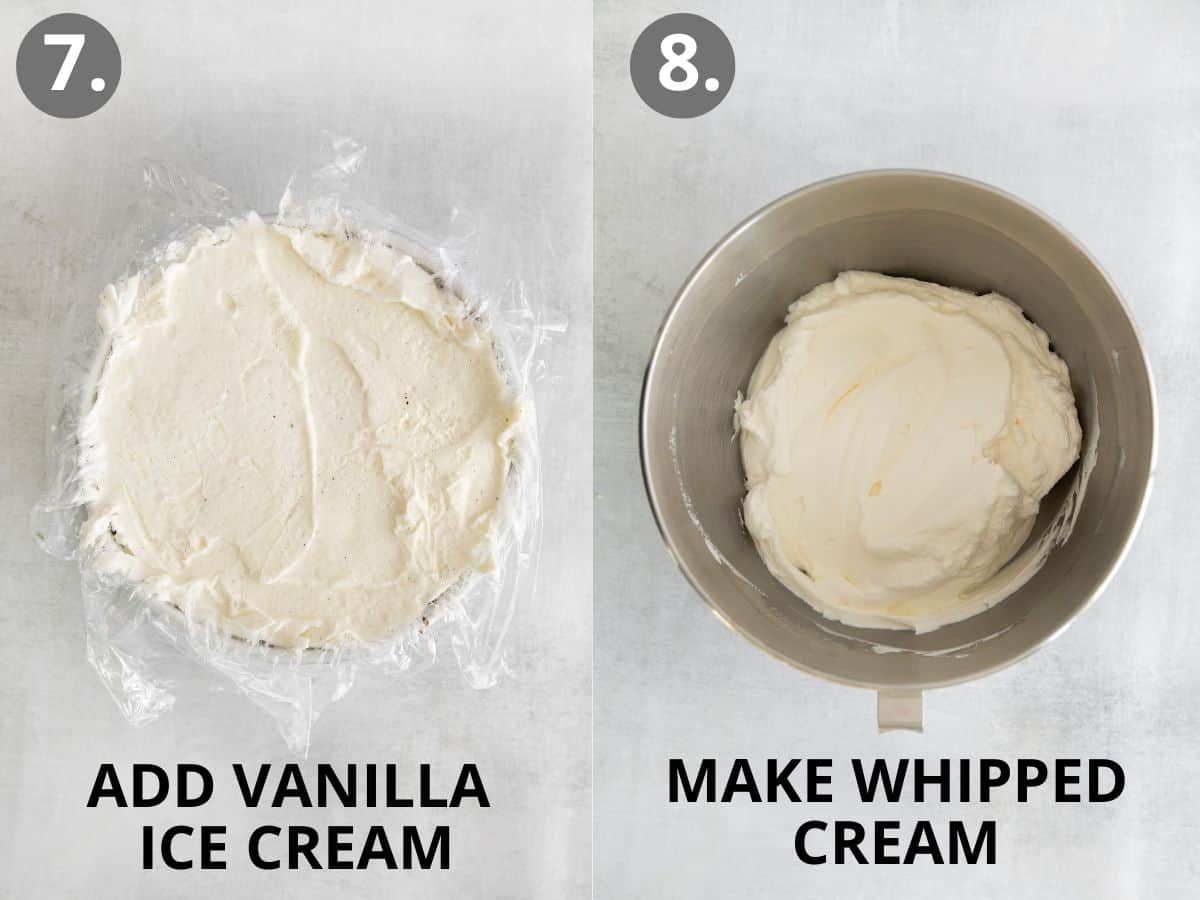
- Spread the softened vanilla ice cream layer (you may not use all the ice cream) over the cookie crumbs. Freeze for 2-3 hours until firm.
Make the Whipped Cream Topping
- In a large mixing bowl, add the heavy whipping cream, powdered sugar and vanilla extract. Using a hand mixer, whip on high speed until stiff peaks form.
- Take the cake out of the freezer. Use the plastic wrap to lift the frozen cake out of the pan, and place on a serving platter.
Frost the Cake

- Spread the whipped cream frosting over the top and sides of the cake, and decorate as desired. The whipped cream can also be piped on top of the cake decoration. Top with sprinkles.
- Keep the cake in the freezer until ready to serve, then remove the cake from the freezer and let it sit at room temperature for 10 minutes before slicing. Enjoy your custom ice cream cake!
You also might like this gluten-free peppermint oreo pie!
Storage/Make Ahead Instructions
- Freeze the cake until ready to serve. The cake will keep covered for up to 3 days in the freezer.
Expert Tips & Tricks
- I highly recommend using a deeper than standard 8×3 cake pan to make this gluten-free cake!
- You can use parchment paper instead plastic wrap to remove the cake from the pan, or use a springform pan instead.
- Feel free to swap out chocolate ice cream or vanilla ice cream for other ice cream flavors. This cake would taste great with strawberry ice cream, mint ice cream, etc. Choose your favorite ice cream brand and you can’t go wrong!
- Don’t have time to make the chocolate fudge layer? Take a shortcut and buy hot fudge sauce at the store.
- Dip a sharp knife in hot water to it easier to cut and serve the cake.
If you’re looking for a way to wow friends and family on their birthday, this gluten-free ice cream cake is it!
I hope you love this gluten free ice cream cake recipe as much as we do! If you try it, be sure to leave me a comment/rating below. I’d love to hear from you!

Gluten-Free Ice Cream Cake
Ingredients
Cookie Crunchies
- 1 cup gluten-free oreo crumbs 130 grams (about 12 crushed oreos)
- 2 tablespoons butter melted
Chocolate Fudge
- 1 cup semi-sweet chocolate chips 170 grams
- ¼ cup light corn syrup 85 grams
- 1 tablespoon butter
- 1 teaspoon vanilla extract
- ¼ teaspoon salt
- 1/2 cup heavy whipping cream 120 ml
Ice Cream Layers
- 1.5 quart container vanilla ice cream
- 1.5 quart container chocolate ice cream
Whipped Cream Topping
- 2 cups cold heavy whipping cream 480 ml
- 3/4 cup powdered sugar 100 grams
- 1 teaspoon vanilla extract
- Sprinkles for topping
Instructions
- I highly recommend using a deeper than standard 8×3 cake pan to make this recipe! This is the pan I use.
Make the Cookie Crunchies
- TIP: Now is a good time to set out the chocolate ice cream (not the vanilla) so it can soften for 20 minutes before making the cake layers.
- Preheat the oven to 350 degrees. Line a baking sheet with parchment paper or a silicone baking mat.
- In a small bowl, mix together the gluten-free oreo crumbs and melted butter until well combined. Spread the crumbs evenly onto the prepared baking sheet. Bake for 8-10 minutes, then cool completely to room temperature. Break up any big clumps into smaller ones and set aside.
Make the Chocolate Fudge
- Add the chocolate chips, corn syrup, butter, vanilla and salt to a medium sized bowl.
- Microwave the heavy whipping cream for 45 seconds to 1 minute until just starting to boil. Pour the hot cream over the chocolate chips mixture. Let sit for 2-3 minutes, then whisk until smooth. Set aside at room temperature.
Make the Ice Cream Cake
- Line a 8×3 cake pan with a generous layer of plastic wrap to cover the bottom and sides of the pan. (You can also use an 8-inch springform pan.)
- Spread the softened chocolate ice cream into an even layer. (If you want a thicker chocolate layer use the whole carton. If you want even layers of chocolate and vanilla ice cream use ⅔ of the container.) Freeze for 30 minutes. Set out the vanilla ice cream to soften while the chocolate ice cream layer freezes.
- Remove the cake from the freezer. Spread the chocolate fudge in an even layer over the chocolate ice cream. Sprinkle the cookie crumbs over the fudge. Freeze for 10 minutes to set the fudge layer.
- Spread the softened vanilla ice cream into an even layer (you may not use all the ice cream) over the cookie crumbs. Freeze for 2-3 hours until firm.
Make the Whipped Cream Topping
- In a large mixing bowl, add the heavy whipping cream, powdered sugar and vanilla extract. Using a hand mixer, whip on high speed until stiff peaks form.
- Take the cake out of the freezer. Use the plastic wrap to lift the frozen cake out of the pan, and place on a serving platter.
- Frost the cake with the whipped cream and decorate as desired. The whipped cream can also be piped on top of the cake decoration. Top with sprinkles.
- Freeze the cake until ready to serve (at least 4 hours, preferably overnight!) . The cake will keep covered for up to 3 days in the freezer. Let sit at room temperature for 10 minutes before slicing. Enjoy!
Notes
- I highly recommend using a deeper than standard 8×3 cake pan to make this gluten-free cake!
- You can use parchment paper instead plastic wrap to remove the cake from the pan, or use a springform pan instead.
- Feel free to swap out chocolate ice cream or vanilla ice cream for other ice cream flavors. This cake would taste great with strawberry ice cream, mint ice cream, etc. Choose your favorite ice cream brand and you can’t go wrong!
- Don’t have time to make the chocolate fudge layer? Take a shortcut and buy hot fudge sauce at the store.
- Dip a sharp knife in hot water to it easier to cut and serve the cake.


I made this cake this week for my daughter’s birthday. It was divine! We all loved it. I put more cookies in the cookie layer because I used a 9 inch springform pan and because I love the cookie layer. It definitely takes more freezing time… I doubled the freezing time called for in recipe. Absolutely delicious!
Hi Maria! We’re so glad the ice cream cake was a success for your daughter’s birthday! We love the cookie layer too. It’s great to hear it worked well in the 9″ springform with the extra freezing time. Thanks for sharing!
I just made for a birthday party and it was 10/10- everyone loved it!
Aw, that’s wonderful to hear! Thanks so much for your review, Janel!
Hi. We don’t have corn syrup in the UK so o was wondering what I could use instead? Thank you.
Hi Hannah, good question! Corn syrup stops the sugar from crystalizing, making a smooth fudge sauce. You could try golden syrup or glucose syrup instead!
I don’t see instructions for making the cake part. Just to pull it out of the freezer. Pretty frustrating to find out such a big part is missing from the instructions!
Hi Juliet, the full instructions are featured in the recipe card. It includes steps to make the cookie crunch and fudge layers along with the ice cream layers and whipped cream topping. The ice cream cake doesn’t include a standard gf cake in it. We hope this helps!
Do you use the entire Oreo with stuffing, or just the cookie parts?
Hi Dagmar! We use the entire Oreo with the filling. We hope you love the ice cream cake!
why is this cake only good for 3 days in the freezer? Can it last 4-5 days?
Hello! Freezing for a max of 3 days ensures all layers have the best flavor and texture. The longer it’s frozen, the more the textures will change and overtime flavor can change. 4-5 days would typically be safe to eat, just not necessarily the best taste/texture. We hope this helps!