

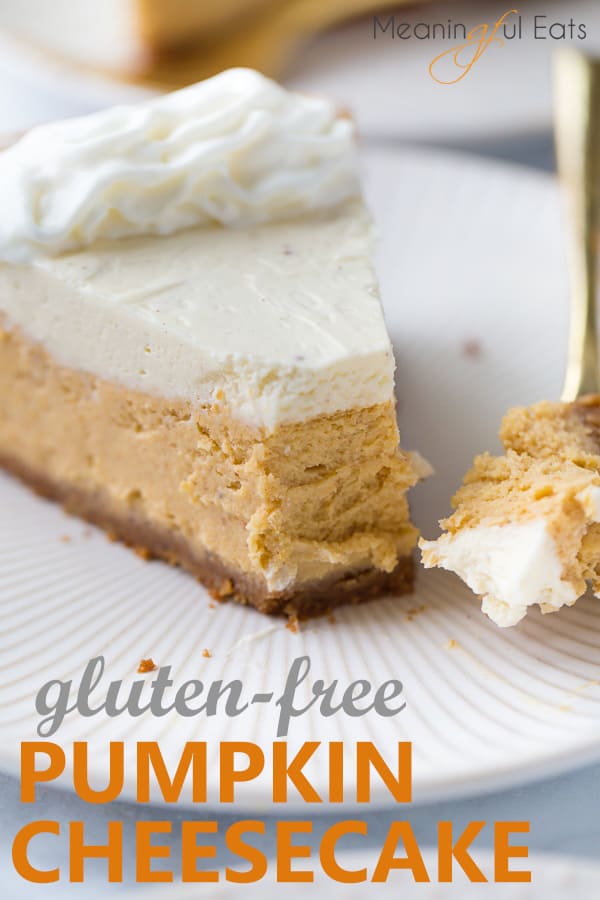
Gluten-Free Pumpkin Cheesecake! NOBODY will guess this is gluten-free! Lightly spiced, creamy and totally luxurious. The perfect crowd-pleasing holiday dessert!
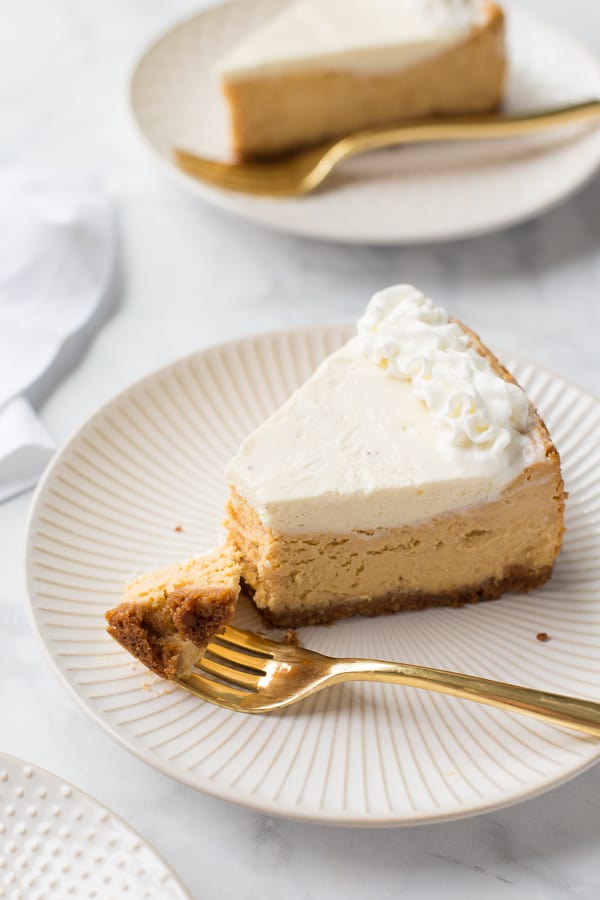
If you’re looking for a show-stopping gluten-free holiday dessert – look no further! This Gluten-Free Pumpkin Cheesecake is one of my favorite desserts of all-time – gluten-free or not.
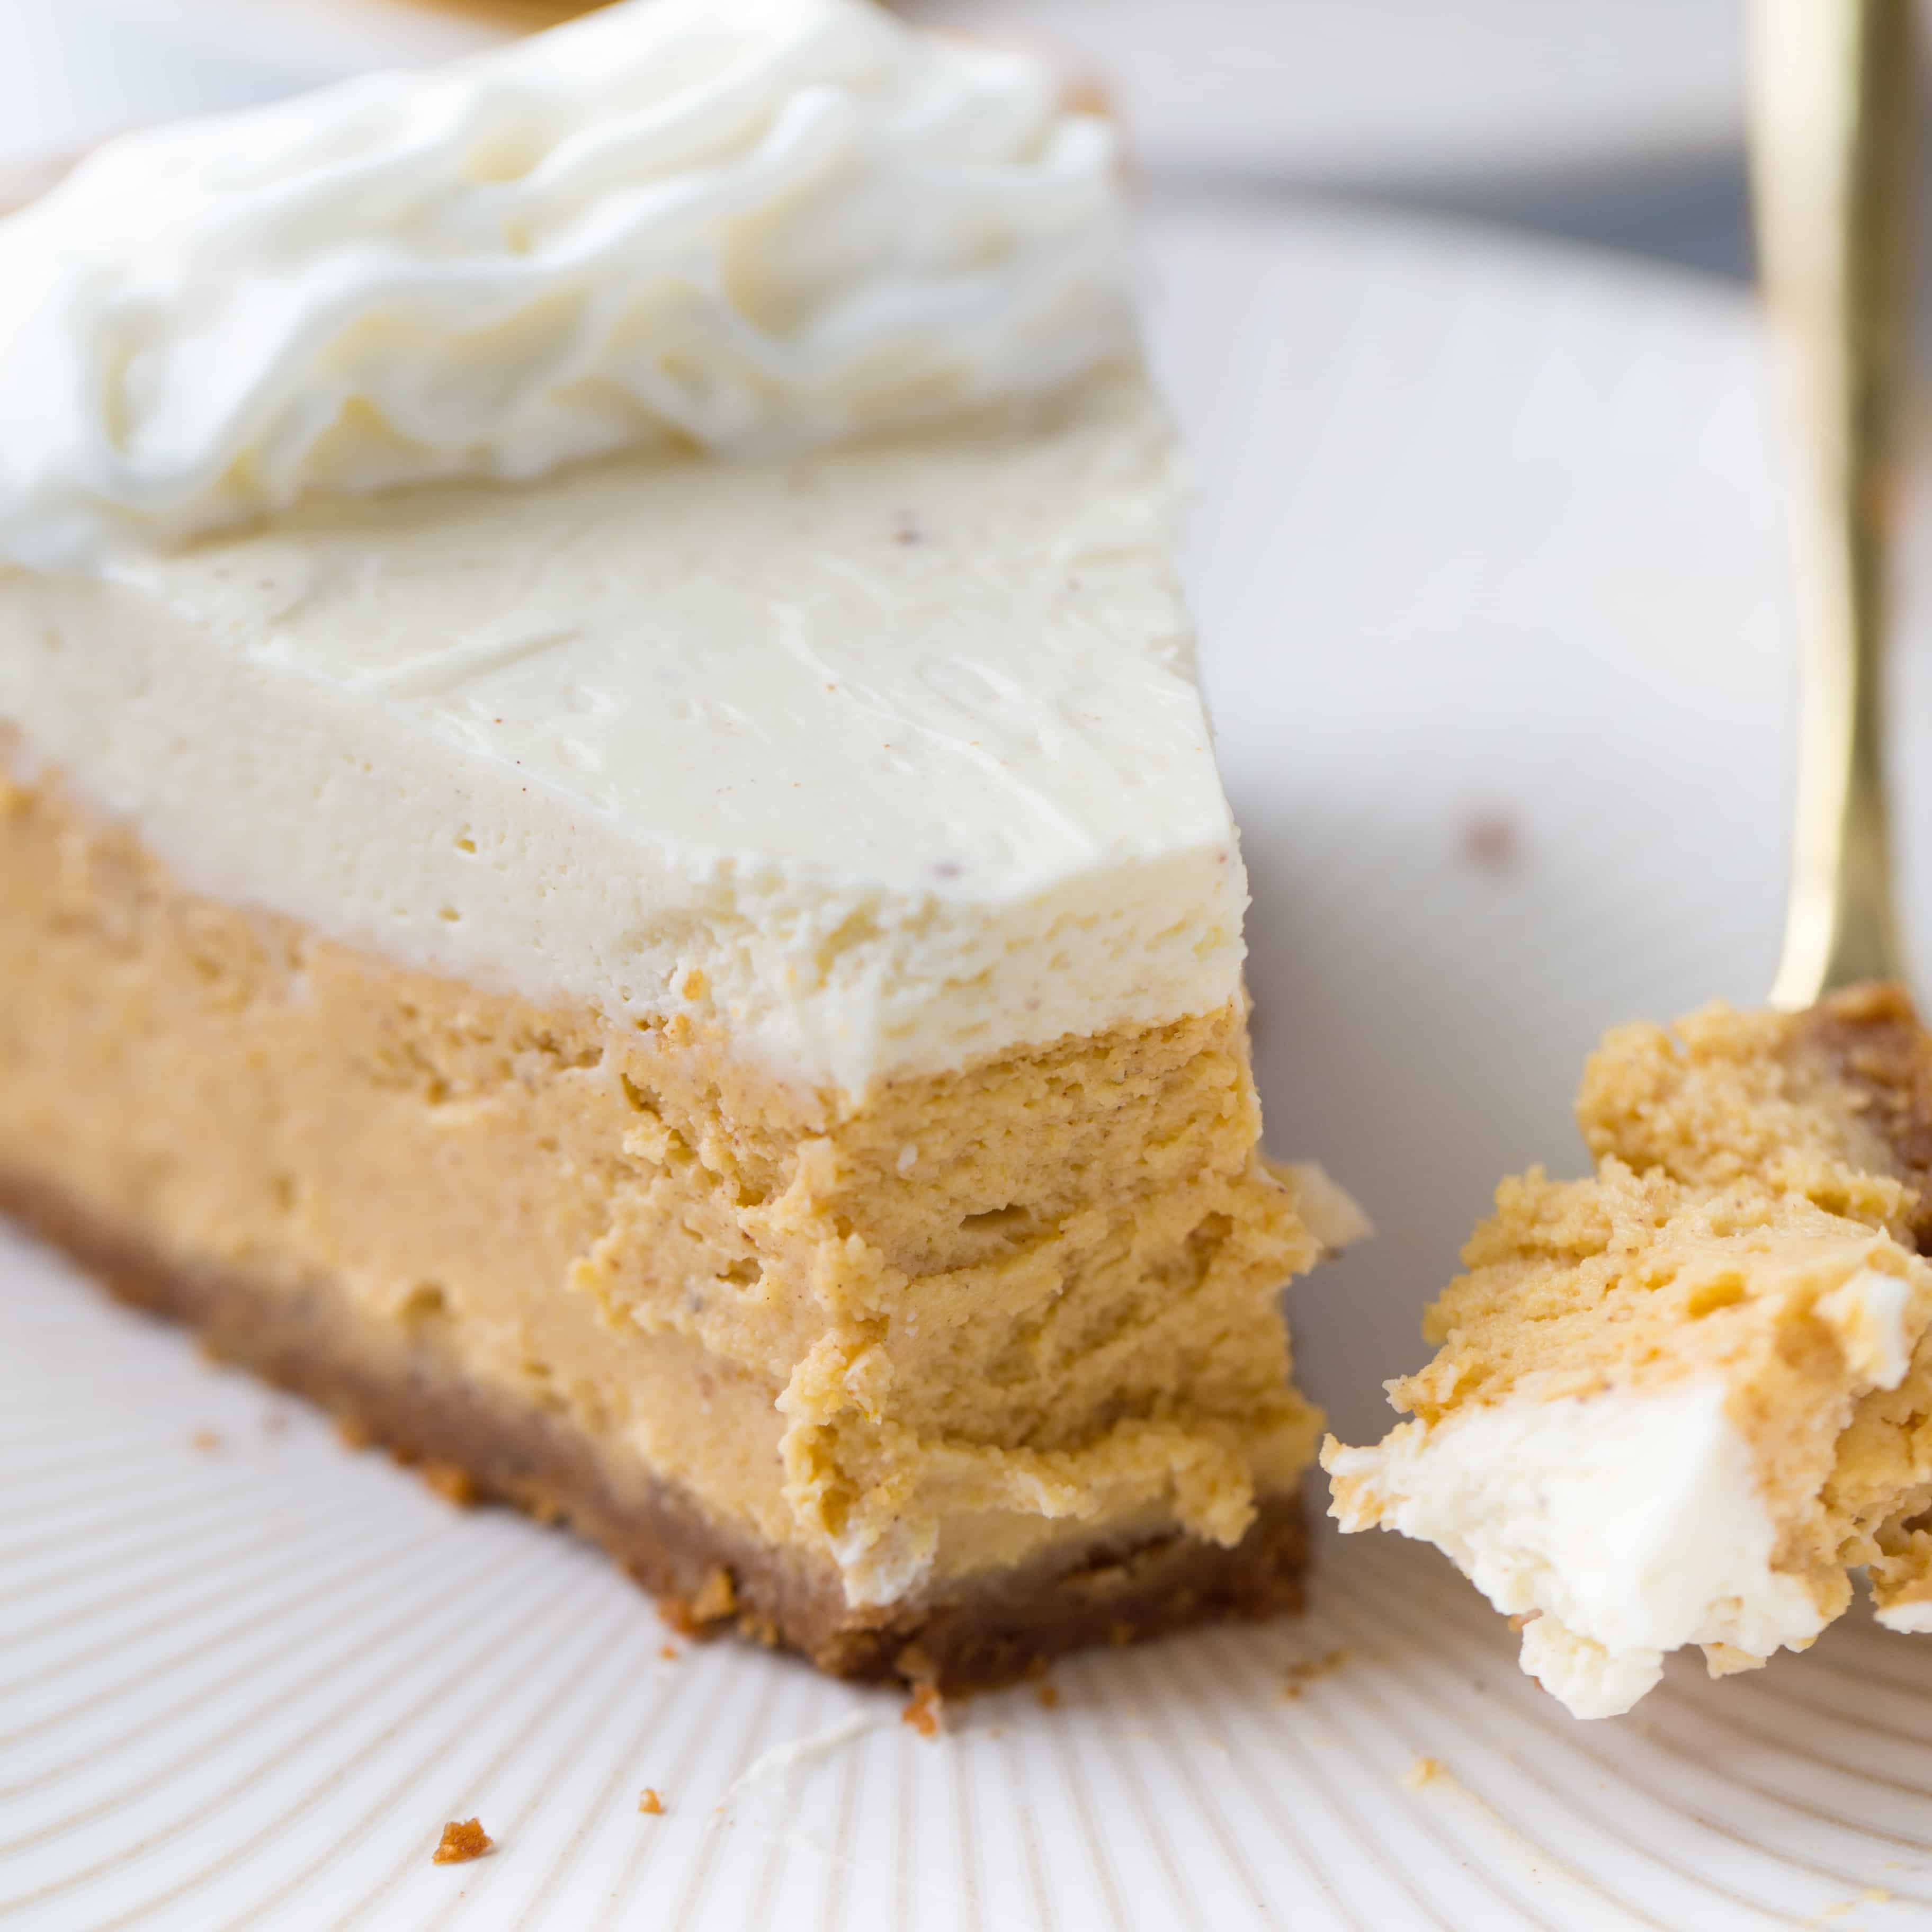
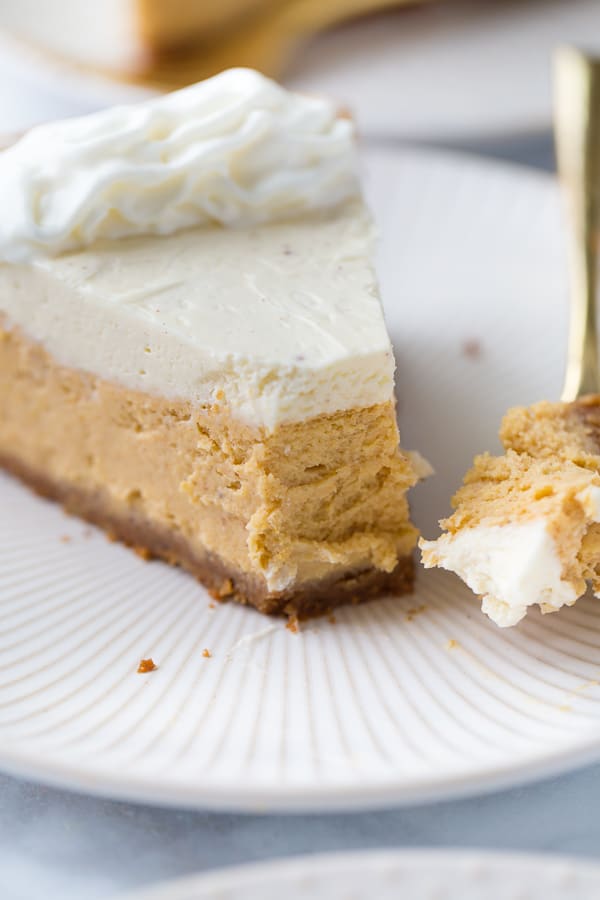
It is lightly spiced, creamy and totally luxurious.
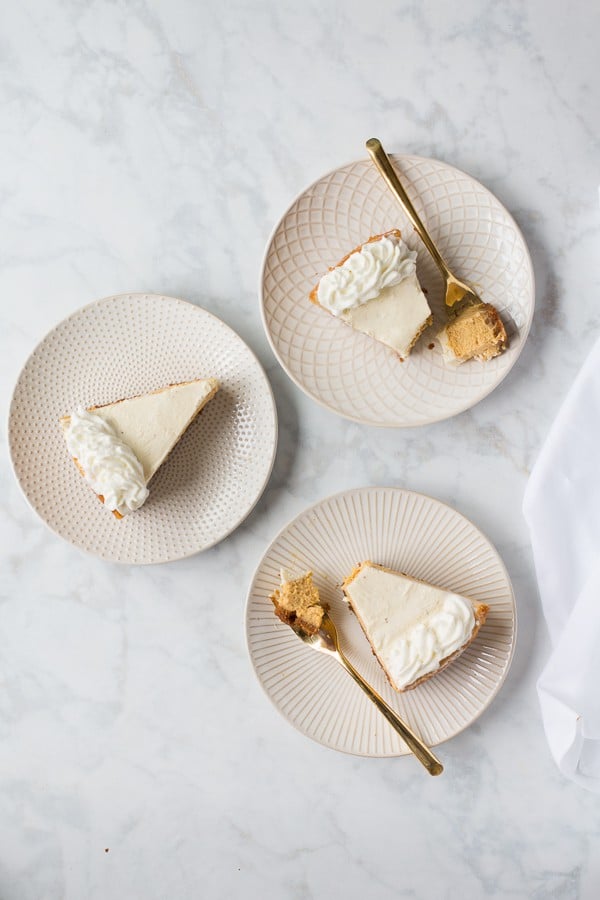
Whether or not it’s the holidays – I dream of this cheesecake year-round! It’s definitely swoon-worthy with it’s 3 layers of creamy goodness.
Ingredients for the Gluten-Free Graham Cracker Crust
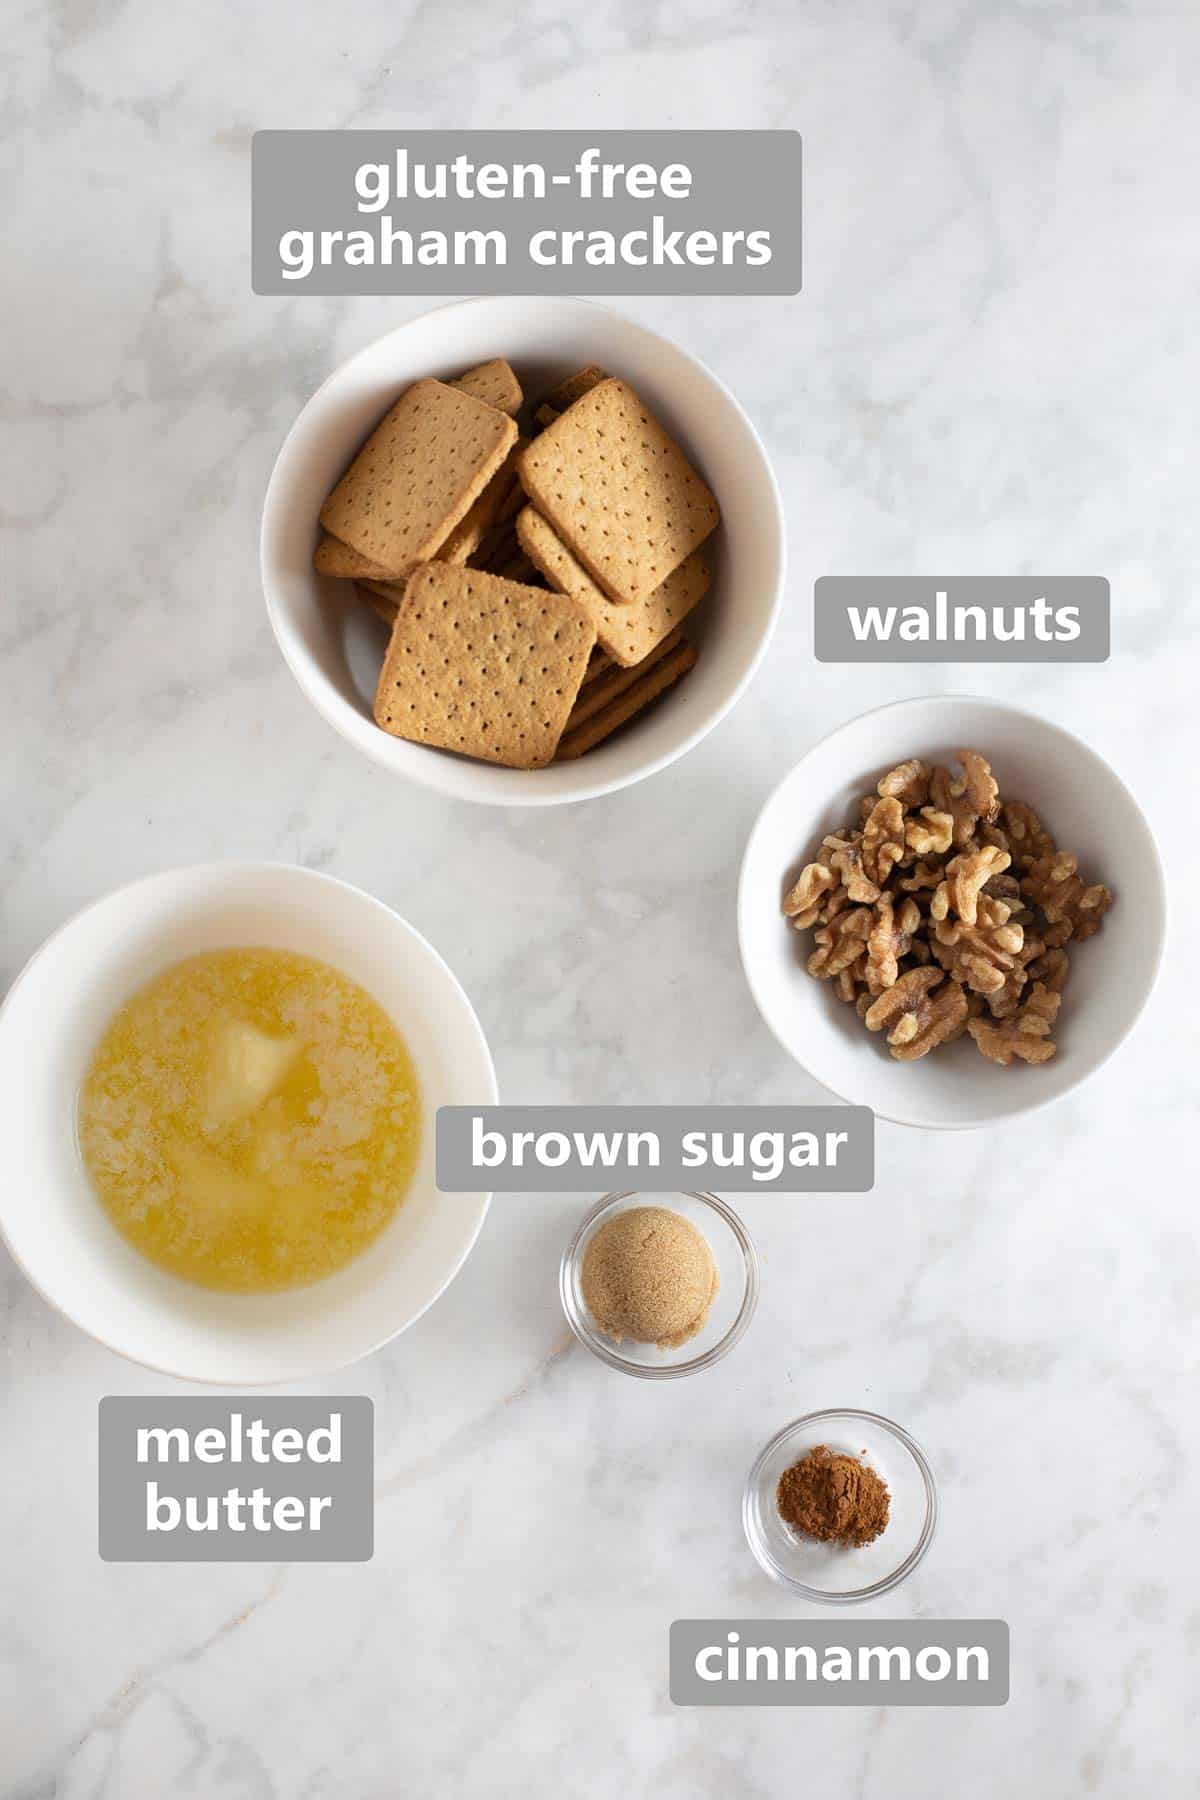
The first layer of this cheesecake is an easy, gluten-free graham cracker crust. I like to add walnuts to the crust for a delicious taste and to help the gluten-free cookies hold up.
Check out this post for a full review of the best brands of gluten-free graham crackers!
Make the Crust
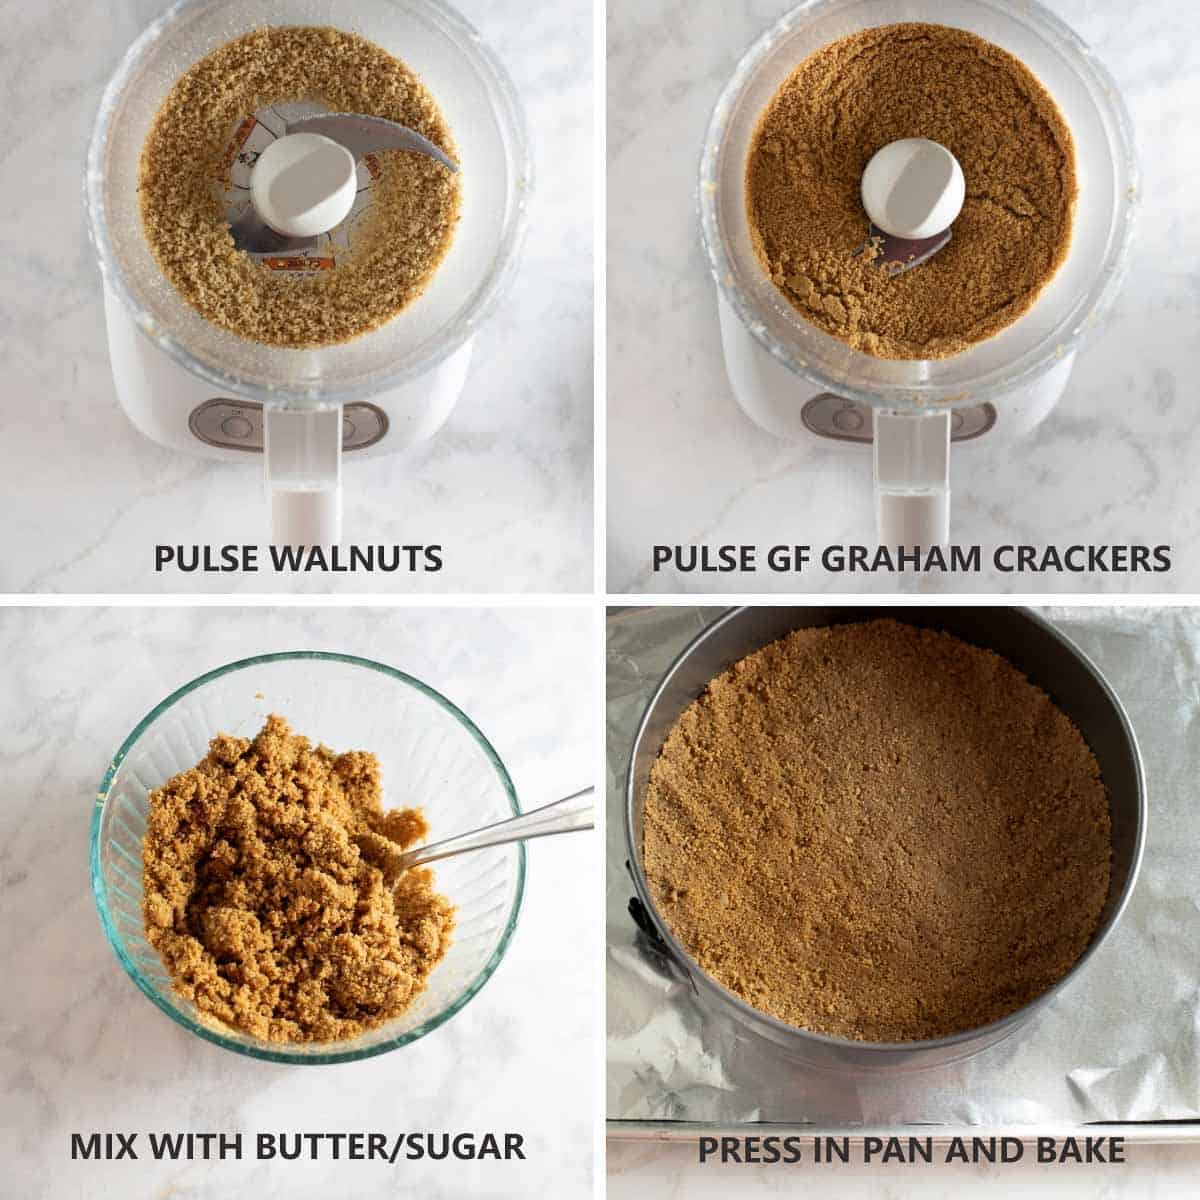
It works best to make this crust in the food processor. You’ll also need a springform pan to bake the cheesecake.
- First you pulse the walnuts then transfer them to a bowl.
- Then pulse the graham crackers and add to the bowl.
- Mix the walnuts and graham crackers with the melted butter, sugar and cinnamon.
- Then press into a pan and bake.
You also might like this recipe for pumpkin cheesecake dip.
Ingredients for the Pumpkin Cheesecake Filling
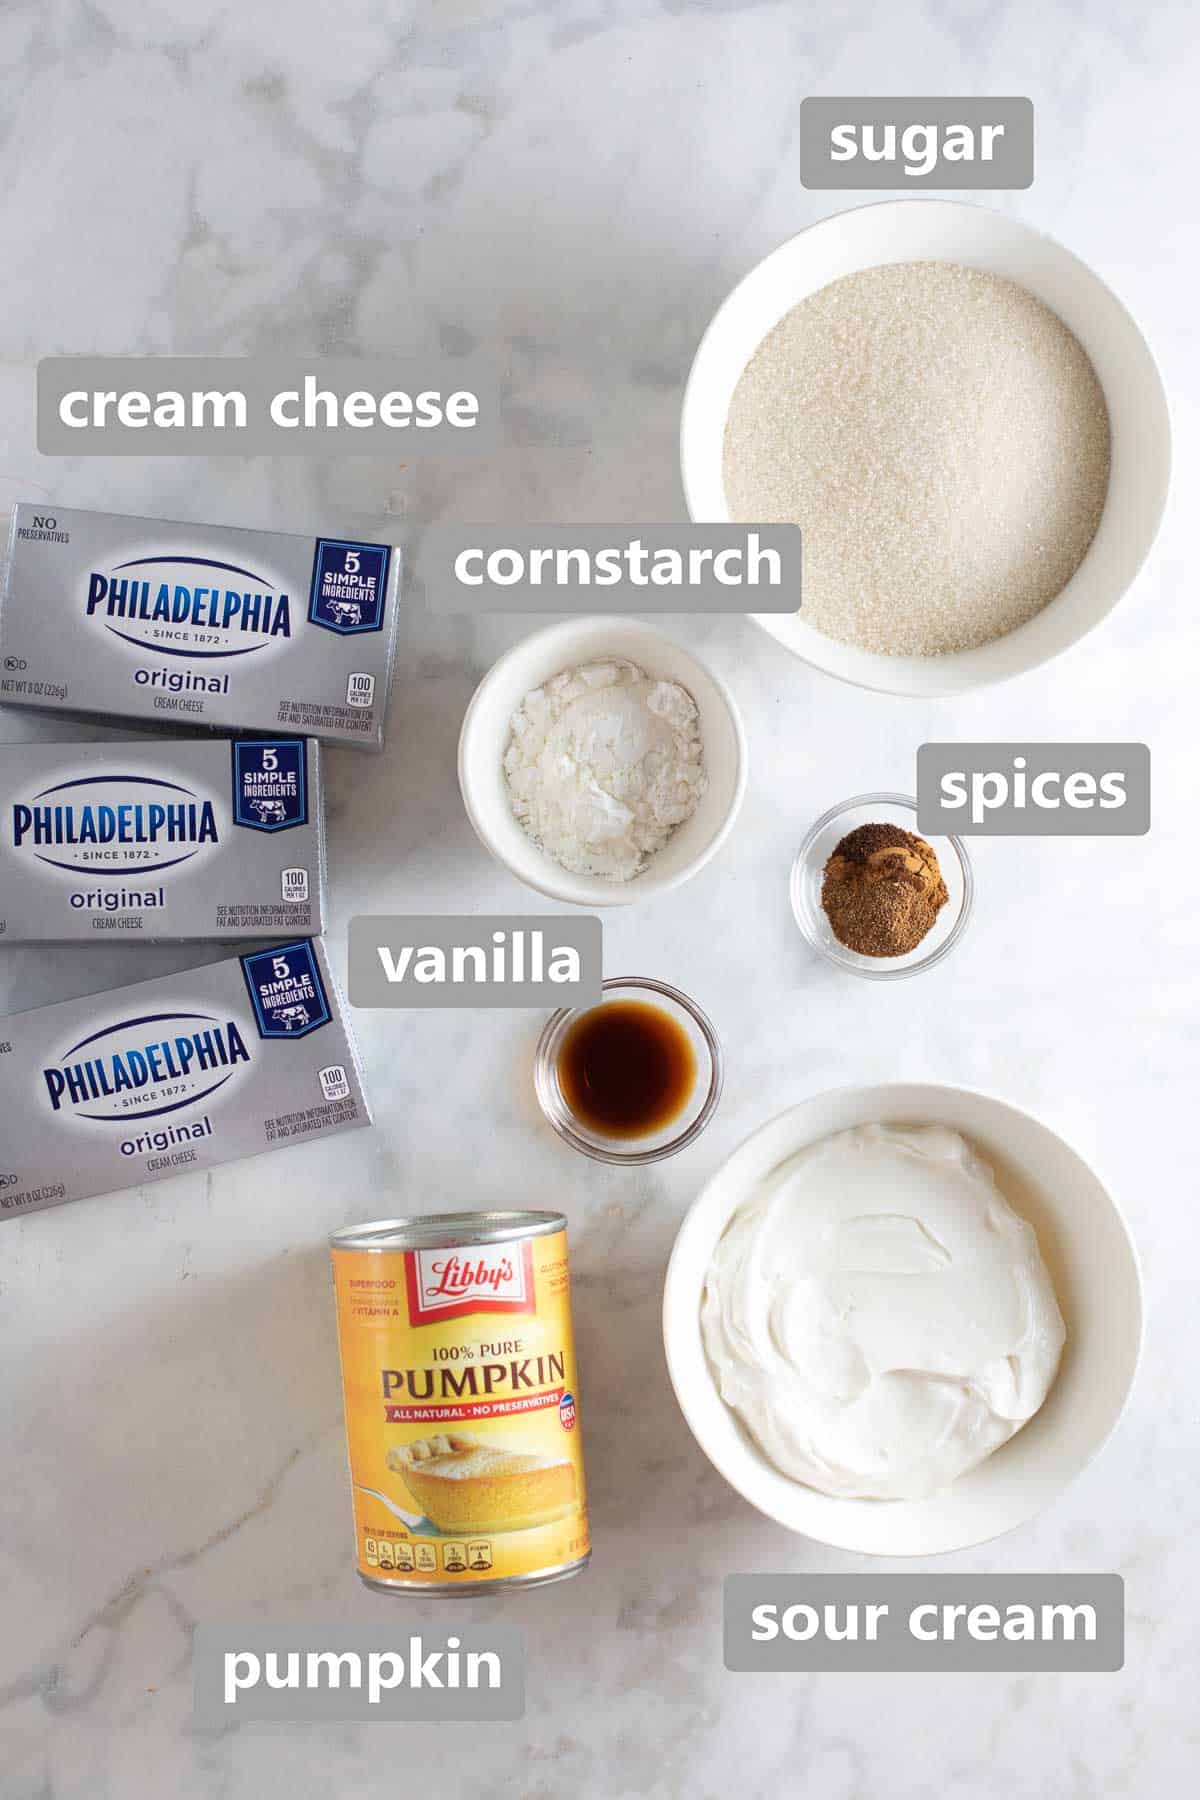
While the crust bakes and cools, you can get started on the pumpkin cheesecake filling.
This recipe is unique because it doesn’t need any eggs. A combination of pumpkin and cornstarch gives the cheesecake the structure it needs.
Tip: Be sure to set your cream cheese out in advance so it can come to room temperature. It needs to be fully softened for a smooth filling.
Make the Filling
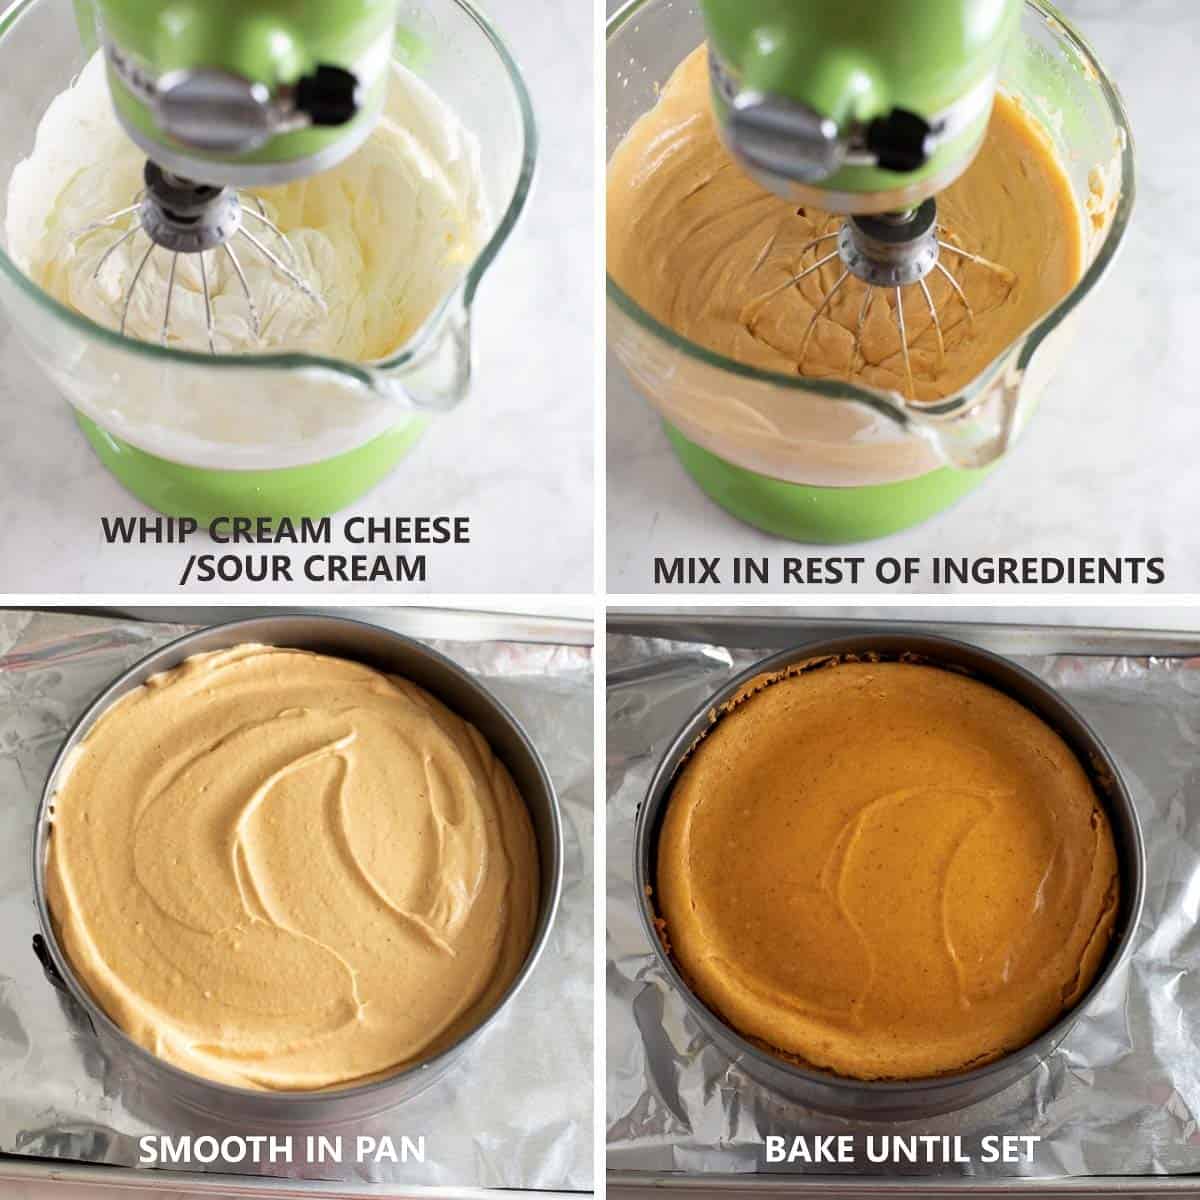
I prefer to use my stand mixer to make the filling, but a hand mixer will work too.
- Start by whipping together the cream cheese/sour cream.
- Then add the rest of the ingredients and continue to mix.
- Smooth the filling into the pan.
- Bake until the center is set.
You’ll know the cheesecake is done with it appears set and has a slight jiggle in the middle when you shake it.
Ingredients for the Whipped Cream Topping
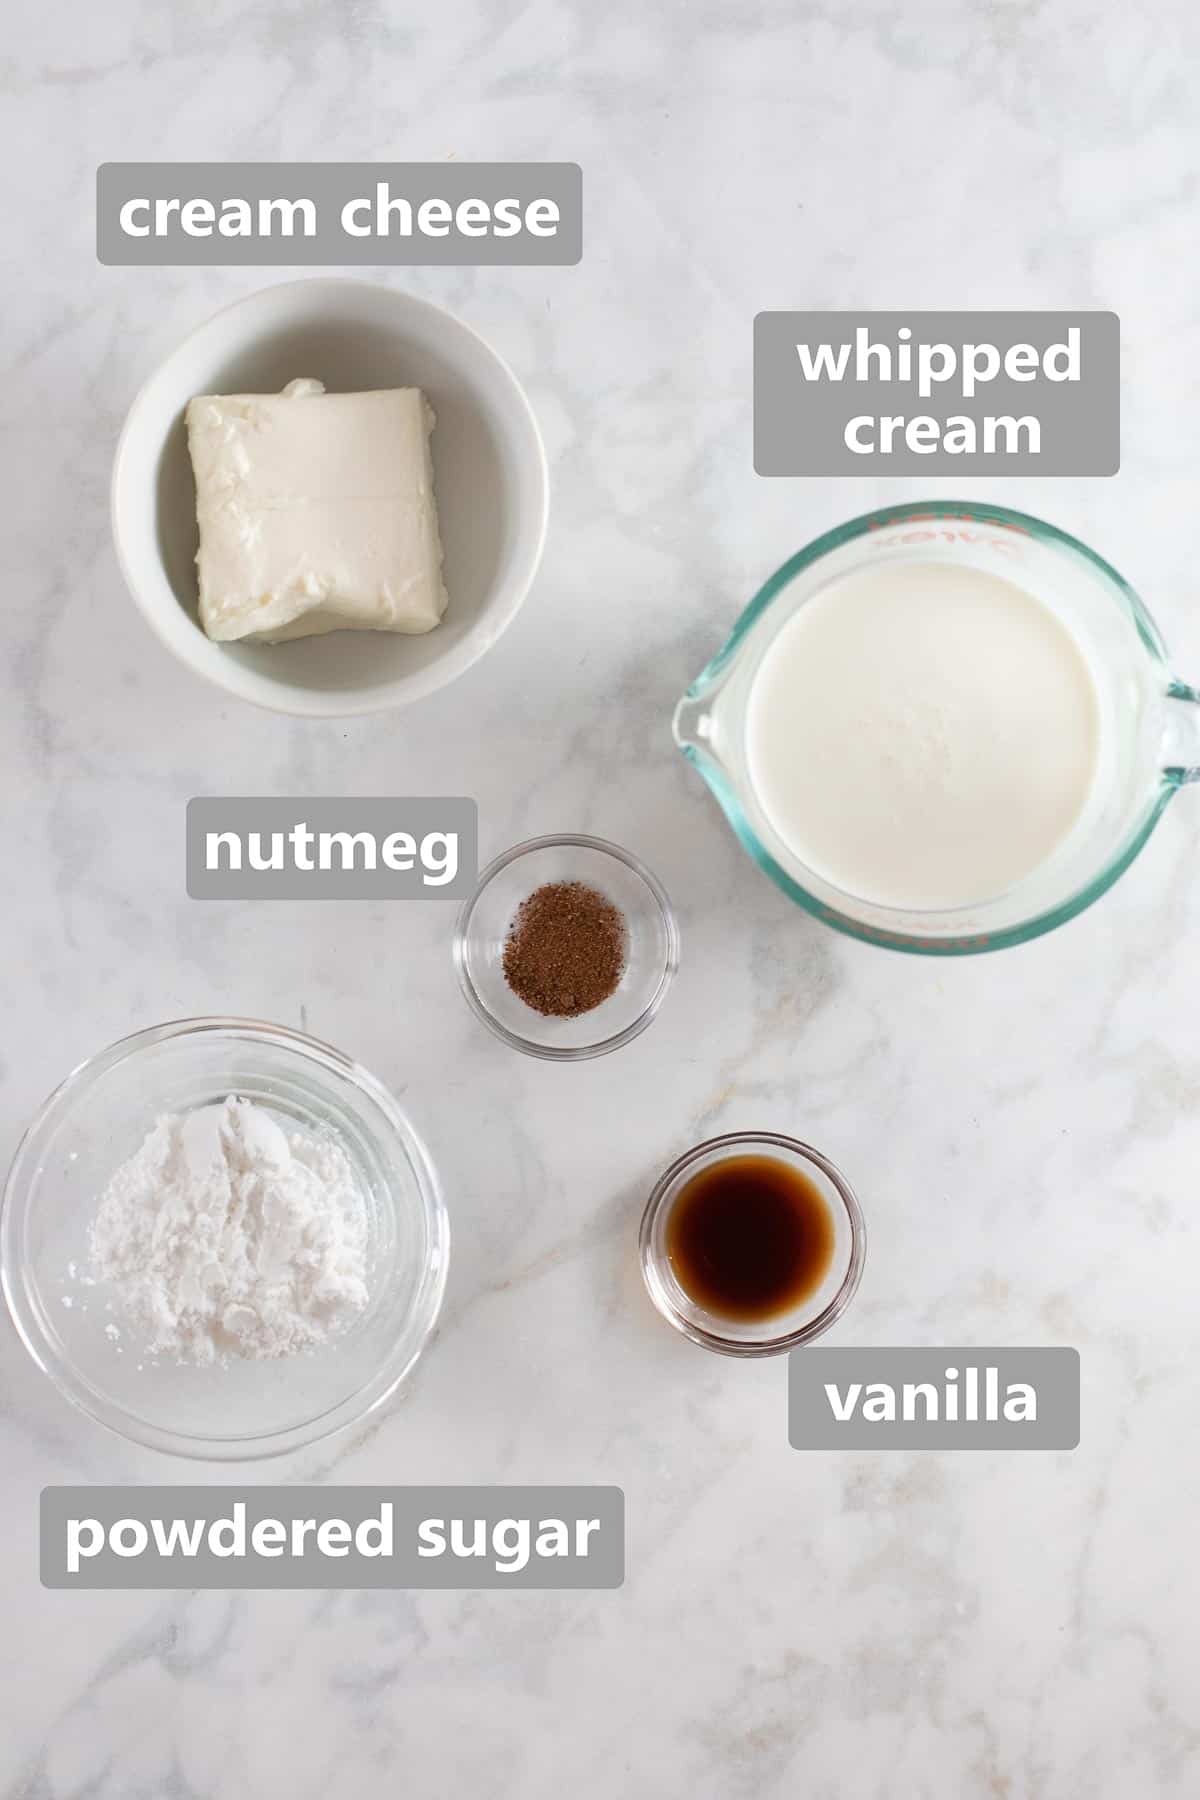
Once the cheesecake is fully cool you can add the last layer – a whipped cream topping!
This topping has a little cream cheese in it to stabilize the whipped cream. A little nutmeg also gives it delicious flavor!
Whip the Topping
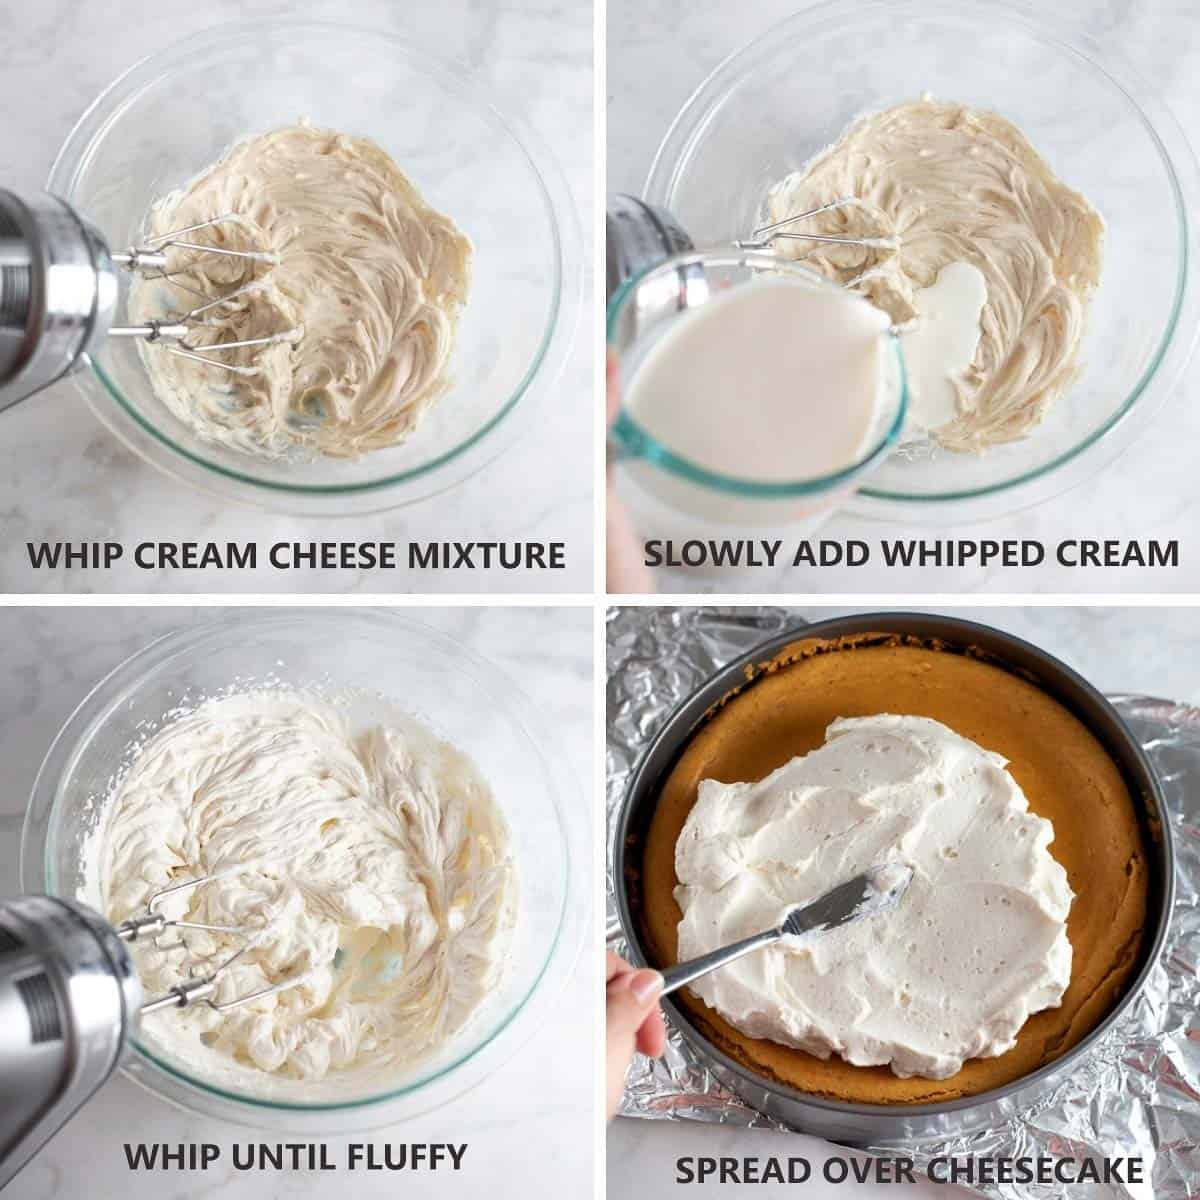
To make the whipped topping:
- Start by mixing together the cream cheese, powdered sugar, nutmeg and vanilla until smooth. Again you’ll want room temperature cream cheese here.
- Slowly add in the whipped cream while mixing.
- Whip until the mixture is light and fluffy.
- Then smooth the topping over the cooled cheesecake.
You also might like this vanilla bean gluten-free cheesecake!
I am always on the hunt for gluten-free baked goods and desserts that are delicious enough to feed a crowd – whether they eat gluten-free or not.
I brought this cheesecake to a big family get-together at my aunt’s house and everyone was amazed. My brother and cousins said it was the best cheesecake they’ve ever had. It is so delicious nobody will ever guess it’s gluten-free!
Unlike other cheesecakes this one is egg-free. Using pumpkin gives the cheesecake structure so eggs are not needed. So this is also perfect for guests with egg allergies!
You also might like this gluten-free oreo cheesecake.
Make Ahead Options
This Gluten-Free Pumpkin Cheesecake is a delicious option for a non-pie Thanksgiving dessert. It can be made a day in advance which is always a lifesaver on holidays.
Many gluten-free desserts can’t be made in advance (sorry Gluten-Free Banana Cream Pie – I still love you) which makes this recipe even more of a gem.
Tips for Perfect Gluten-Free Cheesecake
- Be sure all the ingredients are at room temperature before mixing the cheesecake together.
- Bake the cheesecake in a 10-inch springform pan.
- No peeking! Keep the oven closed while the cheesecake bakes.
- Cook until the cheesecake is set but still jiggly in the middle.
- After the cheesecake has been out of the oven for 10 minutes, cut around the edges of the pan so it can release as it cools.
- Cool the cheesecake completely at room temperature before transferring to the refrigerator.
- Refrigerate at least 4 hours and preferably overnight. It’s even better the second day!
More Thanksgiving Dessert Ideas: Try this Gluten-Free Apple Crisp, Pumpkin Rice Pudding or this Gluten-Free Pumpkin Pie.

Gluten-Free Pumpkin Cheesecake
Ingredients
For the Crust:
- 5-6 oz gluten-free graham crackers (I use Schar)
- 1/2 cup walnuts
- 1 tablespoon brown sugar
- 1/4 teaspoon cinnamon
- 6 tablespoons butter melted
For the Pumpkin Filling:
- 24 ounces cream cheese, softened
- 1 1/2 cups sour cream
- 3 tablespoons cornstarch
- 1 1/2 cups granulated sugar
- 1 teaspoon ground cinnamon
- 1/2 teaspoon ground nutmeg
- Pinch of ground cloves
- 1 teaspoon vanilla extract
- 15 ounce can pumpkin puree
For the Topping:
- 4 ounces cream cheese softened
- 1/4 teaspoon ground nutmeg
- 1/4 teaspoon vanilla
- 3 tablespoons powdered sugar
- 1 cup whipping cream
Instructions
For the Crust:
- Preheat the oven to 350F. In the bowl of a food processor, add the gluten-free graham crackers and walnuts. Process until the mixture resembles sand. Add the brown sugar and cinnamon and pulse to combine. Remove the food processor blade and stir in the melted butter. Press the crumbs into the bottom of a 10-inch springform pan. Place the springform pan on a foil-lined larger baking pan and bake for 6-8 minutes, until the crust is lightly golden and toasted. Let cool before adding filling.
For the Cheesecake:
- In the bowl of a hand or stand mixer, add the cream cheese and sour cream and whip until fully incorporated. (Be sure the cream cheese is softened!) Add the cornstarch, sugar, cinnamon, nutmeg and cloves and mix until evenly combined. Mix in the vanilla and pumpkin until fully incorporated.
- Pour the filling over the cooled crust. Smooth the top and return the oven (keep the pan on the foil-lined baking sheet). Bake at 350F for 45-60 minutes until the edges are set and the center jiggles just slightly. Let the cheesecake cool completely to room temperature.
For the Topping:
- In the bowl of a hand or stand mixer, combine the cream cheese, nutmeg, vanilla, and powdered sugar. Mix until smooth and combined. While mixing on low, slowly add the whipping cream over 1-2 minutes. Increase the speed and whip until fluffy. Spread evenly over the cooled cheesecake.
- Refrigerate for at least 2-3 hours or up to a day. Garnish with a light dusting of freshly grated nutmeg, if desired.
Notes
- Be sure all the ingredients are at room temperature before mixing the cheesecake together.
- Bake the cheesecake in a 10-inch springform pan.
- No peeking! Keep the oven closed while the cheesecake bakes.
- Cook until the cheesecake is set but still jiggly in the middle.
- After the cheesecake has been out of the oven for 10 minutes, cut around the edges of the pan so it can release as it cools.
- Cool the cheesecake completely at room temperature before transferring to the refrigerator.
- Refrigerate at least 4 hours and preferably overnight. It’s even better the second day!
Nutrition
Post was originally published in November 2017. It was updated with new photos and more details in October 2020.


Can I sub in raspberry preserves for pumpkin puree? I made this recipe for Thanksgiving as is and it was incredible! Now my family wants the same version but with raspberries instead of pumpkin. Again, incredible recipe!!!! Made a perfect cheesecake!
Hi Dana, we haven’t tried that! It may throw off the texture, since pumpkin has a lot more moisture. We recommend looking for a raspberry-specific cheesecake recipe instead to be safe! But so glad you loved it!
I made this for a Thanksgiving potluck at the VFW. I was sitting by the food table and notice a couple of pieces were taken. Then someone stands up and says “Who made the pumpkin cheesecake?” I stood up and said, “Me.” The proceeded to rave about the cheesecake and said it was the best they ever had. People came up and asked for the recipe. My serving plate was clean shortly thereafter. It was awesome bringing something everyone love so much! Thank you!
Hi Cheril, thanks so much for taking the time to share! We love hearing stories like this and so glad you all enjoyed it!
Thank you!! This recipe is AMAZING! I made it for Thanksgiving dessert and it did not disappoint. Even the gluten eaters loved it and didn’t catch on until they realized everyone was eating it! I have already been asked to make this again!! I love this site and I love that I’m able to make delicious homemade food that everyone in my family can enjoy!!
Hi Michelle, we’re so happy to hear this was a crowd-pleaser! Thanks so much for the review!
This cheesecake is so light and flavorful! I would ABSOLUTELY recommend this recipe! I made a few modifications to the pie and whipped topping:
Pie: swapped 1/3 C brown sugar for the granulated sugar, added 2 TBSP pumpkin pie spice instead of the cinnamon, nutmeg blend, added 1 tsp of maple extract.
Whipped topping: doubled the ingredients, added 1 tsp pumpkin pie spice, a few drops of maple extract
Hi Becky, thanks so much for your review! Your modifications sound delicious-love that idea for the whipped topping!
I attempted to make this. I baked it in the spring form pan for almost 90 minutes. Let it sit for a little over an hour. And then when I opened the pan, the entire thing fell apart. I salvaged what I could, put it into a baking dish and cooked in the oven for another 15 minutes. The texture is still a bit runny. I reread all of the ingredients and I followed to a tee. What happened? Can I still eat it? It tastes good and set more once in the fridge. No eggs so I would assume safe? Sad it didn’t turn out.
Hi Kelsie, so sorry this didn’t turn out as expected! The cheesecake needs a minimum of 4 hours in the fridge to fully set up, so the pan shouldn’t be opened before then. The notes of the recipe have lots of helpful tips to ensure proper cooling/setup, such as cutting around the edges of the pan after 10 minutes to release the cake, then chilling in the fridge. The good news is that it’s safe to eat, even if it didn’t set up completely. Glad it tastes good either way!
Is the topping a true whipped cream? I’ve followed the instructions twice now and neither batch turned into whipped cream, just a runny mess? Do the cream cheese and the cream both need to be cold when mixing? Mine were at room temperature and wondering if that contributed to the fails?
Hi Emily, yes, it’s important for them to be cold to whip up properly!
Does the cheesecake need to be covered when refrigerated overnight? Thanks!
Hi Jenna, yes! We recommend covering it loosely with plastic wrap or foil, or you can put leftover slices in an airtight container.
I made the crust and baked it for 8 minutes and it’s still really sticky and wet. It doesn’t look toasted at all. Is this how it’s supposed to be?
Hi! Can you freeze it with the whipped cream cheese layer on top or should you wait until it is thawed and ready to serve?
Thanks!
Hi Jen, good question! We recommend waiting to add the whipped cream topping until after thawing. The whipped cream layer doesn’t freeze well, so you can freeze the baked pumpkin-cream cheese layer, then thaw in the fridge and add the topping just before serving.