


Erin’s Recipe Rundown

Texture: Light, fluffy sponge with creamy filling and crisp white chocolate coating.
Taste: Sweet vanilla covered in white chocolate.
Ease: Easy and fun to make!
Top Tip: Plan time to freeze the cakes overnight (or at least 8 hours) before dipping them in the white chocolate coating for the cutest little trees!
Recommended GF Flour: This recipe calls for King Arthur Gluten-Free Yellow Cake Mix for easier prep. You could also use a double batch of my Best Gluten Free Vanilla Cake which turns out best using Bob’s Red Mill 1:1 Baking Flour.
Would I make these again? Yes! These are so fun to make and they turn out absolutely adorable! It can be hard when all the store-bought treats are rolling out their holidays specials, but with this gluten-free copycat recipe I don’t feel like I’m missing out on anything.
xoxo erin

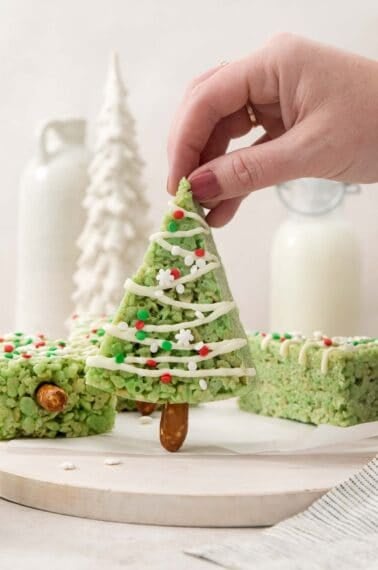
I don’t know about you, but one of the hardest things about being gluten-free is having to pass on classic store-bought treats, especially when the holiday versions hit store shelves. Thankfully, it’s easy to recreate the magic of Little Debbie Christmas Tree Cakes without the gluten using this copycat recipe!
With the softest cake and fluffiest filling, these little cakes look and taste like the real deal! Take them to holiday parties, serve them as a fun Christmas snack, or get the kids involved in a family baking night and make these fun treats together — everyone will love them!
Featured Comment
From Laura: “Made them for my two daughters and they turned out great! Wish it would post my picture!”
Table of Contents
- Erin’s Recipe Rundown
- Ingredients You’ll Need
- How to Make Gluten-Free Little Debbie Christmas Trees
- Make-Ahead/Storage/Freezing Instructions
- What should I do if I don’t have a tree cookie cutter?
- What can I do with the cake scraps after I cut out all of the trees?
- Why did my white chocolate coating crack?
- Can I add different flavors to the filling instead of vanilla?
- More Gluten-Free Holiday Desserts
- Gluten-Free Little Debbie Christmas Trees Recipe
Ingredients You’ll Need
Here are a few notes on some of the key ingredients to make these gluten-free Little Debbie Christmas trees. See the recipe card below for exact measurements.

- Gluten-free yellow cake mix: Using boxed cake mix is a great shortcut for this recipe but you could also use a double batch of my Best Gluten Free Vanilla Cake if you’d like.
- Heavy cream: Using very cold heavy cream is important for light and fluffy whipped cream that’s perfect for the filling. It’s key to achieving the stiff peaks!
- Powdered sugar: The powdered sugar sweetens the whipped cream and dissolves easily so you end up with a nice, smooth texture. It also helps stabilize the filling.
- EZ gel: It’s a modified cornstarch thickener that helps stabilize the whipped cream so it doesn’t deflate. It makes the whipped cream smooth and thick so that it will stay put between the two layers of cake.
- Instant vanilla pudding: The pudding mix also helps stabilize the whipped cream and adds a little extra vanilla flavor. You can use a brand like Jell-O which has no gluten containing ingredients or Simple Mixes which is labeled gluten-free.
- White chocolate melts: I like to use these white chocolate melts that have no gluten containing ingredients. Once the white chocolate cools it will form a thin, crisp coating around the cakes.
- Decorations: I use Americolor Red Gel Food Coloring to dye a little bit of the white chocolate red for the ribbon that will go across the trees (but any red food coloring will work). I also like to use red, white, and green nonpareils. Feel free to use any festive sprinkles you like!
How to Make Gluten-Free Little Debbie Christmas Trees
Here’s an overview of how to make these Christmas tree cakes. You can jump to the recipe for the full instructions!

- Make the cake: Line a large, rimmed half-sheet pan with parchment paper and spray with cooking spray. Make the cake according to the instructions on the box (I mix both boxes in one very large bowl all at once). Spread evenly in the pan and bake at 350°F until a toothpick comes out clean (30-35 minutes). Allow to cool completely.
- Cut the trees: Dust the work surface with powdered sugar, then turn the cake out onto it. Remove the parchment paper and dust the top of the cake with powdered sugar. I like to use a 4″ tree cookie cutter to cut out all the trees (about 15 trees).

- Use a serrated bread knife: Cut the trees in half horizontally, place them on the lined baking sheet, and chill them in the fridge while you make the filling.
- In the bowl of a stand mixer: Use a whisk attachment and combine the heavy cream, powdered sugar, EZ Gel, vanilla pudding mix, and vanilla extract. Bump the mixer up to high and beat the whipped cream until it forms stiff peaks (about 2 minutes). Scoop the filling into a large piping bag fitted with a round tip.

- Using a piping bag: Add the filling to the bottom halves of the trees. Make sure you go all the way to the edges.
- Add tops, wrap, and freeze: Place the top halves of the trees on top of the filling and press down very gently so that they stick. I like to use an offset spatula to smooth any spots where filling spilled out of the sides. Wrap the pan tightly with plastic wrap, then freeze it overnight (or at least 8 hours).

- In a heat-safe bowl: Add the white chocolate melts and place it over a pot of barely simmering water (don’t let the bottom of the bowl touch the water). Stir the chocolate often until it’s all melted, then remove it from the heat. Set aside 1/4 cup of chocolate in a small bowl. Dip one frozen tree at a time in the main bowl of chocolate. Let excess drip back into the bowl and use an offset spatula to smooth the tops/sides. Place the trees on a lined baking sheet and add sprinkles while the coating is still wet. Repeat with all trees.
- With the reserved chocolate: Add 2 drops of red food coloring to the 1/4 cup of white chocolate that had been set aside. If it cooled too much, microwave the chocolate in 15 second intervals until it’s all melted again. Keep adding food coloring until it gets to the level of red you want. Put it in a piping bag and pipe zig-zags across the trees. Chill trees in fridge until the white chocolate coating has completely set. Enjoy!
Make-Ahead/Storage/Freezing Instructions
To Make-Ahead: The filling can be made up to 1 day ahead and stored in an airtight container in the fridge. The Christmas trees (cake and filling) can be frozen without coating or decorations for up to 2 weeks. Make sure you coat and decorate the trees with enough time for the coating to then set in the fridge before serving.
To Store: The decorated trees can be stored in an airtight container in the fridge for up to 5 days. Separate layers with parchment or wax paper to avoid sticking.
To Freeze: The decorated trees can be frozen in an airtight container for up to 1 month. Thaw in the fridge overnight before serving.
What should I do if I don’t have a tree cookie cutter?
You can use any shaped cookie cutter you like — they’ll taste the same! You can also freehand cut trees if you really want to stick with the classic Christmas tree look without investing in a new cookie cutter.
What can I do with the cake scraps after I cut out all of the trees?
Try to get as many trees as you can out of the cake. You can then use scraps to make cake pops, crumble them over ice cream, or just snack on the scraps while you decorate the Christmas tree cakes!
Why did my white chocolate coating crack?
This can happen if the chocolate layer is too thick. After you dip the trees in the white chocolate, let the excess coating drip off the cakes and smooth with an offset spatula.
Can I add different flavors to the filling instead of vanilla?
Yes, you can use extracts like peppermint, almond, coconut, etc. Just keep in mind that those extracts tend to be stronger than vanilla extract. Slowly add them in to get the right flavor intensity.

More Gluten-Free Holiday Desserts

Gluten-Free Little Debbie Christmas Trees
Ingredients
- 2 boxes King Arthur Gluten Free Yellow Cake Mix plus ingredients listed on the box
- 2 cups (480ml) very cold heavy cream
- ½ cup (60g) powdered sugar plus more for dusting
- 1 tablespoon EZ Gel
- 1 tablespoon instant vanilla pudding mix
- 2 teaspoons pure vanilla extract
- 2 pounds (907g) white chocolate melts
- Red food coloring
- Festive sprinkles
Instructions
- Preheat the oven to 350F. Line a large rimmed half-sheet pan with parchment paper and spray it generously with nonstick cooking spray.
- Prepare the cake mix according to the instructions on the box (you can prepare them both at the same time in a very large bowl). Spread the cake batter evenly into the prepared pan and bake for 30-35 minutes, or until a cake tester comes out clean. Allow the cake to cool completely before cutting.
- Dust your work surface with powdered sugar and then turn the cake out onto it. Remove the parchment and dust the top of the cake with powdered sugar as well. This will help prevent it from sticking.
- Using a 4” tree cookie cutter, cut out as many trees as you can– you should be able to get about 15.
- Next, use a serrated bread knife to cut the trees in half horizontally. Place the trees on a lined baking sheet and set them in the fridge to chill while you prepare the filling.
- In the bowl of a stand mixer fitted with the whisk attachment, combine the heavy cream, powdered sugar, EZ Gel, vanilla pudding mix, and vanilla extract. Once combined, turn the mixer to high speed and beat until stiff peaks form– about 2 minutes.
- Transfer the filling to a large piping bag fitted with a round tip.
- Pipe the filling onto the bottom of one of the trees, making sure to go all the way to the edges. Place the top of the tree on the filling and press down very gently to adhere the top tree to the filling. Use an offset spatula to smooth anywhere that the filling has oozed out the sides.
- Wrap the pan tightly with plastic wrap and place it in the freezer overnight, or at least 8 hours.
- When the trees are frozen solid, add the white chocolate melts to a heatsafe bowl and put it over a pot of barely simmering water (making sure the bottom of the bowl is not touching the water). Stir often, just until the white chocolate has melted. Then remove the bowl from the heat.
- Remove ¼ cup of melted white chocolate and set it aside in a small bowl (this will be for decorating the cakes later).
- Working one at a time, dip a frozen christmas tree into the white chocolate. Allow any excess white chocolate to drip back into the bowl (an offset spatula is helpful for smoothing the top and sides of the trees) and then place the tree on a lined baking sheet. Garnish with festive sprinkles while the chocolate is still wet. Then repeat with the remaining Christmas trees.
- Add 2 drops of red food coloring to the reserved white chocolate (if it cools too much, just microwave it in 15 second intervals until it is melted again). Keep adding additional drops of red food coloring until you achieve your desired color. Transfer the red chocolate to a piping bag and pipe zig-zags across the trees.
- Place the trees back in the fridge and allow the chocolate to set completely before enjoying.


Wow…these are amazing! I make the cake with King Arthur funfetti cake since that’s all I had, and I added another tablespoon (maybe a little more) of jello instead of the EZgell and they turned out amazing! I also coated some in vanilla almond bark instead of all white chocolate. They are so cute and everyone loved them!
These are very good. We’ll make them again and try for a thinner cake as ours was nice and fluffy but made the trees about 3” when they were finished. We used an extra Tbsp of pudding mix instead of the EZ gel and it worked out great. Any thoughts on how you can coat them without it making such a hard shell?
Hi there, good question! You could try thinning the white chocolate melts with a bit of coconut oil for a softer shell. Or use white chocolate bars instead of melts, adding in coconut oil.
to be clear, you want two mixes, mixed together, and baked together on one sheet pan?
Hi Chelsea, Smart to double-check—yes, that’s correct!
Excited to try these! Do you bake both cake mixes together in the same pan? Thanks!
Hi Jeanne, yes! You can make the two boxes of King Arthur Gluten Free Yellow Cake Mix at the same time in a very large bowl, as the recipe mentions in step 2. Hope you enjoy them!
Can you use king author instant clear jel instead of ex jel? Are they the same? Thx
Hi Kathy, good question! Yes, they’re interchangeable, both used as a gluten-free thickener. So that will work great!
Is there a substitute for ez gel that doesnt cost $10 or more?
Hi Amy, EZ gel gives the most stable, thick whipped cream consistency. We can’t guarantee the results, but you could try using cornstarch if it’s something you have on hand!
Thank you. I cant find either ez gel or king arthur instant gel. Do you think gelatin would work? If so how much would you recommend using? If not I’ll try cornstarch. How much cornstarch would you recommend? Sorry for all the questions
How would you make the filling into chocolate to make the chocolate version of these? I would love to make both flavors!
Hi Melissa, we haven’t tested a chocolate version. Typically to make vanilla recipes into chocolate it requires a few more adjustments beyond adding cocoa powder to get the right taste and texture. If you decide to give it a try, we’d love to hear how it goes!
Erin, is there a good way to make the filling dairy free? My hubs has an allergy. Would dairy free whipping cream work you think?
Hi Molly, thank you for your question! We haven’t tested dairy-free subs with this one to say for sure. DF heavy whipping cream may work. You’d also want to double-check that the vanilla pudding mix and white chocolate melts you use are DF as well. If you decide to give it a try, we’d love to hear how it goes!
Made them for my two daughters and they turned out great! Wish it would post my picture!
Yay! We’re so glad you all enjoyed the recipe! Thank you for sharing with us, Laura!
I finished making these today. The taste is fabulous! My only issue was getting the coating on in a thin layer, even with trying to scrape off the excess. Thanks for creating this recipe!
We’re so glad you loved it, LeeAnn! Thank you for sharing your experience with us!
Is the EX Gel a necessary stabilizer? Could it be omitted completely if the finished cakes are kept refrigerated? Curious if anyone else has tried it this way, I am going to try with gelatin & will report back with results
Hi Courtney, the recipe need a stabilizer, but we haven’t tested other options since the EZ gel works really well in this recipe. If you try it with the gelatin, we’d love to hear how it goes!
I tried this with unflavored gelatin (2t warmed after blooming & drizzled into whipped cream mixture before soft peaks started to form) and it worked great! This is truly a labor of love kind of recipe but it’s a delicious one!!
Hey! How much water and gelatin did you use? I can’t find ez gel and want to go for the gelatin substitute!
You have a link to your own cake mix. If using that recipe does it also need to he doubled?
Hi Marissa, good question! Yes, you’ll want to double the recipe for the homemade cake!
What size pan in inches/cm is needed to bake the cake?
Hi Gail, this recipe calls for a half sheet which is 18 x 13 inches (45.7 x 33 centimeters). We hope you enjoy the recipe!
I’m looking forward to making these. Is there a substitute for EZ Gel?
Hi Jami, we haven’t tested other stabilizers as the EZ gel works well in this recipe. If you decide to give another product a try, we’d love to hear how it goes!
Is there an alternative to the EZ Gel? Meringue powder? Gelatin maybe?
Hi Leslie, we haven’t tested those out to say for sure. Those two suggestions are worth a try, just keep in mind meringue powder can cause it to stiffen up more than the other products. If you decide to give it a try, we’d love to hear how it goes!
I tried this with unflavored gelatin & it worked great!
Hi Courtney,
How much gelatin did you use?
Courtney we need your secret!!! haha
Could you use cornstarch or arrowroot instead of the EZ gel?
Hi Jenn, yes you can try that! Just use about the same amount and be sure to whip the cream very cold. It may be a touch softer, so freeze the trees right away to help them hold their shape.