
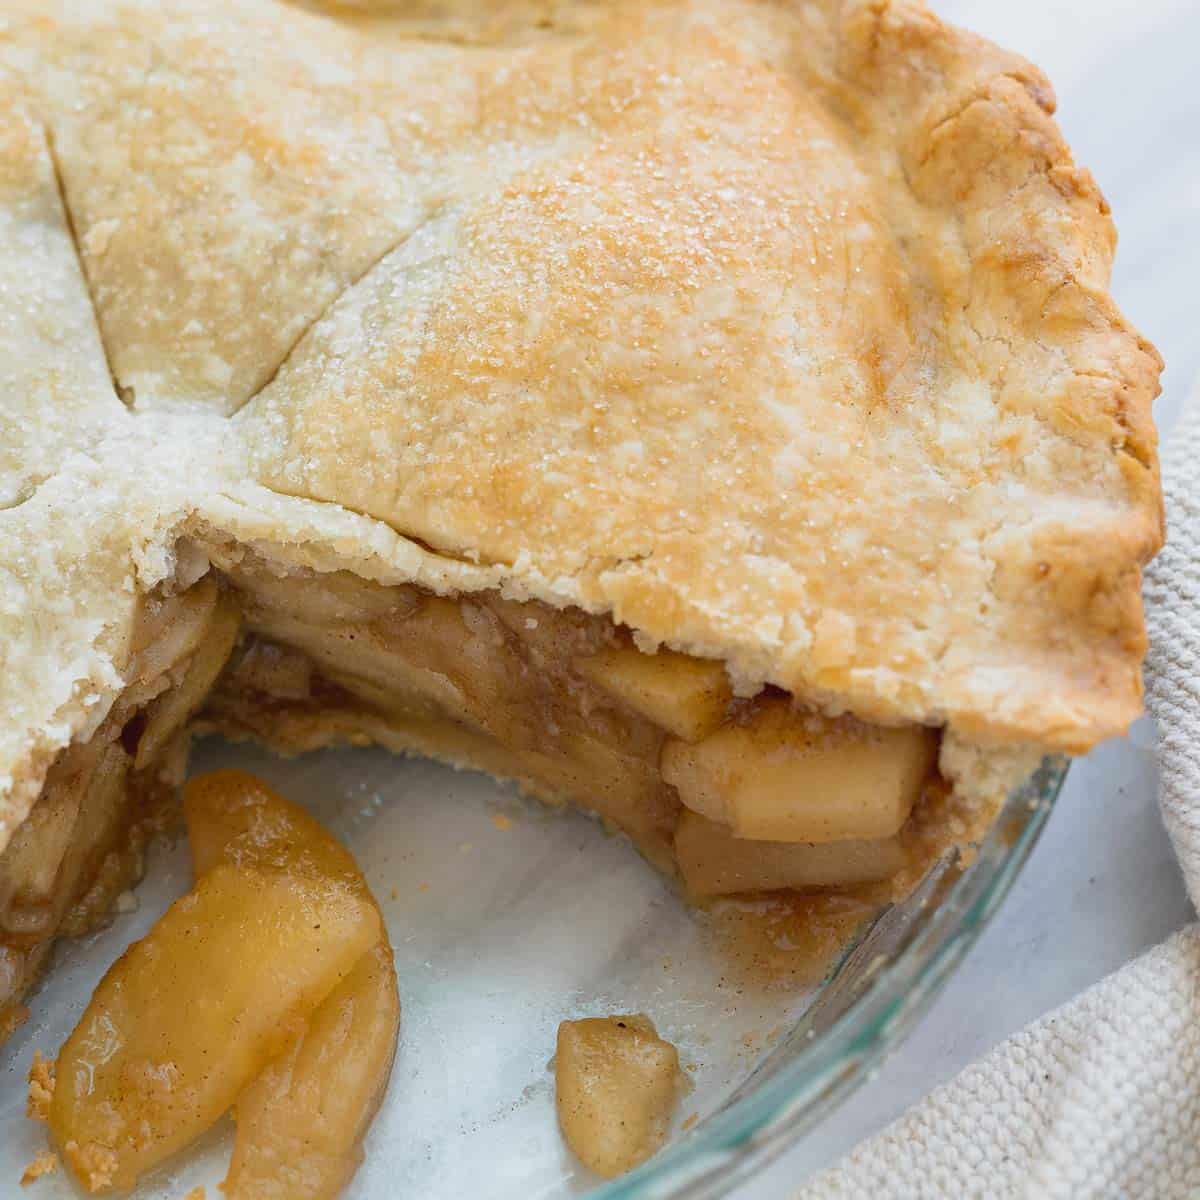

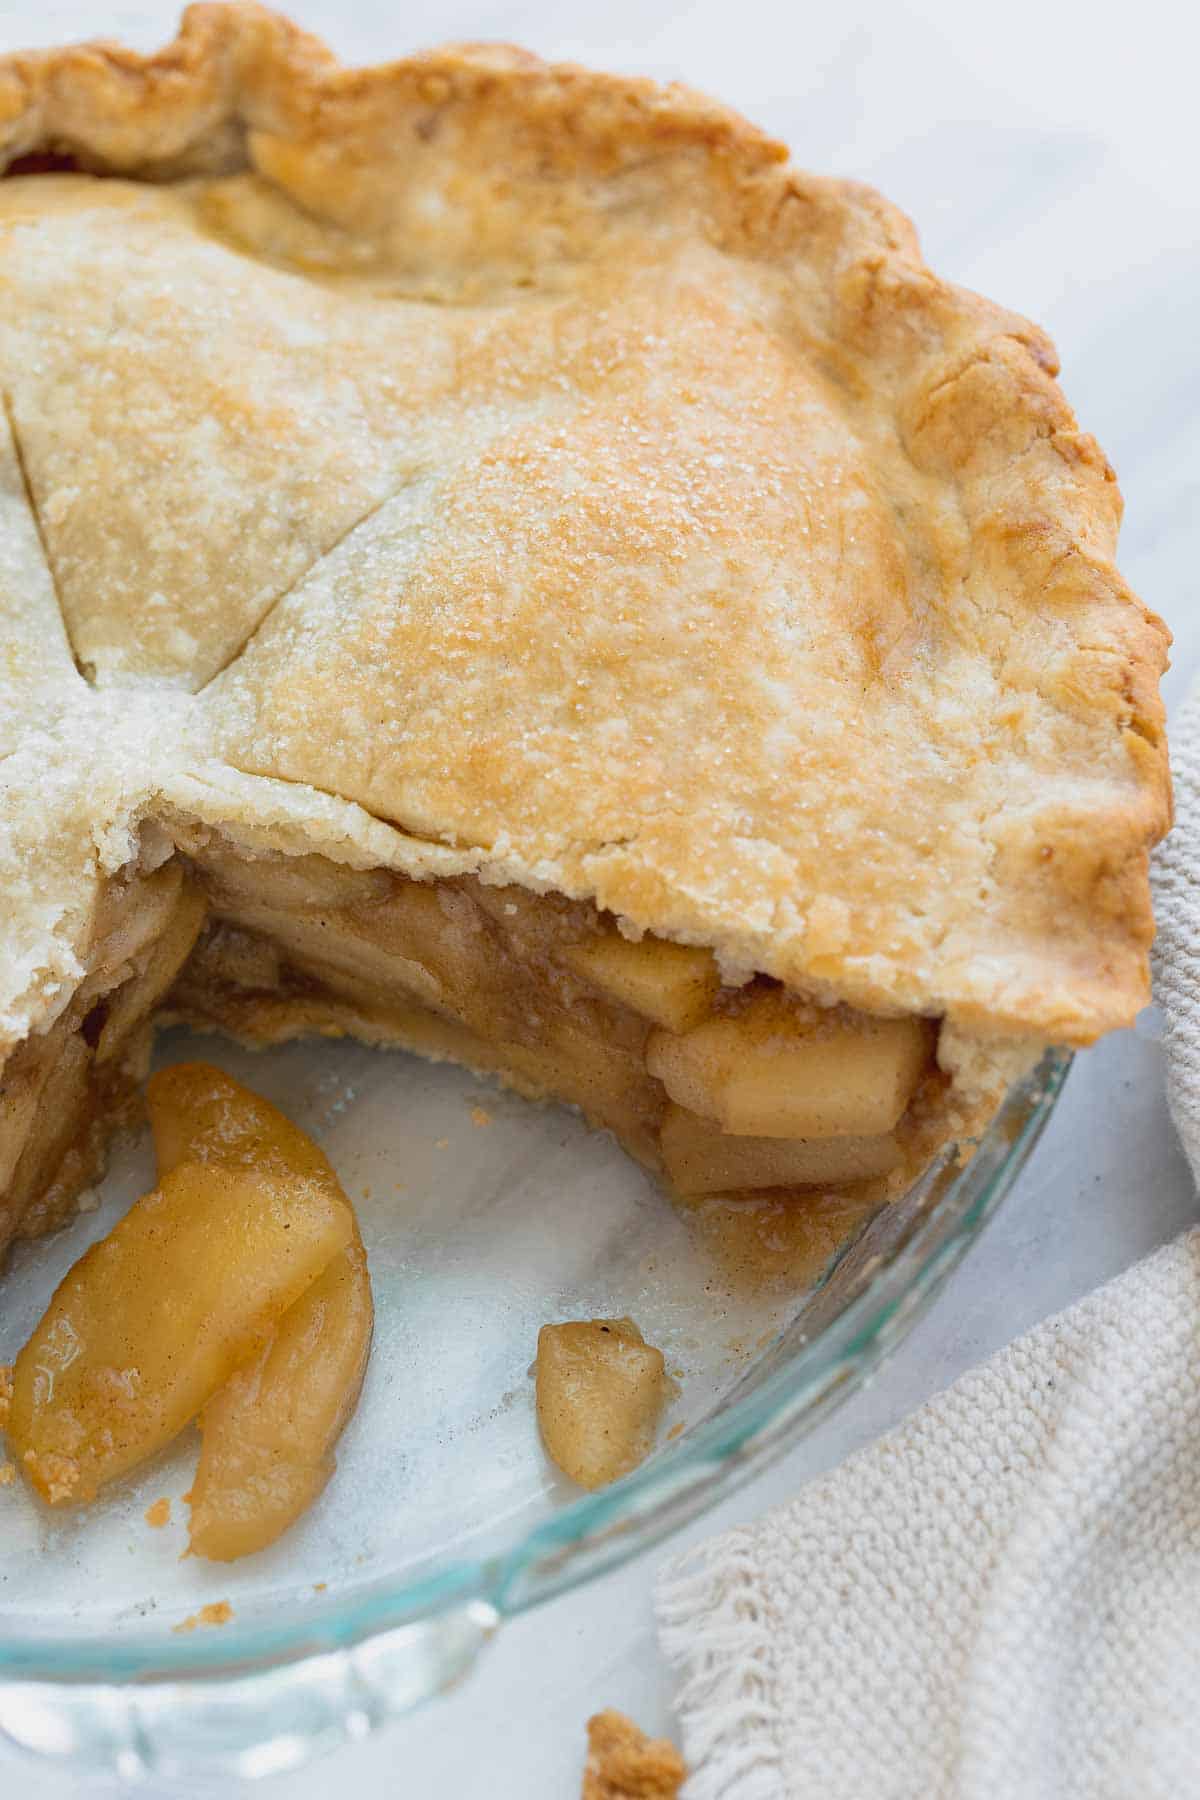
This gluten-free apple pie has a flaky, homemade pie crust and sweet-spiced apple filling! My #1 tip for gluten-free apple pie: pre-cooking the apple pie filling! This ensures a crisp bottom crust and a thick, saucy center.
This post has all the tips and tricks you need to make a classic gluten-free apple pie with a flaky crust from scratch. Be sure to watch the full video on how to make it!
Homemade apple pie, especially gluten-free apple pie, can be tricky to say the least. From soggy pie crust to watery filling, there’s a lot that can go wrong.
I’m here to save you gluten-free pie attempts with this tested and perfected gluten-free apple pie recipe!
VIDEO: How to Make Gluten-Free Apple Pie
For more gluten-free desserts try this gluten-free cheesecake, gluten-free pecan pie or these crustless gluten-free pumpkin desserts. You also might want to check out all my gluten-free Thanksgiving recipes.
If you love apples you also might like these recipes for gluten-free apple crumble, gluten-free apple cake, gluten-free apple muffins, apple compote and gluten-free apple crisp!
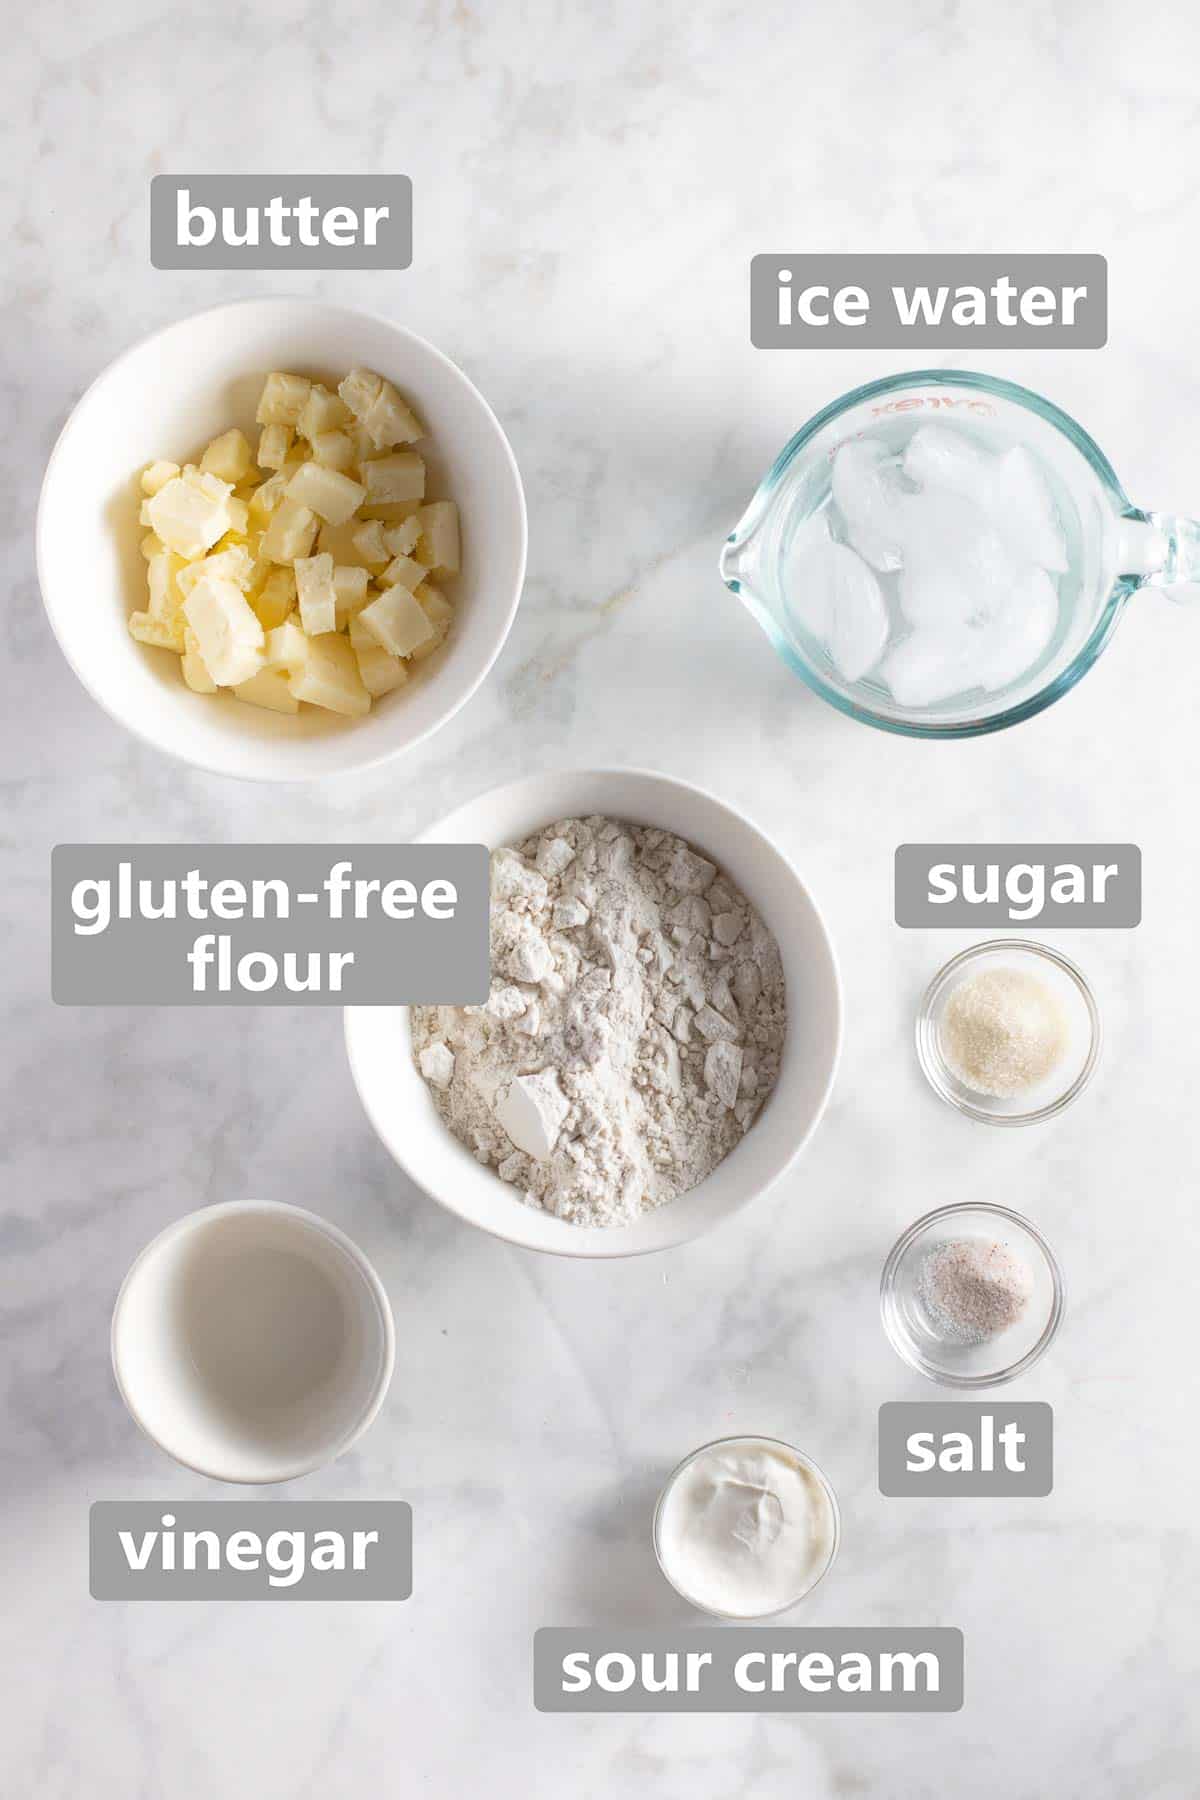
Ingredients for the Pie Crust
I use the same crust recipe that I use in my favorite gluten-free pumpkin pie.
This combination of ingredients creates a gluten-free pie dough with just the right consistency! Here are a few notes on the ingredients.
- Gluten-Free Flour: I like to use a high-quality 1:1 gluten-free flour blend that contains xanthan gum for best results. This is my favorite brand.
- Vinegar: I prefer white vinegar or rice vinegar.
- Sour Cream: Gives the dough a little stability and helps it brown.
- Butter/Ice Water/Salt/Sugar: All the usual suspects when it comes to pie crust! You want cold water and butter for a flaky pie crust.
Dairy-Free? You can use dairy-free sour cream in place of the sour cream, however I don’t recommend using vegan butter. I recommend using shortening (butter flavored with you like) in place of the butter for a dairy-free option.
Tips for Gluten-Free Pie Dough Success
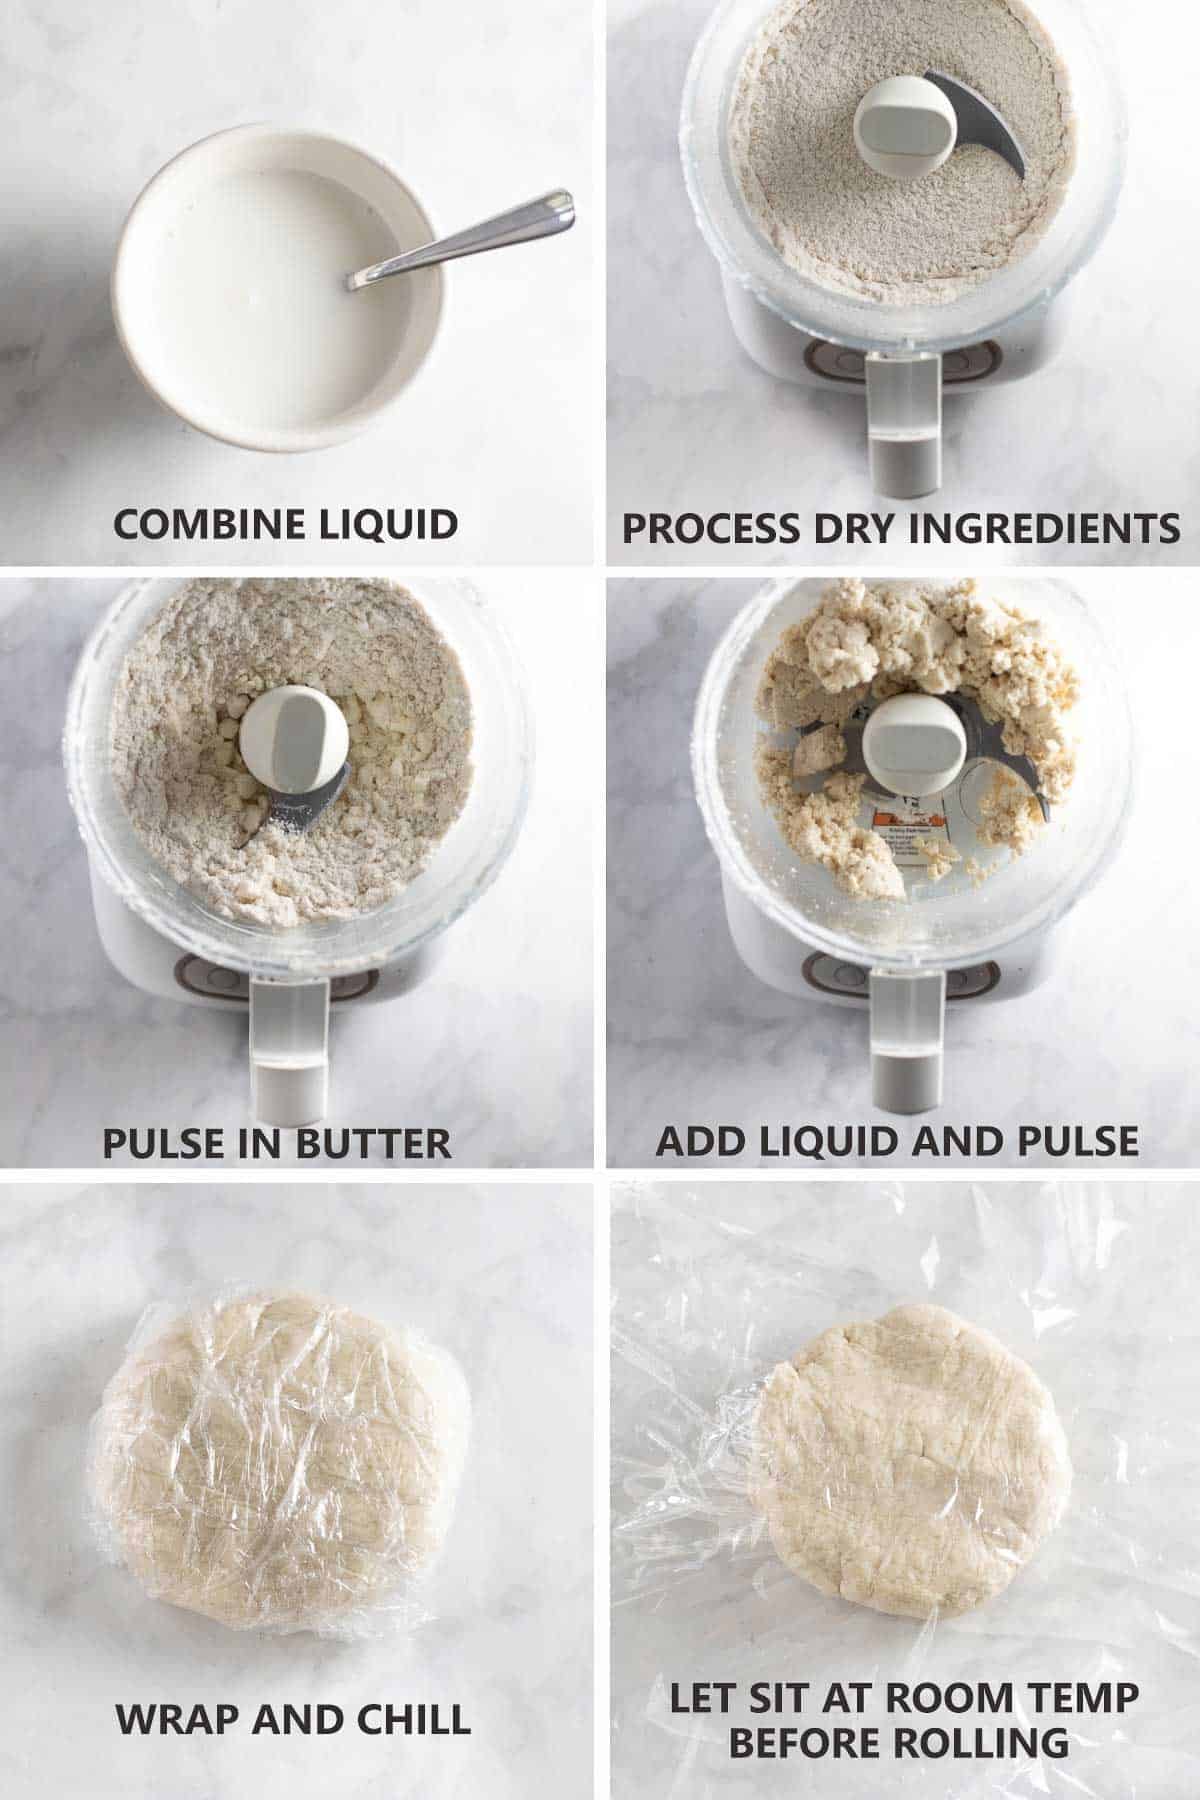
I really like making this pie crust in the food processor because it’s quick and reliable. You could also cut in the butter into the dry ingredients by hand using a fork or pastry cutter.
It’s important to let the pie dough sit in the fridge for at least 1 hour (up to overnight) before rolling it out. This allows the dough to hydrate form a cohesive ball.
After the chilling time, the pie dough also has to sit at room temperature for 15 minutes before you roll it out.
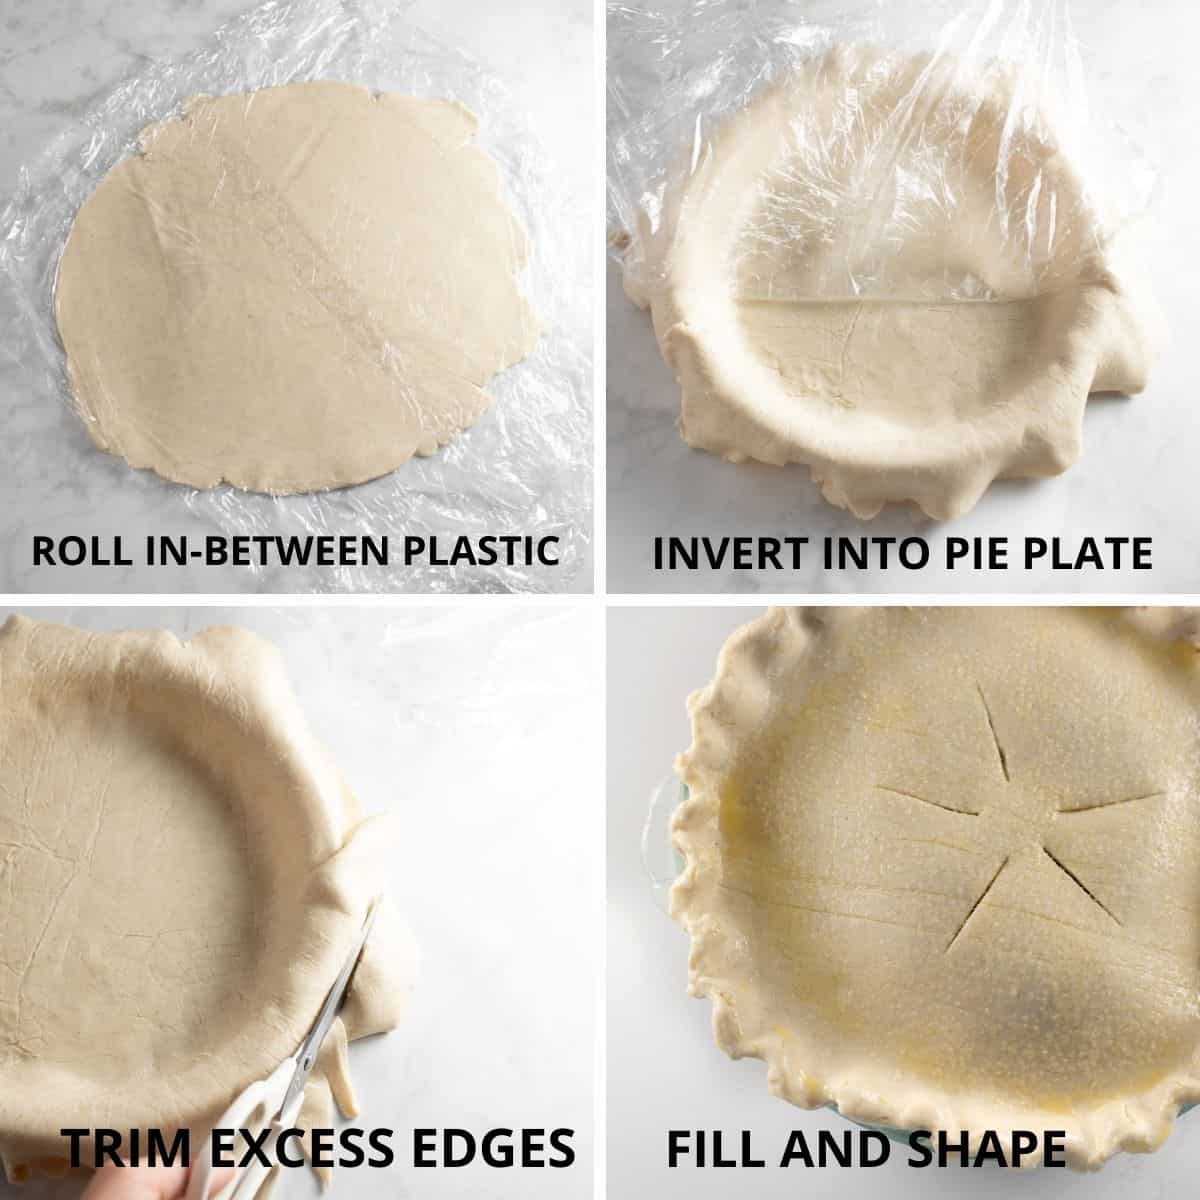
Gluten free crust is more delicate than regular pie dough. It helps to roll the dough in-between plastic wrap so you can easily transfer it to the pie plate.
UPDATE: I now recommend using a metal pie plate for a crisp bottom crust. I find a light metal 9-inch pie pan works best for gluten-free pies in general!
Peel off the top layer of wrap and carefully invert the rolled crust onto the plate. Then peel off the remaining plastic wrap off the pie shell. After this you can trim the edges and shape the crust as usual.
Tip: Try to smoosh any cracks that form on the edges together with the rolling pin as you roll. They may form at first, but the crust will meld together as you roll it.
You may also like my 2025 tested and perfected gluten-free pie crust!
A Pre-Cooked Apple Pie Filling!
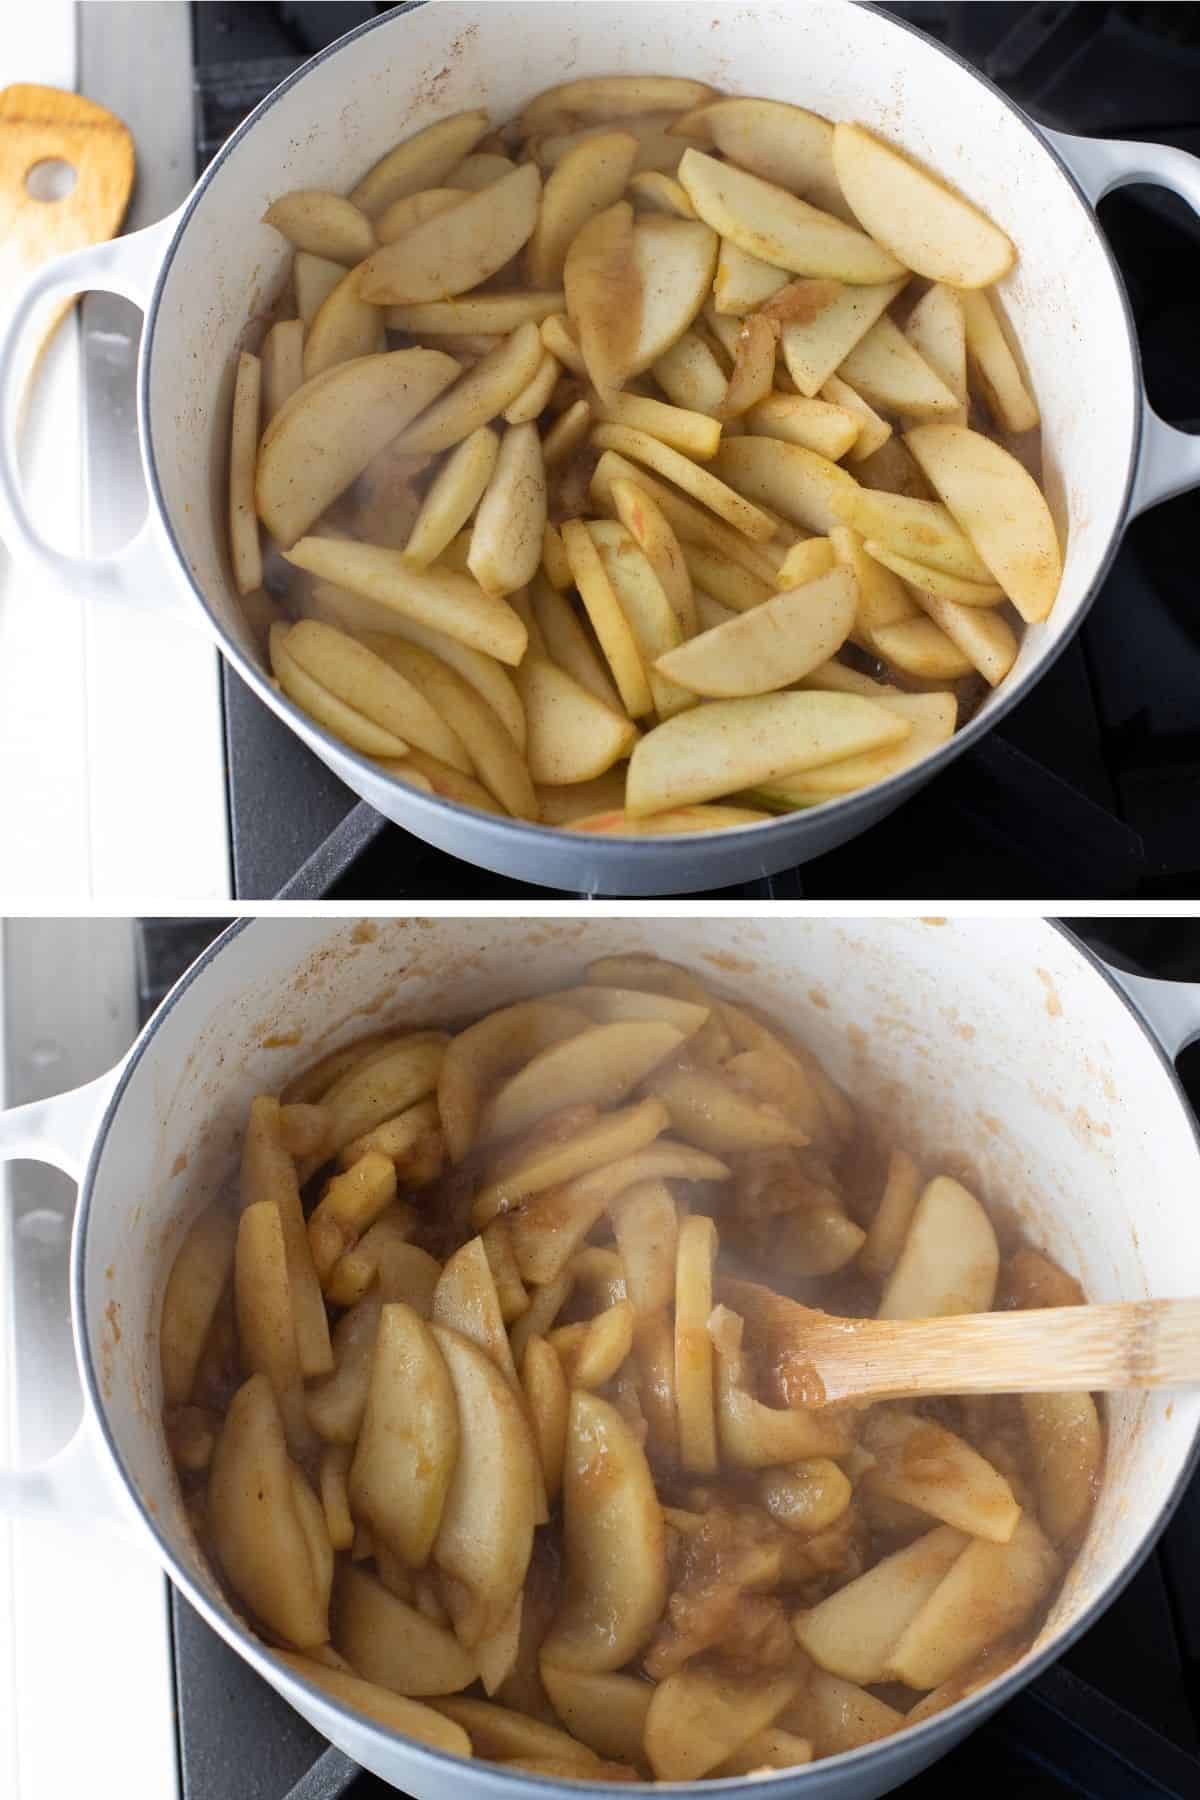
A pre-cooked apple filling with the apples, brown sugar and lemon juice is one of the key tricks to making a gluten-free apple pie with a crisp bottom crust!
Precooking the apples ensures the liquid thickens before it’s added to the crust. The best apples to use are tart and firm like granny smith apples.
To do this place all the filling ingredients in a large dutch oven and cook for about 5 minutes, until the apples just start to soften. Then thicken the juices with a little cornstarch and water.
The filling needs to cool completely before adding it to the pie crust.
Tip: To speed up the cooling process, pour the apple filling out onto a baking sheet and place in the refrigerator.
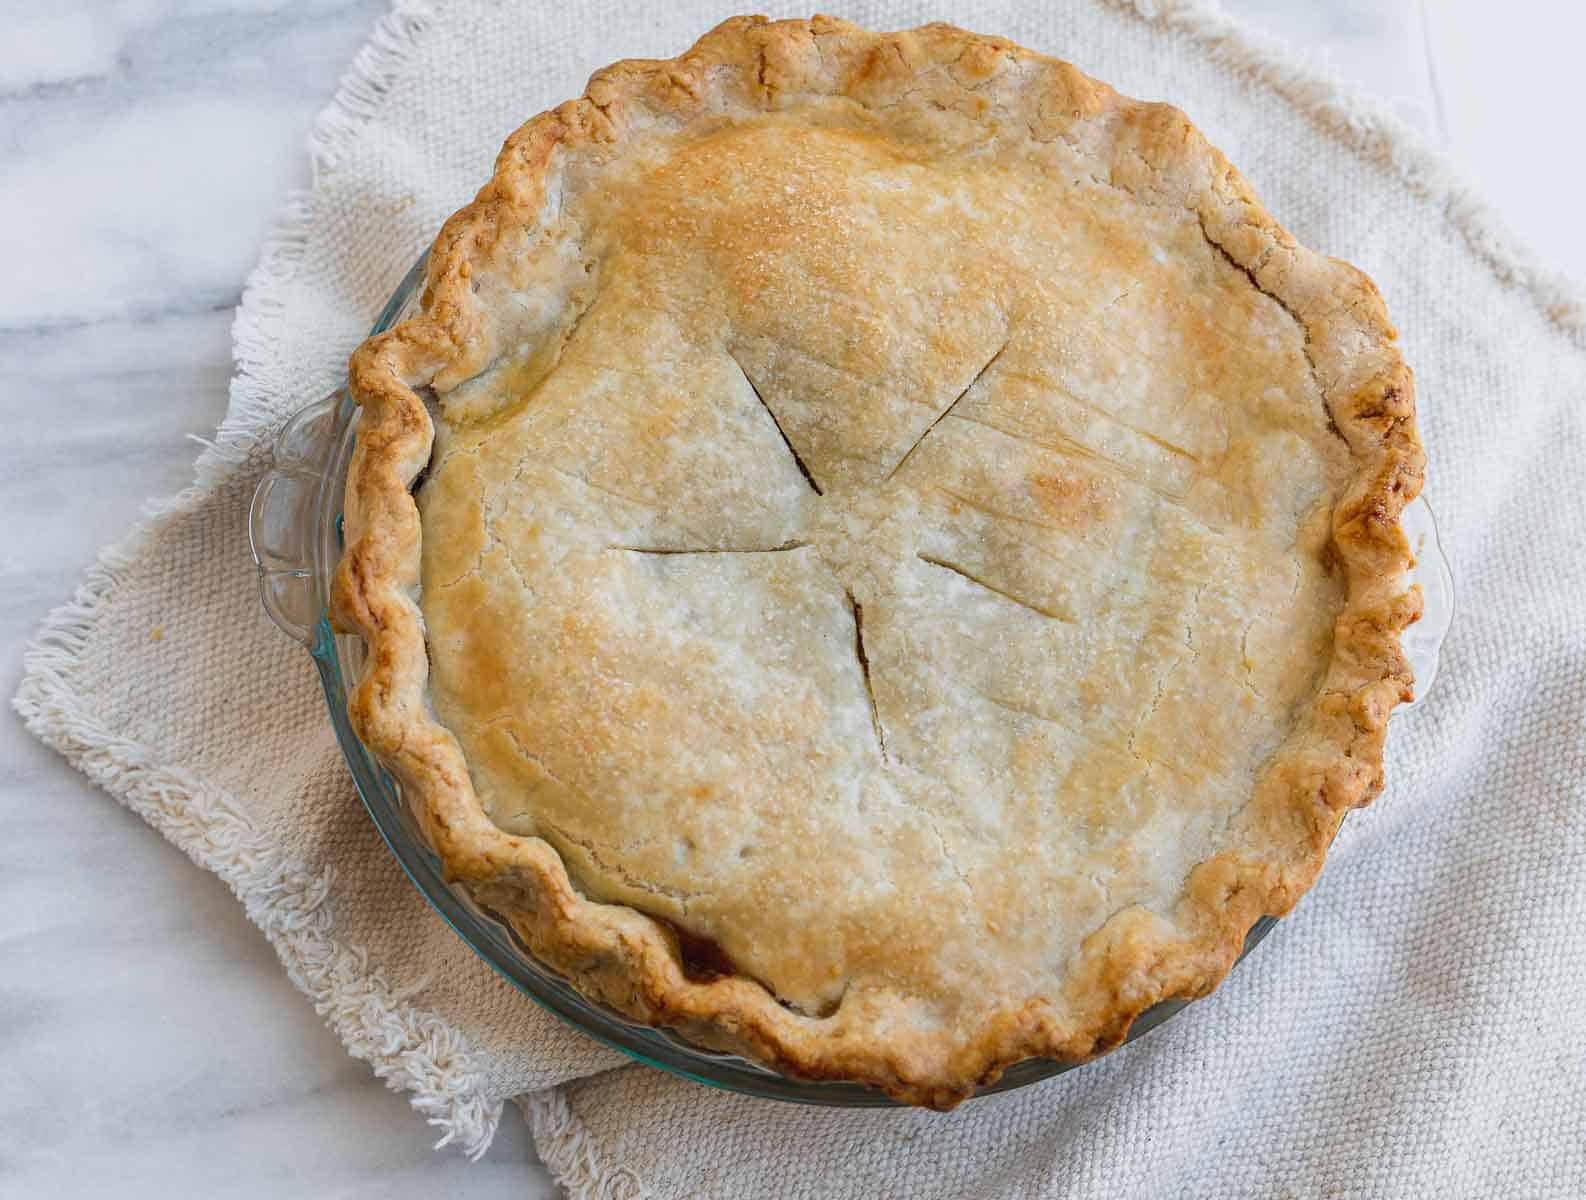
After the filling is made and cooled and the pie crust is chilled, it’s time to assemble the top of the pie and bake. I like to brush the top crust with an egg wash for that golden color. (SEE THE RECIPE VIDEO FOR A FULL TUTORIAL!)
Tip: Place a baking sheet in the oven as it preheats. You’ll place the pie on the hot baking sheet which will help the bottom crust bake.
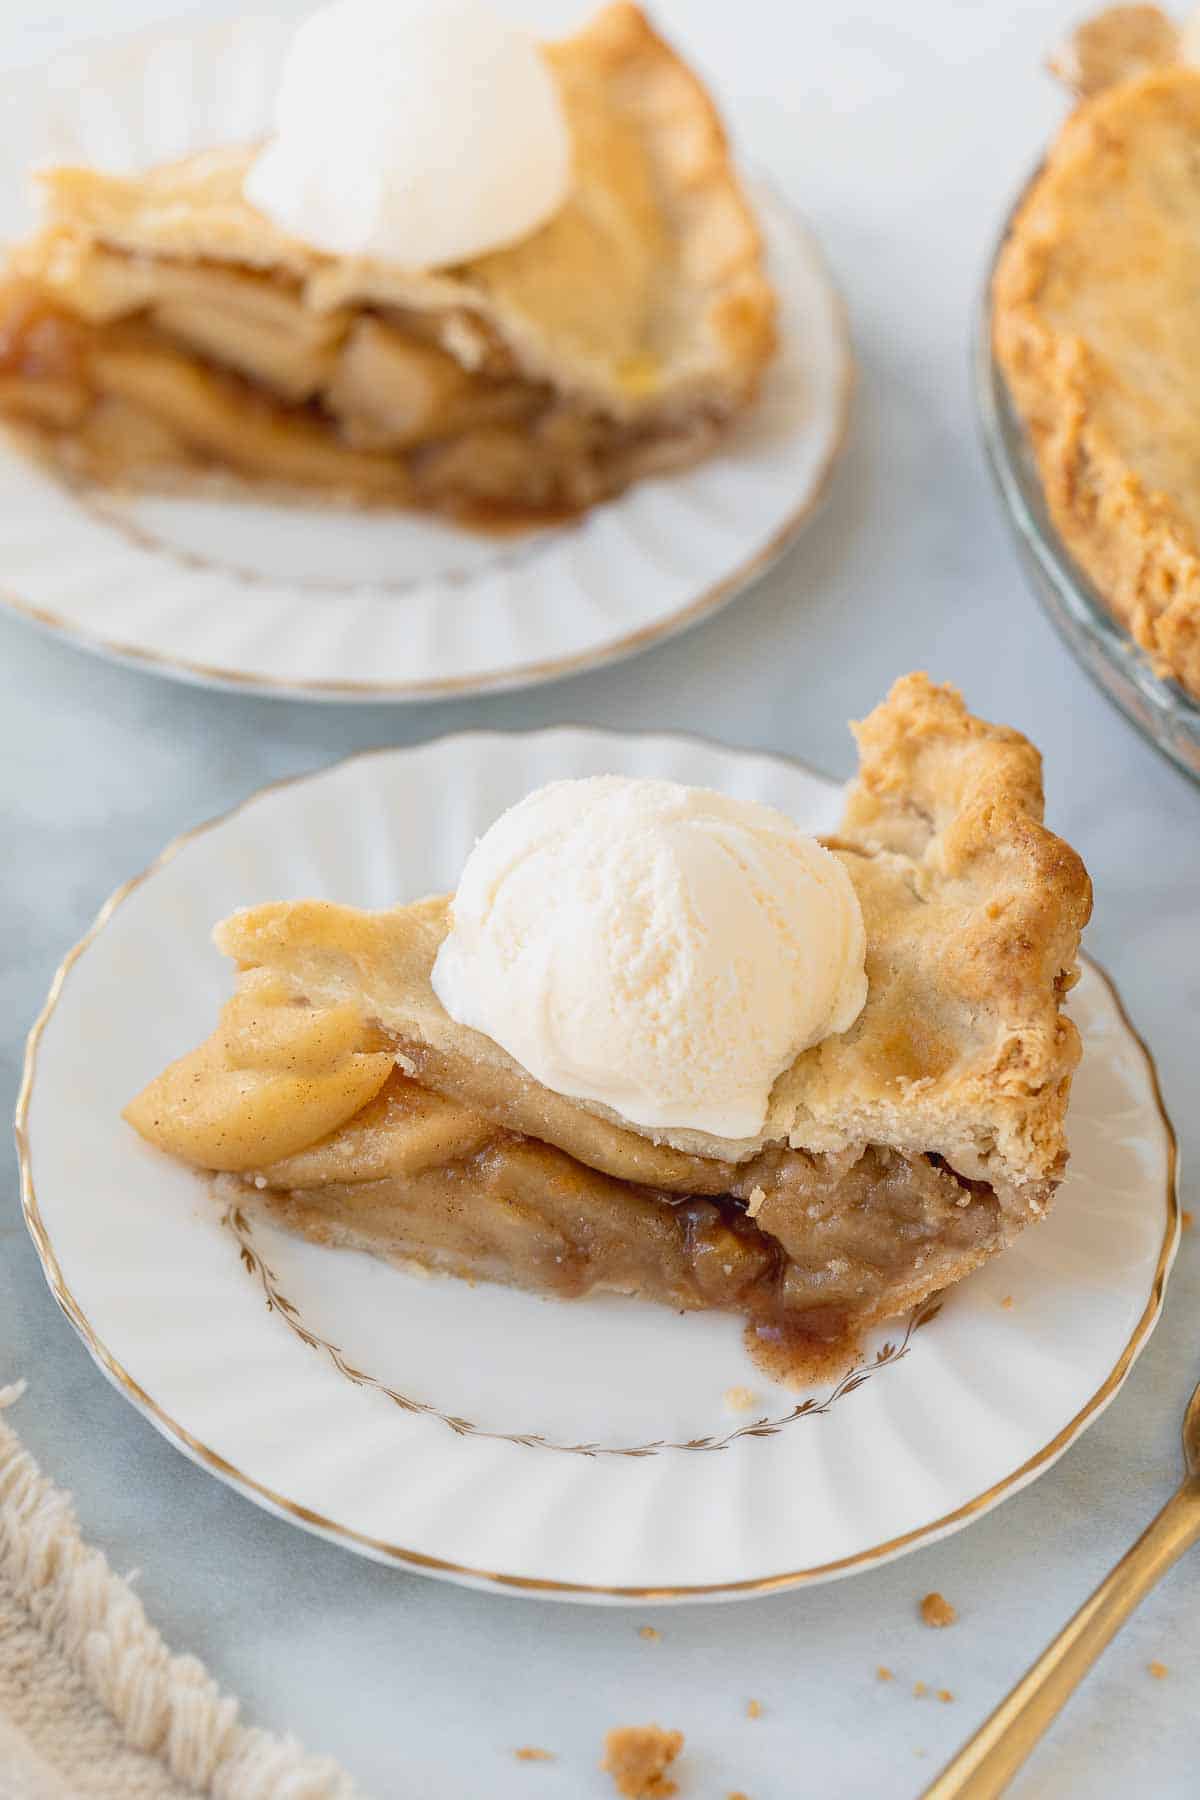
Let the pie cool and serve with a scoop of vanilla ice cream and a drizzle of caramel sauce. (Try this dairy-free caramel sauce!)
Tips for Amazing Gluten-Free Apple Pie
- For the best apple pie, start with a well-tested gluten-free pie crust recipe. Like the one in this post!
- Roll the pie crust in-between plastic wrap so it’s easier to handle
- Pre-cook the filling to get rid of extra moisture and ensure that the filling is perfectly thickened before going into the oven
- Taste the pre-cooked filling to see if you need to add more lemon or sugar to your liking
- Cook on pre-heated baking sheet for a crispy bottom crust
Make-Ahead Options
This pie is best eaten the day it’s baked. Unfortunately the gluten-free pie crust doesn’t hold up for longer storage.
To make this pie in advance I recommend making the apple pie filling and pie crust and refrigerating them until you’re ready to assemble the pie.
More Gluten-Free Thanksgiving Recipes


I hope this answers all your questions about gluten-free apple pie and sets you up for baking success! If you have any other questions please leave me a comment or star rating below. Happy Baking!

Gluten-Free Apple Pie (Homemade Crust!)
Video
Ingredients
For the Crust:
- 16 tablespoons salted butter (2 sticks)
- 6 tablespoons ice water
- 3 tablespoons sour cream (dairy-free sour cream works too!)
- 1 tablespoon white vinegar
- 2 cups gluten-free 1:1 baking flour 340 grams
- 2 teaspoons sugar
- 1 teaspoon salt
For the Filling:
- 4 pounds apples about 6-7 large apples, see the note below recommended apple types
- 2 tablespoons butter
- 1/2 cup brown sugar
- 1/4 cup granulated sugar
- 1 1/2 teaspoons ground cinnamon
- 1/4 teaspoon ground nutmeg
- 1/4 teaspoon ground allspice
- 1/4 teaspoon salt
- Zest of 1 lemon
- 2 tablespoons fresh lemon juice
- 2 tablespoons cornstarch + 2 tablespoons water
For the Egg Wash:
- 1 egg
- 1 tablespoon milk of choice
Instructions
Make the Crust:
- Cut the butter into small ¼-inch pieces and freeze for 10-15 minutes.
- Combine the ice water, sour cream, and vinegar in a small bowl. Whisk until smooth and set aside.
- Process the flour, sugar and salt in the bowl of a food processor until combined. Scatter the butter over top and pulse until the butter is the size of large peas, about 10 pulses.
- Add the sour cream mixture and pulse until the mixture begins to clump around the blade, about 10 pulses. If the crust does not clump around the blade after 10 pulses, pour it into a bowl and finish mixing with your hands or a spatula.
- Divide the dough into 2 balls. Press and shape into flat discs and wrap each disc tightly in the plastic wrap. Refrigerate for 1 hour or up to 2 days.
Make the Filling:
- Peel the apples and cut out the core. Then cut into 1/4 inch slices. Be sure to cut the apples the same size so they cook evenly.
- In a large deep skillet or Dutch oven, combine the sliced apples, butter, brown sugar, granulated sugar, cinnamon, nutmeg, allspice, salt, lemon juice and lemon zest. Cook over medium heat, stirring occasionally for about 10 minutes, until apples have slightly softened but not lost their shape.
- Mix together the cornstarch and water. Pour into the apple mixture and cook for another 2-3 minutes until thickened.
- Pour the filling into a bowl and let cool to room temperature. Taste the filling to see if it needs any more sugar or lemon juice to your liking.Tip: To speed up the cooling process, pour the apple filling out onto a baking sheet and place in the refrigerator.
Assemble the Pie:
- If you refrigerated the dough longer than 1 hour, let the dough sit at room temperature for 15 minutes before rolling. Roll the pie crust out between 2 large pieces of plastic wrap to 1/4-inch thickness. Tip: Try to smoosh any cracks that form on the edges together with the rolling pin as you roll. They may form at first, but the crust will meld together as you roll it.
- After rolling, remove the top piece of plastic wrap and flip into a 9-inch pie plate. (UPDATE: I recommend a metal pie plate!) Gently ease the dough into the edges of the pan before removing the 2nd piece of plastic wrap. Place the bottom crust in the fridge to keep chilled while you roll out the top crust the same way.
- Pour the cooled filling into the prepared crust. Top with the 2nd crust. Trim any overhang or excess dough. Seal edges with a fork or with your fingers. Cut a few slits into the center of the pie for the steam to escape. Place the pie in the freeze for 10 minutes before baking for the dough to chill one last time.
- Place a baking sheet in the center rack of the oven. Preheat the oven to 400F. Tip: You want the baking sheet to be in the oven as it preheats. You'll place the pie on the hot baking sheet which will help the bottom crust bake.
- Make the Egg Wash: Whisk together the egg and milk until totally combined. Brush the pie dough with egg wash and sprinkle sugar if desired.
- Place the pie on the preheated baking sheet and bake for 35 minutes. Lightly place a piece of foil on top of the pie to keep it from over-browning (or use a pie shield), then lower the oven temperature to 375 F. Bake for an additional 35-40 minutes, until golden brown and bubbly.
- Let the pie cool on a wire rack for 3 hours before slicing. (I know it's hard to wait but this is important!) Enjoy! (Tip: This pie is best eaten the day it's baked. See the notes for make-ahead instructions.)
Notes
- Use tart, firm apples. I prefer Granny Smith apple for this pie!
- Roll the pie crust in-between plastic wrap so it’s easier to handle
- Pre-cook the filling to get rid of extra moisture and ensure that the filling is perfectly thickened before going into the oven.
- Taste the pre-cooked filling to see if you need to add more lemon or sugar to your liking
- Cook on pre-heated baking sheet to get the bottom crust extra crispy


Hello, I’m planning on making this for a 4th of July party tomorrow. I see that you have added an update – you recommend using a metal pie pan, which I was planning to use anyway! Would you still place it on a pre-heated baking sheet? I don’t want to end up baking the bottom Too well and burn it!
Hi Emily! Yes, we’d still recommend using the preheated baking sheet with the metal pie pan. It helps the bottom crust bake evenly and prevents sogginess. It shouldn’t burn if properly chilled and baked on the middle rack. We hope you enjoy the apple pie!
Love just reading your recipes and would love to add you to my email address. I have friends that I cook gluten and dairy free when they come to visit. I need some good recipes. Thanks!
Hi Karen! Thank you for your kind words. We’ve added you to our email newsletter—you can always adjust your subscription or unsubscribe at the bottom of any email. We hope your next GF DF bake is a total hit with your friends. Happy baking!
I’m curious about the lemon in the filling, I’m going for a warm homey apple pie, and lemon seems too sharp. Is lemon normally used in apple pie filling like the pies bought from a bakery? Correct me if I’m wrong and thanks for this recipe!! I havn’t tried it yet so I’m giving no start, not because of bad quality
Hi Abby! Lemon juice is common in apple pies. It keeps the apples from browning while prepping the pie then balances the sweetness and brings out the apple flavor. You’ll still get a warm cozy apple pie and won’t taste the citrus. We hope this helps and you enjoy the pie!
I havn’t tried this recipe yet so that’s why I have not rated this recipe just yet. I ABSOULOUTLY LOVE meaningful eats gluten free Blondies, never fail :)) I was wondering though, what is the second best apple to use? I have granny Smith but not enough and I have some fugi, do I do half of each type? Also I was wondering if the lemon makes it lemoney in flavor? I want a warm, classic apple pie, and lemon sounds like it would be too sharp, but correct me if I’m wrong! Thanks for all the recipes!
Hi Abigail! Yes, half Granny Smith and half Fuji works well! The lemon juice won’t make the pie taste lemony — it just brightens the apple flavor and balances the sweetness. It’s a common ingredient in apple pies. We hope you love the recipe!
Hi this was a lovely recipe! How do I stop the pie crust from shrinking around the edges and not holding the rope edges I made? Also could I make the dough and leave it in the freezer to make later, if so how long would it last in the freezer?
Thanks in advance!
Hi Sofia! We’re so glad you enjoyed the apple pie! To avoid shrinkage, we definitely recommend using a metal pan as it will set the crust faster. Also, make sure the dough stays nice and cold before baking (all of the chill times make a difference). This dough can be frozen for up to 3 months. Happy baking!
Thank you so much! Be so much easier to freeze the dough!
This is our first Thanksgiving since my daughter was diagnosed with celiac disease and she was so worried about not being able to have apple pie. We made a practice pie the weekend before to see how it turned out. I semi-homemade it and used pie filling and used your crust but she was sooooo happy! Honestly I usually just eat the filling and not the crust because I am not a fan, but this crust was delicious! When we make it again tomorrow we are going take the left overs and make a cinnamon sugar crust like my grandma used to do with the crust leftovers. Can’t wait! Thank you so much!
Hi Katie, that’s so wonderful to hear! Thank you for taking the time to share, it means a lot!
The BEST gluten free pie crust! I use it for anything and everything. It even holds up for hand pies! My dad even LOVES it, and he scorns everything gf. If it gets past him, it’s the perfect recipe!!!!
Hi Skye, glad to hear this pie passed the test of the toughest critic! Music to our ears! Thanks for the review!
Would this work with pre-made crusts?
Hi Ciara, yes, you can definitely use a pre-made crust!
Hi,
Can you make this without the top crust? (just the bottom?)
Thank you!
Absolutely delicious! Even my non-gluten free friends were asking for a slice! Thank you Erin for putting in the work to create this. It’ll be my go-to pie dough now. I used Country Crock Plant Butter with olive oil and it worked like a charm. My crust ended up a bit on the hard side (only on the bottom) but I think that I rolled it too thick. The top crust was perfect. Oh, and my food processor was too small so I used my kitchen aid making sure the butter was large pea sized and careful not to melt it.
Yay! We’re so pleased to hear the apple pie was such a hit with you and your friends! Thank you for taking the time to share your positive baking experience with us, Hanna!
Made the apple pie for our Canadian Thanksgiving. We don’t carry King Arthur gf flour here , so Presidents’s Choice 1:1 was the closest match and the crust turned out very well. Everyone was surprised it was gf. Thank you for your inspiration!
We’re so pleased to hear that the recipe worked well with that flour blend and that the pie was such a hit! Thank you for sharing your positive experience with us, Peg!
I’m planning on making a crumble on top. Should I cut the crust recipe in half if I only want to make the bottom crust?
Hi Sammy, yes you’d only need half of the dough recipe for the bottom crust. We hope you enjoy the pie!
Hi! I love baking but I’ve never tried to make anything gluten free – Would making the top of the pie a lattice crust change anything about how it has to bake/would it still bake well? Thank you so much!
Hi Sophia, you can definitely make a lattice crust! Gluten-free dough is typically more fragile which makes the latticework a delicate step, but still possible. The pie may brown a little faster. If so, cover the top with foil during the second have of the baking time to avoid burning. We hope you love the recipe!
This was my first try at making a pie and it turned out absolutely amazing, will be trying more of these recipes!!!
Hi Liz, we’re so pleased you loved the apple pie recipe so much! Thank you for sharing your positive baking experience with us!
Okay… this is the second recipe I’ve tried from this website and they’ve both been absolutely phenomenal.
My daughter has a wheat allergy so gluten free is very new to me and I honestly thought gluten free deserts were impossible or gross but this was a home run!
She has great tips on everything I’ve made so far
Yay! We’re so happy to hear you’ve enjoyed the recipes so far! Thank you for sharing your positive baking experience with us!