
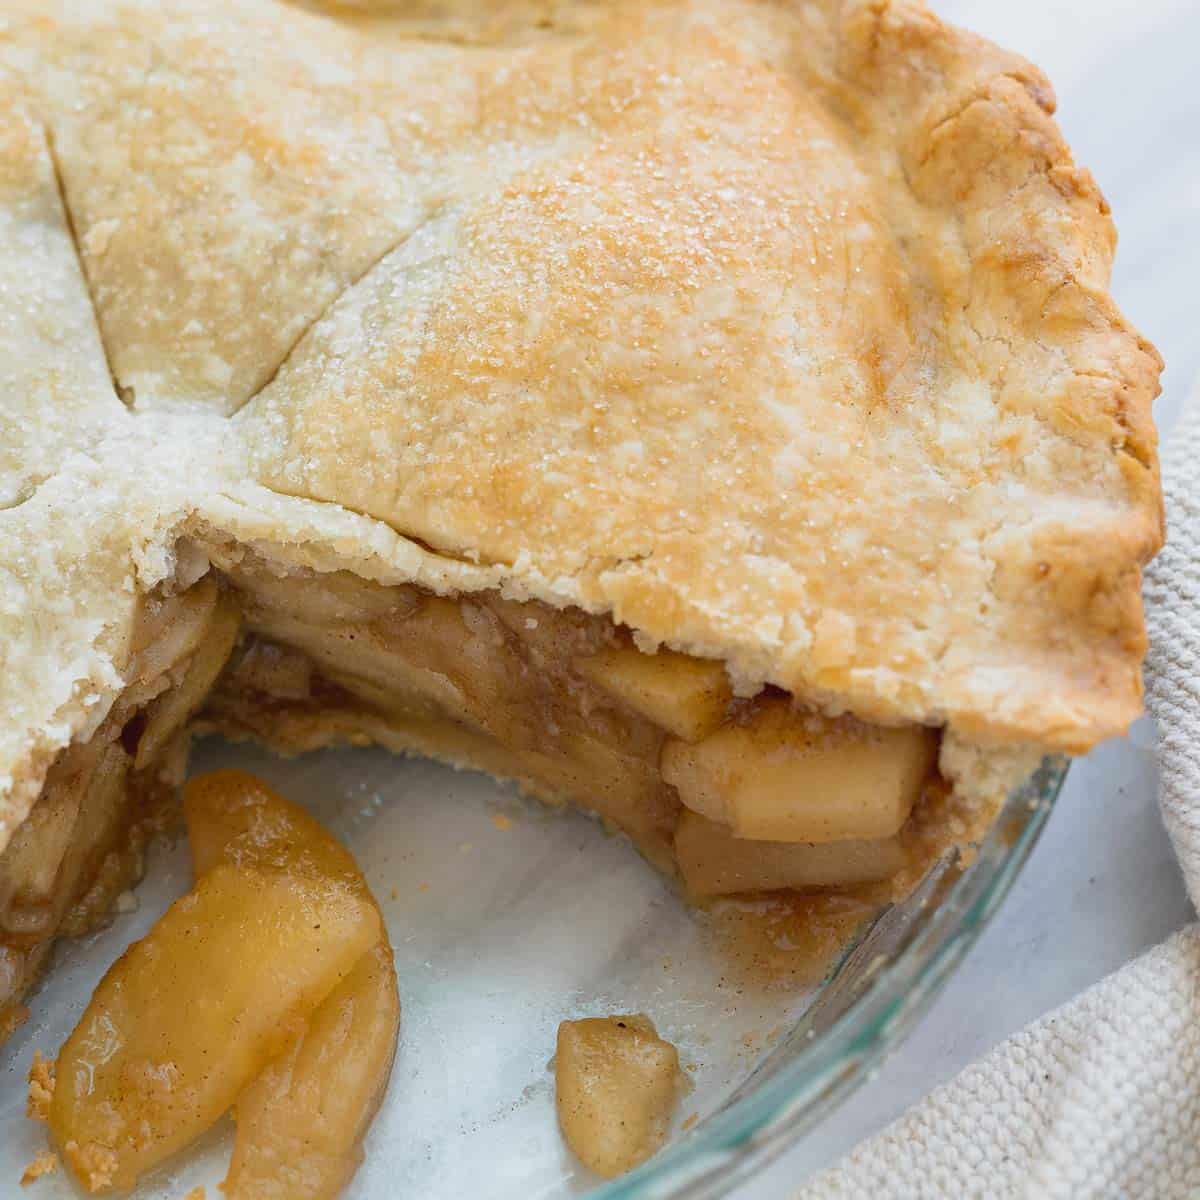

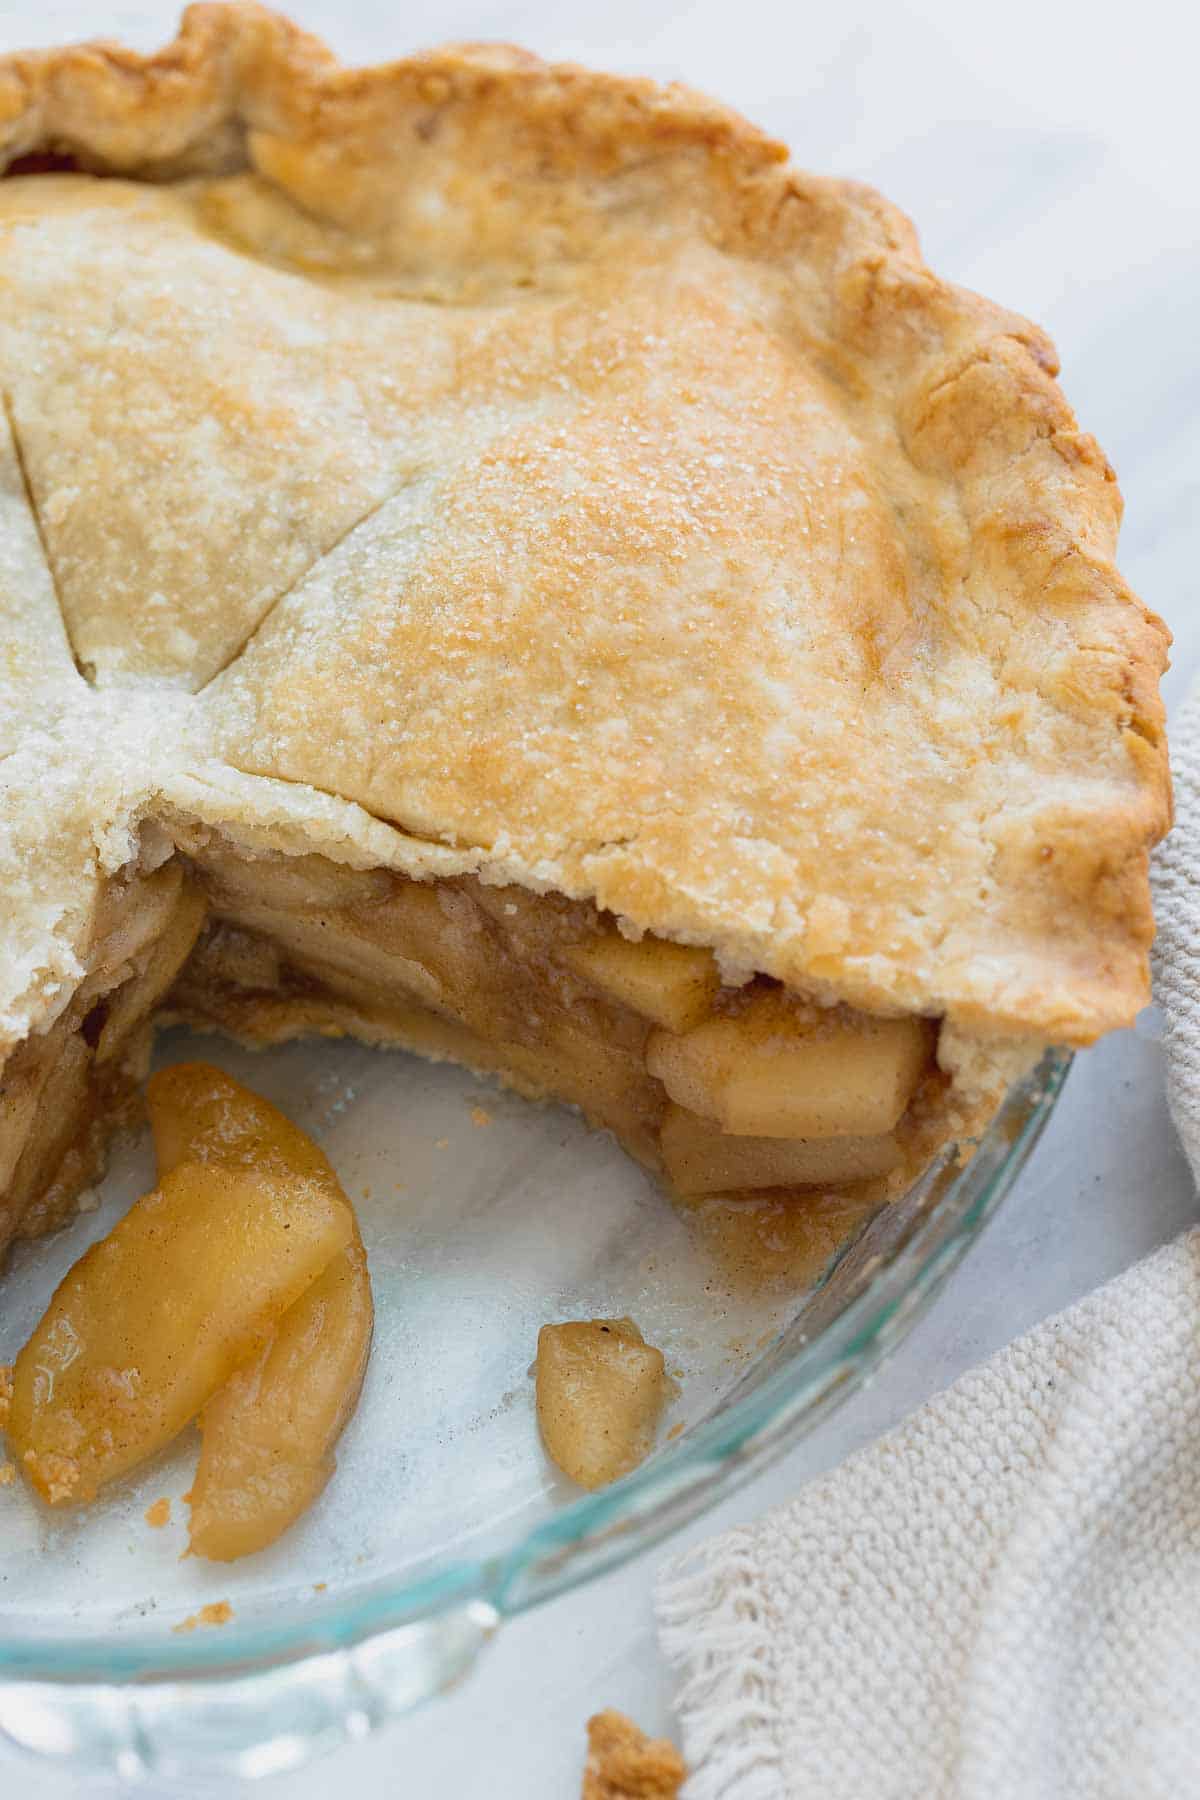
This gluten-free apple pie has a flaky, homemade pie crust and sweet-spiced apple filling! My #1 tip for gluten-free apple pie: pre-cooking the apple pie filling! This ensures a crisp bottom crust and a thick, saucy center.
This post has all the tips and tricks you need to make a classic gluten-free apple pie with a flaky crust from scratch. Be sure to watch the full video on how to make it!
Homemade apple pie, especially gluten-free apple pie, can be tricky to say the least. From soggy pie crust to watery filling, there’s a lot that can go wrong.
I’m here to save you gluten-free pie attempts with this tested and perfected gluten-free apple pie recipe!
VIDEO: How to Make Gluten-Free Apple Pie
For more gluten-free desserts try this gluten-free cheesecake, gluten-free pecan pie or these crustless gluten-free pumpkin desserts. You also might want to check out all my gluten-free Thanksgiving recipes.
If you love apples you also might like these recipes for gluten-free apple crumble, gluten-free apple cake, gluten-free apple muffins, apple compote and gluten-free apple crisp!
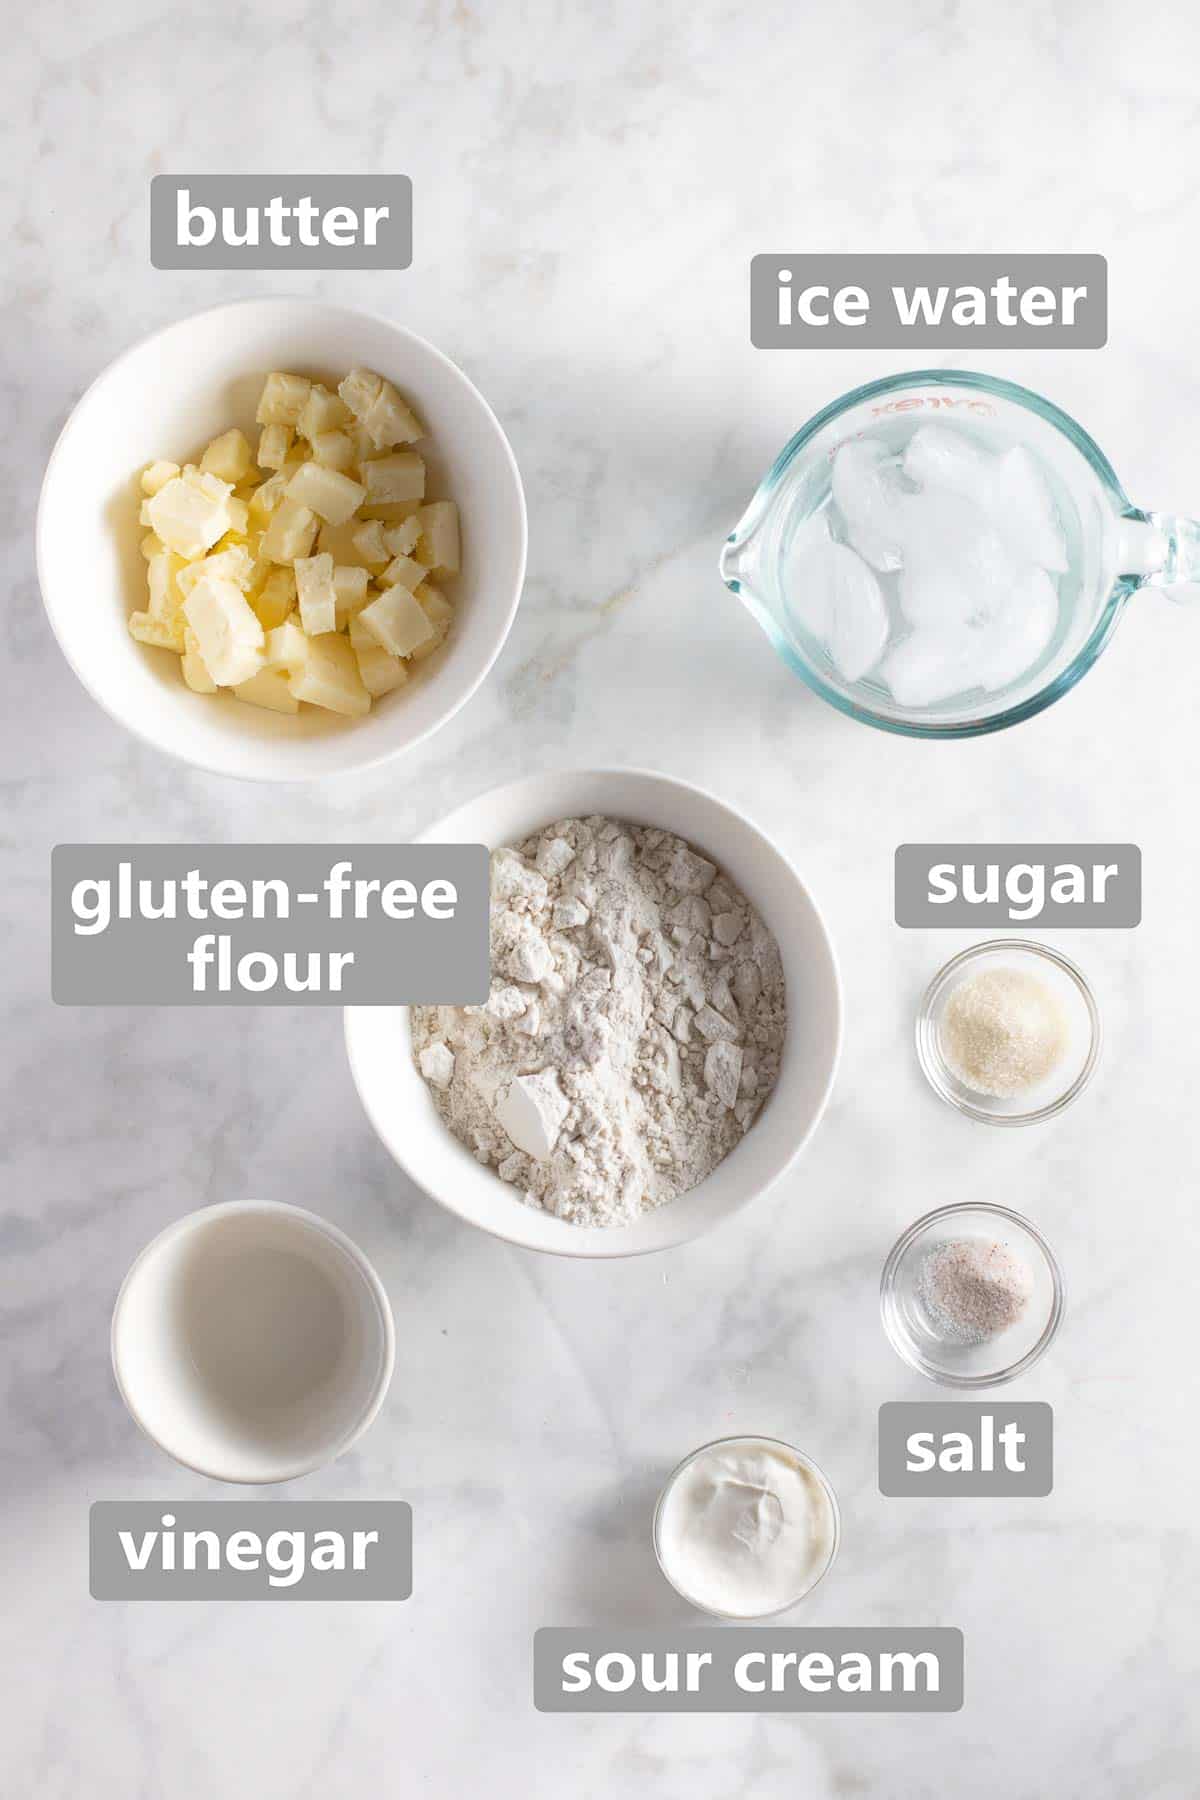
Ingredients for the Pie Crust
I use the same crust recipe that I use in my favorite gluten-free pumpkin pie.
This combination of ingredients creates a gluten-free pie dough with just the right consistency! Here are a few notes on the ingredients.
- Gluten-Free Flour: I like to use a high-quality 1:1 gluten-free flour blend that contains xanthan gum for best results. This is my favorite brand.
- Vinegar: I prefer white vinegar or rice vinegar.
- Sour Cream: Gives the dough a little stability and helps it brown.
- Butter/Ice Water/Salt/Sugar: All the usual suspects when it comes to pie crust! You want cold water and butter for a flaky pie crust.
Dairy-Free? You can use dairy-free sour cream in place of the sour cream, however I don’t recommend using vegan butter. I recommend using shortening (butter flavored with you like) in place of the butter for a dairy-free option.
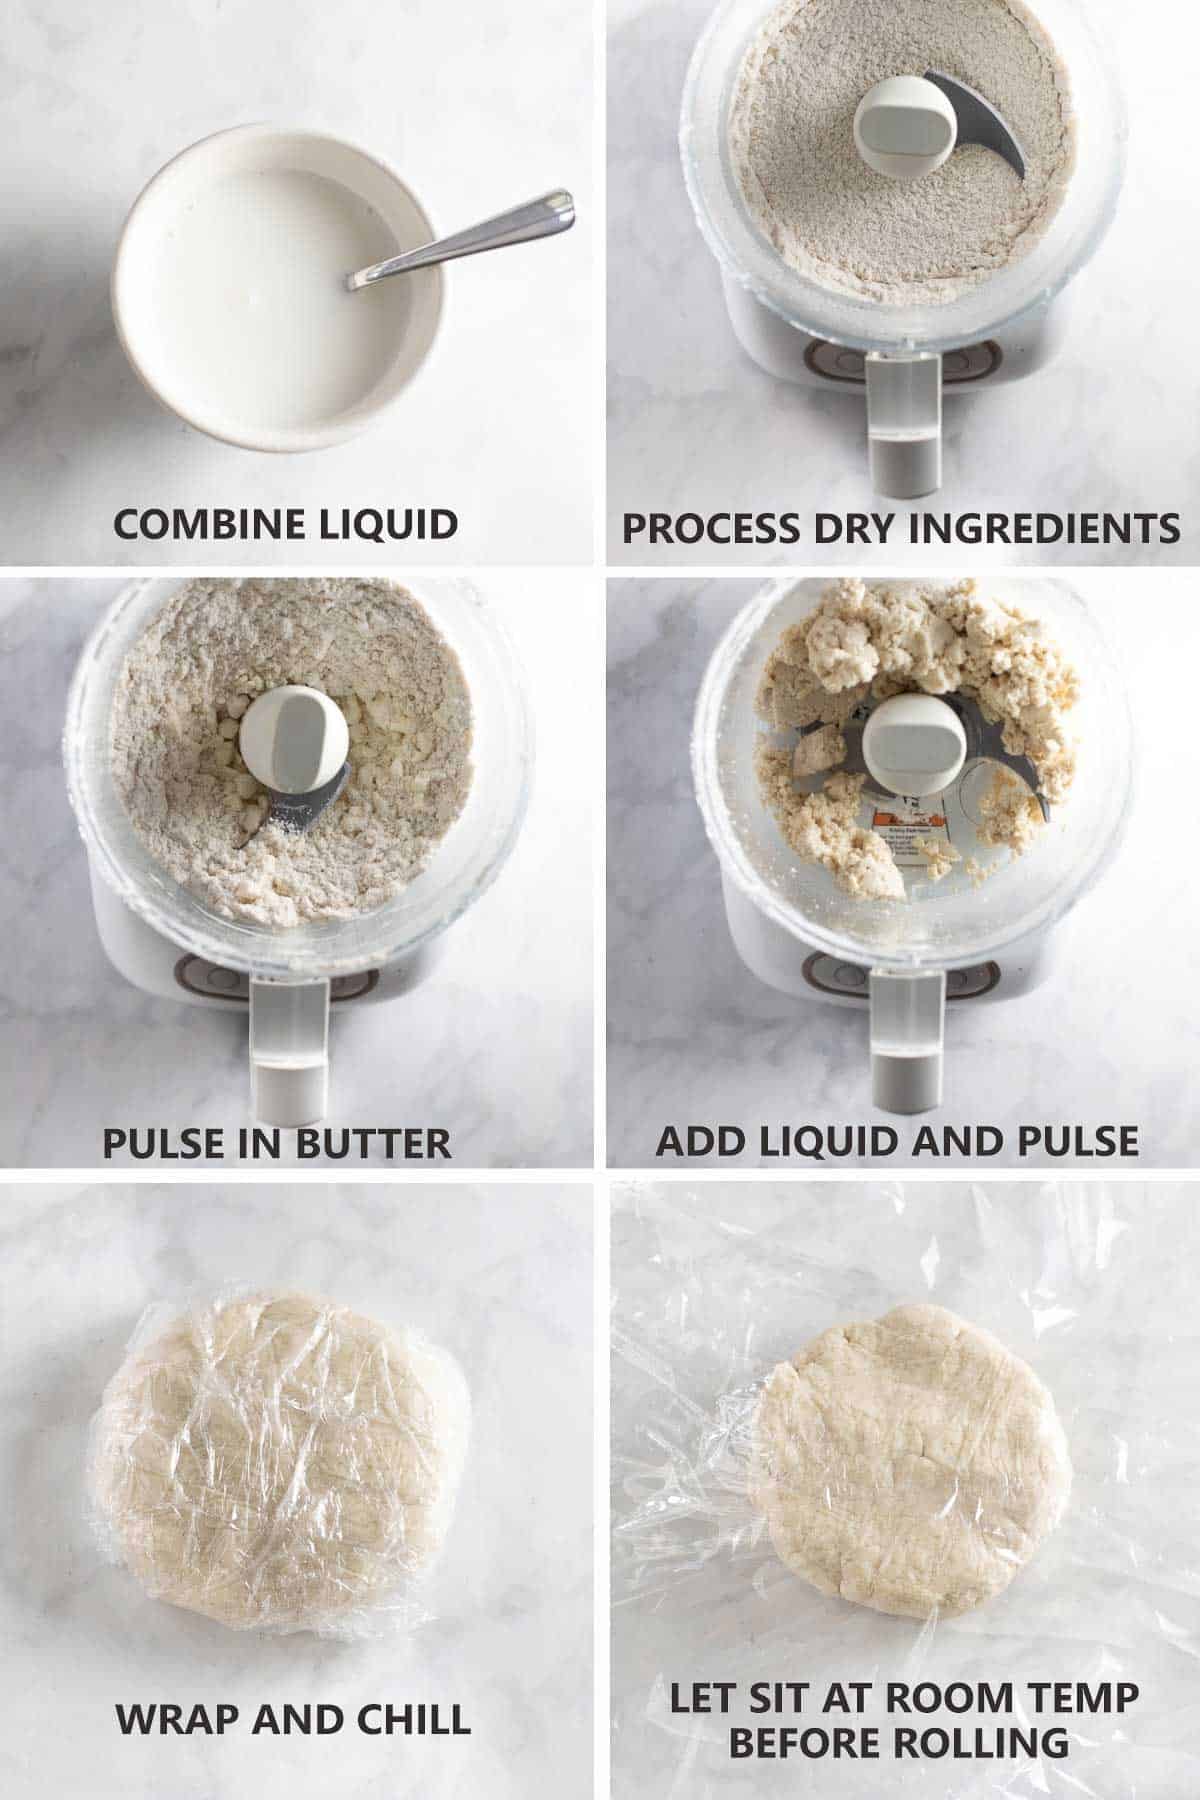
Tips for Gluten-Free Pie Dough Success
I really like making this pie crust in the food processor because it’s quick and reliable. You could also cut in the butter into the dry ingredients by hand using a fork or pastry cutter.
It’s important to let the pie dough sit in the fridge for at least 1 hour (up to overnight) before rolling it out. This allows the dough to hydrate form a cohesive ball.
After the chilling time, the pie dough also has to sit at room temperature for 15 minutes before you roll it out.
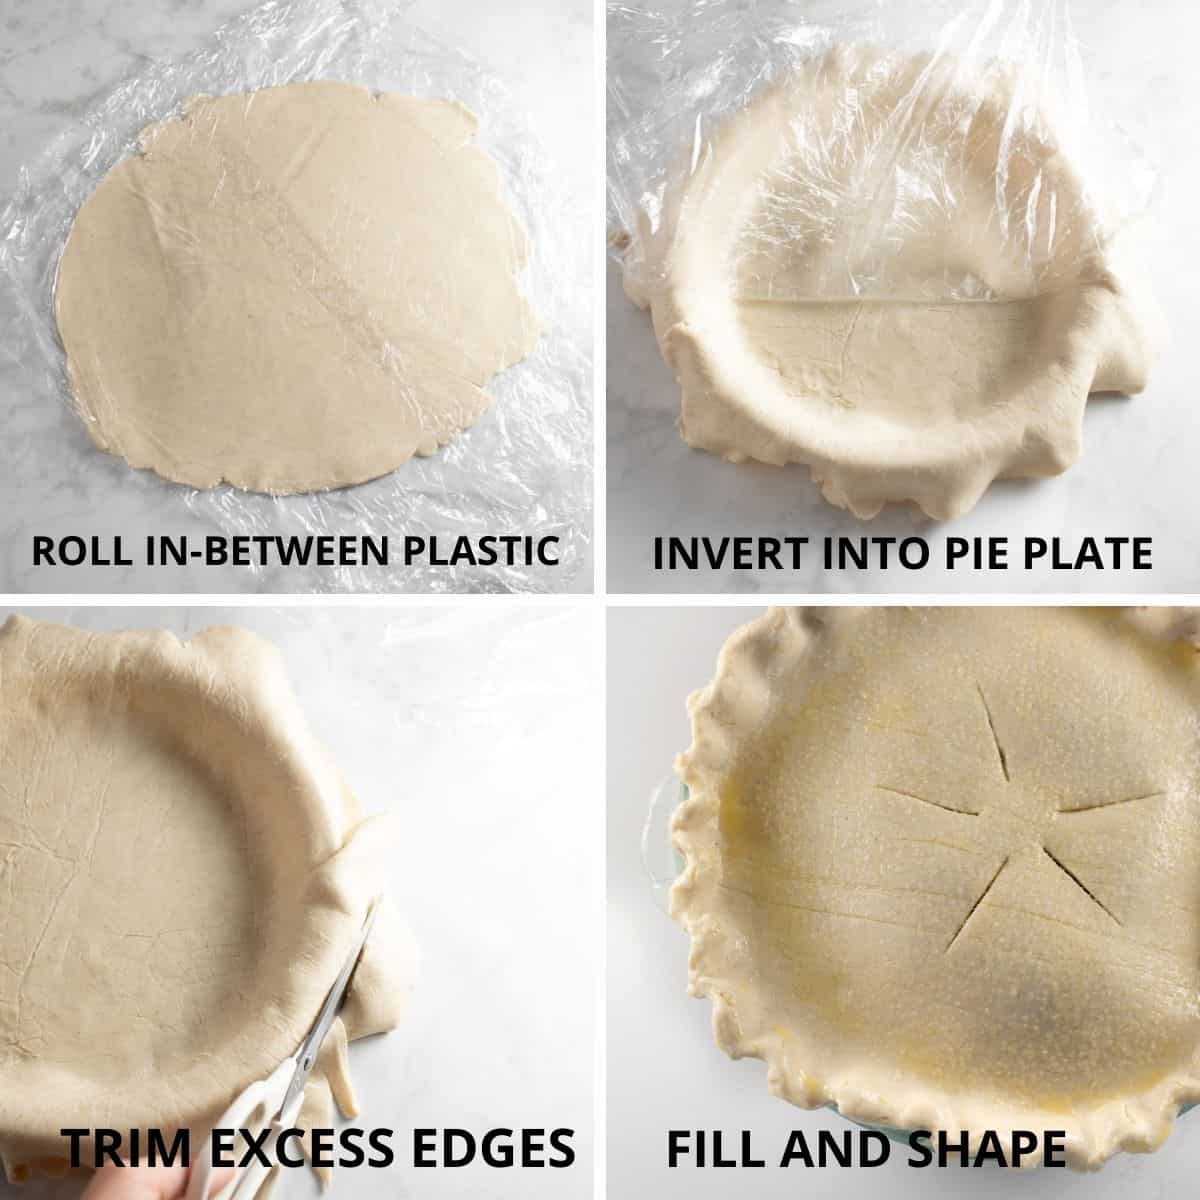
Gluten free crust is more delicate than regular pie dough. It helps to roll the dough in-between plastic wrap so you can easily transfer it to the pie plate.
UPDATE: I now recommend using a metal pie plate for a crisp bottom crust. I find a light metal 9-inch pie pan works best for gluten-free pies in general!
Peel off the top layer of wrap and carefully invert the rolled crust onto the plate. Then peel off the remaining plastic wrap off the pie shell. After this you can trim the edges and shape the crust as usual.
Tip: Try to smoosh any cracks that form on the edges together with the rolling pin as you roll. They may form at first, but the crust will meld together as you roll it.
You may also like my 2025 tested and perfected gluten-free pie crust!
A Pre-Cooked Apple Pie Filling!
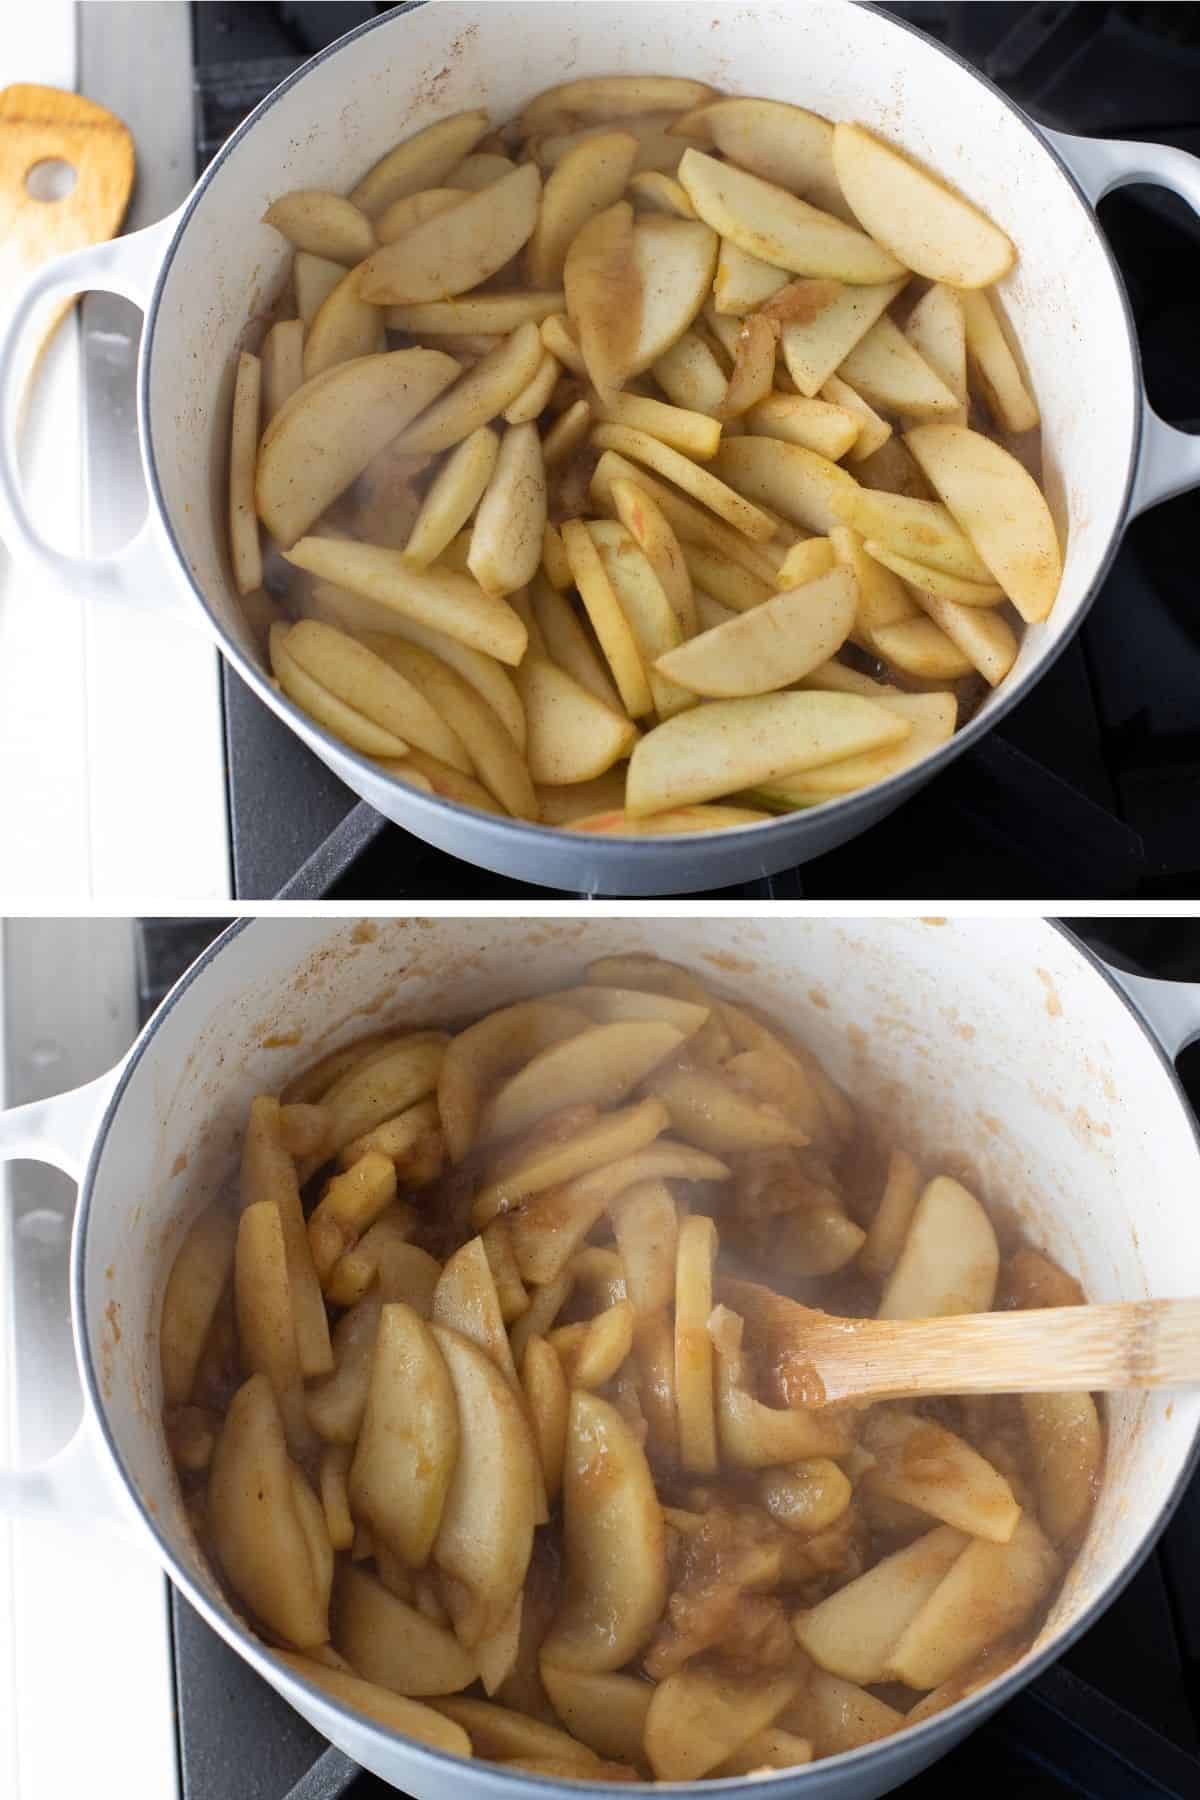
A pre-cooked apple filling with the apples, brown sugar and lemon juice is one of the key tricks to making a gluten-free apple pie with a crisp bottom crust!
Precooking the apples ensures the liquid thickens before it’s added to the crust. The best apples to use are tart and firm like granny smith apples.
To do this place all the filling ingredients in a large dutch oven and cook for about 5 minutes, until the apples just start to soften. Then thicken the juices with a little cornstarch and water.
The filling needs to cool completely before adding it to the pie crust.
Tip: To speed up the cooling process, pour the apple filling out onto a baking sheet and place in the refrigerator.
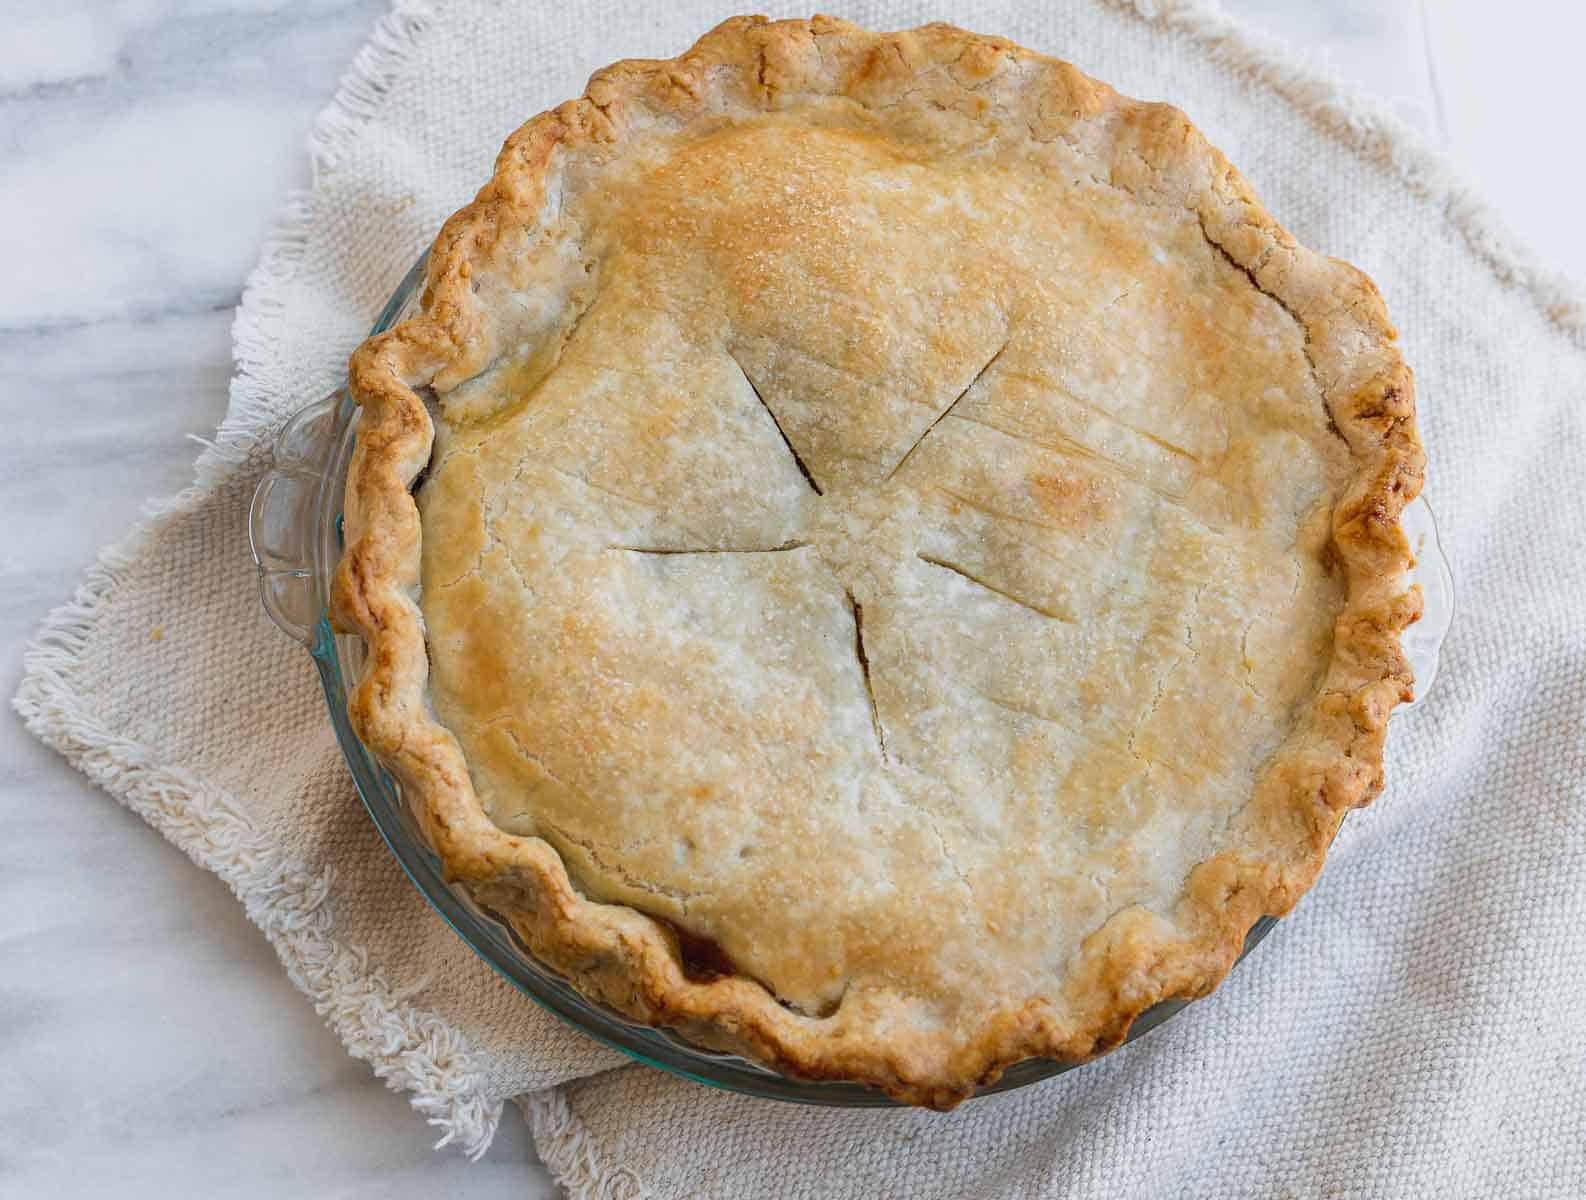
After the filling is made and cooled and the pie crust is chilled, it’s time to assemble the top of the pie and bake. I like to brush the top crust with an egg wash for that golden color. (SEE THE RECIPE VIDEO FOR A FULL TUTORIAL!)
Tip: Place a baking sheet in the oven as it preheats. You’ll place the pie on the hot baking sheet which will help the bottom crust bake.
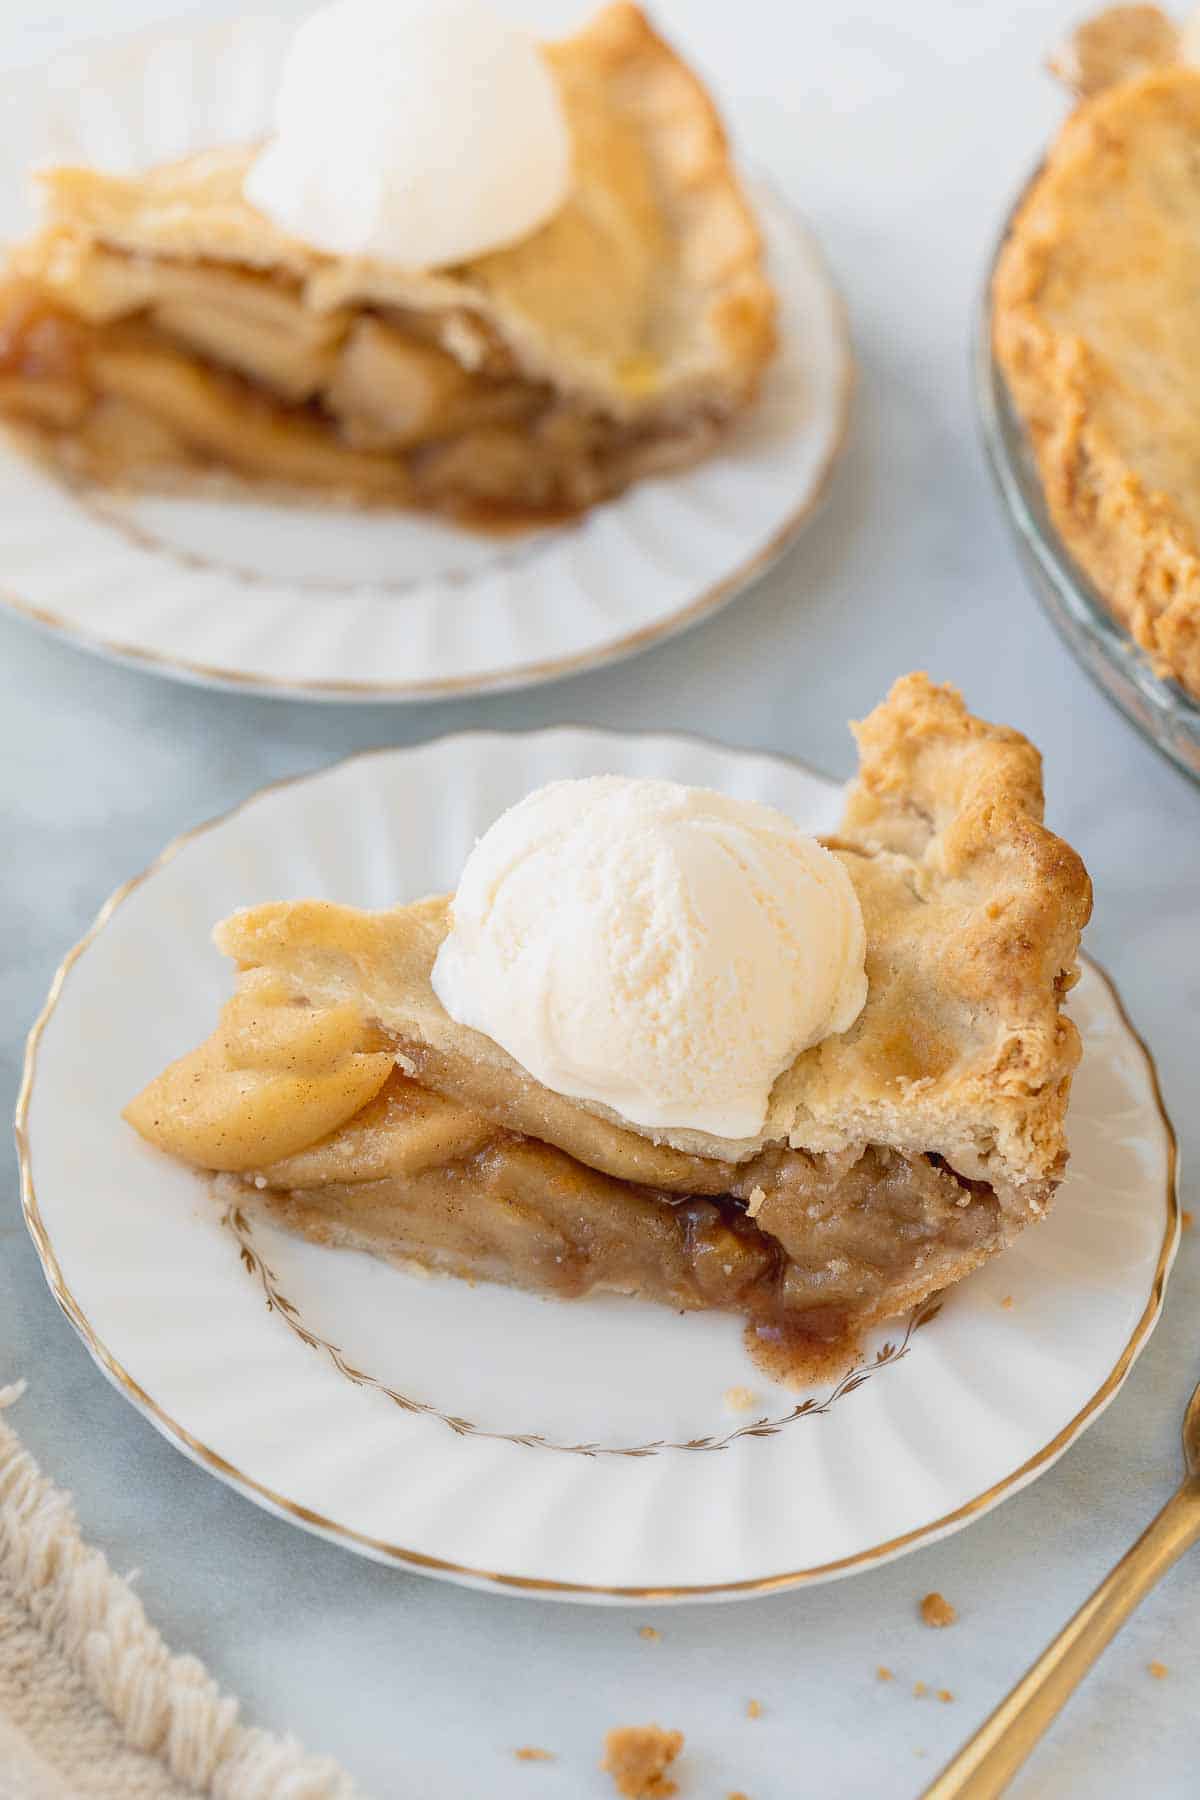
Let the pie cool and serve with a scoop of vanilla ice cream and a drizzle of caramel sauce. (Try this dairy-free caramel sauce!)
Tips for Amazing Gluten-Free Apple Pie
- For the best apple pie, start with a well-tested gluten-free pie crust recipe. Like the one in this post!
- Roll the pie crust in-between plastic wrap so it’s easier to handle
- Pre-cook the filling to get rid of extra moisture and ensure that the filling is perfectly thickened before going into the oven
- Taste the pre-cooked filling to see if you need to add more lemon or sugar to your liking
- Cook on pre-heated baking sheet for a crispy bottom crust
Make-Ahead Options
This pie is best eaten the day it’s baked. Unfortunately the gluten-free pie crust doesn’t hold up for longer storage.
To make this pie in advance I recommend making the apple pie filling and pie crust and refrigerating them until you’re ready to assemble the pie.
More Gluten-Free Thanksgiving Recipes


I hope this answers all your questions about gluten-free apple pie and sets you up for baking success! If you have any other questions please leave me a comment or star rating below. Happy Baking!

Gluten-Free Apple Pie (Homemade Crust!)
Video
Ingredients
For the Crust:
- 16 tablespoons salted butter (2 sticks)
- 6 tablespoons ice water
- 3 tablespoons sour cream (dairy-free sour cream works too!)
- 1 tablespoon white vinegar
- 2 cups gluten-free 1:1 baking flour 340 grams
- 2 teaspoons sugar
- 1 teaspoon salt
For the Filling:
- 4 pounds apples about 6-7 large apples, see the note below recommended apple types
- 2 tablespoons butter
- 1/2 cup brown sugar
- 1/4 cup granulated sugar
- 1 1/2 teaspoons ground cinnamon
- 1/4 teaspoon ground nutmeg
- 1/4 teaspoon ground allspice
- 1/4 teaspoon salt
- Zest of 1 lemon
- 2 tablespoons fresh lemon juice
- 2 tablespoons cornstarch + 2 tablespoons water
For the Egg Wash:
- 1 egg
- 1 tablespoon milk of choice
Instructions
Make the Crust:
- Cut the butter into small ¼-inch pieces and freeze for 10-15 minutes.
- Combine the ice water, sour cream, and vinegar in a small bowl. Whisk until smooth and set aside.
- Process the flour, sugar and salt in the bowl of a food processor until combined. Scatter the butter over top and pulse until the butter is the size of large peas, about 10 pulses.
- Add the sour cream mixture and pulse until the mixture begins to clump around the blade, about 10 pulses. If the crust does not clump around the blade after 10 pulses, pour it into a bowl and finish mixing with your hands or a spatula.
- Divide the dough into 2 balls. Press and shape into flat discs and wrap each disc tightly in the plastic wrap. Refrigerate for 1 hour or up to 2 days.
Make the Filling:
- Peel the apples and cut out the core. Then cut into 1/4 inch slices. Be sure to cut the apples the same size so they cook evenly.
- In a large deep skillet or Dutch oven, combine the sliced apples, butter, brown sugar, granulated sugar, cinnamon, nutmeg, allspice, salt, lemon juice and lemon zest. Cook over medium heat, stirring occasionally for about 10 minutes, until apples have slightly softened but not lost their shape.
- Mix together the cornstarch and water. Pour into the apple mixture and cook for another 2-3 minutes until thickened.
- Pour the filling into a bowl and let cool to room temperature. Taste the filling to see if it needs any more sugar or lemon juice to your liking.Tip: To speed up the cooling process, pour the apple filling out onto a baking sheet and place in the refrigerator.
Assemble the Pie:
- If you refrigerated the dough longer than 1 hour, let the dough sit at room temperature for 15 minutes before rolling. Roll the pie crust out between 2 large pieces of plastic wrap to 1/4-inch thickness. Tip: Try to smoosh any cracks that form on the edges together with the rolling pin as you roll. They may form at first, but the crust will meld together as you roll it.
- After rolling, remove the top piece of plastic wrap and flip into a 9-inch pie plate. (UPDATE: I recommend a metal pie plate!) Gently ease the dough into the edges of the pan before removing the 2nd piece of plastic wrap. Place the bottom crust in the fridge to keep chilled while you roll out the top crust the same way.
- Pour the cooled filling into the prepared crust. Top with the 2nd crust. Trim any overhang or excess dough. Seal edges with a fork or with your fingers. Cut a few slits into the center of the pie for the steam to escape. Place the pie in the freeze for 10 minutes before baking for the dough to chill one last time.
- Place a baking sheet in the center rack of the oven. Preheat the oven to 400F. Tip: You want the baking sheet to be in the oven as it preheats. You'll place the pie on the hot baking sheet which will help the bottom crust bake.
- Make the Egg Wash: Whisk together the egg and milk until totally combined. Brush the pie dough with egg wash and sprinkle sugar if desired.
- Place the pie on the preheated baking sheet and bake for 35 minutes. Lightly place a piece of foil on top of the pie to keep it from over-browning (or use a pie shield), then lower the oven temperature to 375 F. Bake for an additional 35-40 minutes, until golden brown and bubbly.
- Let the pie cool on a wire rack for 3 hours before slicing. (I know it's hard to wait but this is important!) Enjoy! (Tip: This pie is best eaten the day it's baked. See the notes for make-ahead instructions.)
Notes
- Use tart, firm apples. I prefer Granny Smith apple for this pie!
- Roll the pie crust in-between plastic wrap so it’s easier to handle
- Pre-cook the filling to get rid of extra moisture and ensure that the filling is perfectly thickened before going into the oven.
- Taste the pre-cooked filling to see if you need to add more lemon or sugar to your liking
- Cook on pre-heated baking sheet to get the bottom crust extra crispy


Hi, if I wanted to make tarts with any left over dough from the trimmings , how would you suggest altering the cooking temperature and time?
Thanks
Hi Wendy, the baking time and temperature would depend on the size tarts you’re making. We’d stick with the same temperature for a first try and judge the doneness by a golden crust and bubbly filling. We hope you enjoy the apple pie!
Came out beautifully!
We’re so glad you enjoyed the pie, Sara! Thank you for your kind feedback!
Made this and it came out great. Was a little hesitant on the lemon, but it really added a great flavor to the pie.
Love your recipes. Thank you.
Yay! We’re so glad you loved the recipe, John! Thank you for sharing your positive feedback with us. Happy baking!
Soooo good. Not able to tell it’s GF good. I had a go to crust but this is my new go to. It holds together so much nicer. The pie….oh my the pie…best apple pie I’ve ever had, period. The only this that I’ll change next time is the lemon juice. It was pretty tart forward. I’ll use 1 tbsp next time. Thank you for figuring this out for the world.
Yay! We’re so happy to hear how much you loved the recipe, Ashley! Thank you for sharing your positive experience with us. Happy baking!
Long story: my aunt (also my next door neighbor/additional gramma figure to my kids) has a tradition of “breakfast pie,” where she bakes a bunch of pies (not quiches – the regular kinds like cran-apple, triple berry, apple, pumpkin, etc) on Mon/Tues before Thanksgiving and then people (we) go over and eat them all week, including the day of Thanksgiving. I am newly gf, and missing out on breakfast pie is a super bummer.
So I made this apple pie with low expectations but some hope based on the reviews. Made it as exactly as I could. ‘Twas *chef’s kiss* perfect on Thanksgiving, and to be honest, I’ve had it as my own breakfast pie every day since then — still good as of Sunday (3 days later!!!). SO GOOD, y’all. I’m going to use this crust recipe and make a cherry pie for Xmas. Thank you so much, Erin!!! Breakfast pie lives on!
That sounds like such a fun tradition, Amanda! We’re so happy to hear you loved the recipe and that it works as a good breakfast pie! Happy baking!
Phenomenal!! Three of my six children have Celiac Disease and I’ve been searching for perfect GF Thanksgiving recipes for about 10 years now. Meaningful Eats is a gift to me, especially since I was recently diagnosed with Celiac myself. The GF Macaroni and Cheese, the GF Dinner Rolls, and this homemade GF Apple Pie were all hits at our dinner yesterday! These recipes are definitely keepers and will be handed down for many years to come. I have never found a good GF pie crust until this recipe!!! I baked it the night before and was worried that the crust would be soggy, so I let it sit on the table overnight and served it room temp – NO leftovers! Even the non-gluten-free eaters loved it! The metal pie pan is a great trick. Thank you! This is hands-down my favorite gluten free recipe board from now on!
Thank you for such a kind review, Debbie! We’re happy to hear so many of Erin’s recipes were a hit with your family this Thanksgiving! Happy baking!
Hi,
I am looking at a shortcut using a pre made GF pie shell 🙁 Can I use this filling in the crust and bake without a crust on the top?
Is there anything else (like a crumble) I could put on top to make it crispy?
Thanks so much!
Hi Jen, if you’re using a raw pre-made gf pie shell you can sprinkle one with gf flour and roll it out to make a top for the pie. Or a crumble topping will work too! A mixture of brown sugar, cinnamon, gf flour, and butter will taste great! We hope you enjoy the pie!
The absolute best apple pie I have ever had, gluten free or not. My dad (never baked gluten free in his life) whipped this up and we were SHOOK at how delicious the crust was! Everything is perfect, the sweetness, the spices, the flaky crust. Every single recipe I have tried on this site so far is incredible, she is the best gluten free baker by miles in my opinion, at this point I am no longer making anyone else’s recipes lol. We used Bob’s 1-1 flour for the crust
Wow! Thank you for such kind feedback! We’re so glad you and your family loved the apple pie and all of Erin’s recipes! Happy baking!
Hi! I made this a couple of months ago and it turned out amazing! I’m not much of a baker, especially from scratch, so I surprised myself a ton!! Anyways, this Thanksgiving I’m responsible for making two of these now!! Is it okay to bake two of them at the same time or would you recommend one at a time? My only concern is the time it takes to cool down after before serving, and that it’s also suggested to eat the same day. Sorry if this is a silly question, just want to do what I can ahead of time!
Hi Jay, while baking them separately will ensure a uniform bake, we totally get needing to bake them at the same time! If baking them together, give the pies space from each other so they don’t block airflow and consider rotating them halfway through so they bake evenly. They may need a little extra time in the oven, but ovens differ so just keep a close eye on them towards the end. We hope they’re a hit!
I just have a question! I’m prepping for Thanksgiving 2024 and am wondering if I can pre-cook this apple filling, let it cool, and freeze it ahead of time? Like in a freezer bag? Then let it thaw out in fridge night before thanksgiving? Thank you!
Hi Alexandria, yes that should work! Let it cool completely before freezing, then you can store it in a freezer bag or airtight container. And thawing overnight in the fridge sounds like a good plan. We hope you enjoy the pie!
Hi could you substitute sour cream with Greek yogurt? Sorry if you’ve mentioned this in the recipe already! Thanks!
Hi Hannah, that should work if you use full-fat greek yogurt rather than low-fat. We’d love to hear how it goes! Happy baking!
Hi,
I had problems with my pie crust. When I removed the pie out of the oven (it was baking on a pie pan) there was clear oil around the pie dish and the top crust of the pie was very oily. I followed all of the instructions but somewhere I must have done something wrong. Can you please help me troubleshoot?
Hi Susan, we’re sorry you had this experience. A few reasons why this might have happened: butter not cold enough, crust not chilled enough, oven temp too low or not preheated when the pie was put in the oven, or too much liquid in the filling. We hope these ideas help!
Turned out great!!!!! Easy to follow with the great step by step directions. My family loved it!
Yay! We’re so glad the pie was a hit with your family, Brady! Thank you for taking the time to share with us. Happy baking!
This is divine! The top crust was firm and soft in the center. Browned beautifully. The bottom crust was firm and moist, very good. The filling was delicious. This is a keeper recipe. My boyfriend just loved it! I will be making this again in a few weeks. It was fun to make, and turned out like a pie from a bakery. Very happy!
Yay! We’re so glad you and your boyfriend enjoyed the recipe! Thank you for taking the time to share your kind review.
This is the first gluten free pie I’ve ever made and it came out good,but not perfect. I’m hoping you can give me some advice!
First, the filling was perfect. I honestly have avoided using corn starch to thicken the filling, feeling like it’s a bit cheating (which I acknowledge is silly) but I went ahead and did it and it worked wonderfully.
I made the crust with King Arthur Measure for Measure gluten free flour. The dough has a fantastic consistency and rolled extremely well. Once baked it was not soggy on the bottom, but it just wasn’t the nice flakey crust I wanted. It has a good flavor but was a bit rubbery, not crispy or flakey.
It was nicely browned and fully cooked, just not a great consistency. Any advice?
Hi Jerod, we’re glad you enjoyed the filling and flavor! The key to crispy, flaky crust is to use cold water and cold butter. Also, for gluten-free crusts it definitely helps to use a metal pie pan to get that bottom crust crisp. Beyond that a number of things can factor into the texture, such as overworking the dough or having the flour to water ratio off a bit. We hope these ideas help!
Loooove this recipe! I first made it in Dec 2021, and here I am two years later, back again! I used King Arthur brand gluten free pie crust mix. Which is probably a waste of my money because I still have to add 2 sticks of butter to it lol. Next time I’ll try your crust recipe. I love that you precook the filling, it turns out so much better that way. Especially for gluten free, not such a soggy bottom crust. Thank you for sharing this and for all the detailed notes and directions. After it cools, I cut it into slices and freeze the slices on a cookie sheet covered in parchment, separated by an inch or two. Then once they’re frozen, I throw them in a freezer bag. Makes it so easy to defrost individual slices. Anyway, 5 stars and thanks again!!!
I’m so glad you enjoyed it!