


Erin’s Recipe Rundown

Texture: Soft and tender, never crumbly.
Taste: Very peanut buttery with a touch of chocolate!
Ease: Simple recipe and easy to make for gifts or parties.
Top Tips: I recommend using a 1 tablespoon-sized dough balls for the right dough-to-chocolate ratio. I also like to chill the dough for 1 hour for the best texture.
Recommended GF Flour: I like to use King Arthur Flour Gluten-Free Measure-for-Measure Flour for this recipe.
Would I make these again? Absolutely! It wouldn’t be the holidays without a batch of these classic cookies. They’re great for holiday cookie exchanges, parties, and gifting.
xoxo erin

This post was originally published in November 2022. It was updated with new photos and instructions in October 2024
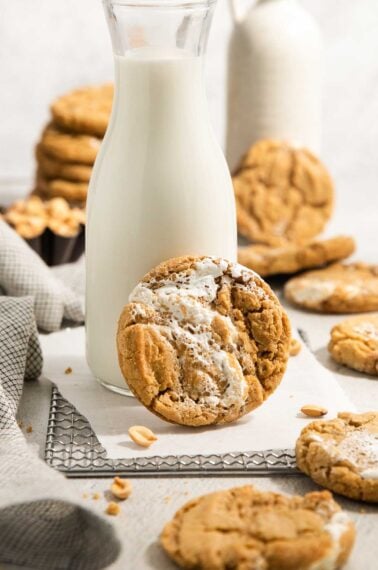
This is my gluten-free version of the classic peanut butter blossom! I absolutely loved these cookies growing up and after some testing, I’ve landed on a gluten-free peanut butter blossom recipe that is just as good as the cookies I remember.
These cookies are NEVER dry and crumbly — they always turn out moist and have the perfect ratio of cookie to Hershey’s Kiss. Everyone will love them, even if they don’t eat gluten-free!
Featured Comment
From Alison: “Love this recipe. I can’t say enough good things – my friends and family love the cookies. They came out of the oven looking beautiful, taste awesome. Soft and delicious!! Thank you for this amazing mix.”
Table of Contents
- Erin’s Recipe Rundown
- Ingredients You’ll Need
- How to Make Gluten-Free Peanut Butter Blossoms
- Make-Ahead/Storage/Freezing Instructions
- Can these gluten-free peanut butter blossoms be made dairy-free?
- How do I prevent the cookies from spreading too much?
- Can I use natural peanut butter or other nut butters?
- Recipe Tips
- More Gluten-Free Christmas Cookies
- Gluten-Free Peanut Butter Blossoms (Tried-and-True Recipe!) Recipe
Ingredients You’ll Need
Here are a few notes on some of the key ingredients to make these peanut butter blossoms. Jump to the recipe card below for the exact measurements.

- Gluten-free measure-for-measure flour: Always use a high-quality gluten-free flour blend that contains xanthan gum, which helps create the perfect texture and crumb. My go-to is King Arthur’s Measure-for-Measure.
- Peanut butter: I find that creamy peanut butter, like Jiff or Skippy, works better than natural peanut butter for this recipe. Don’t use crunchy peanut butter. It will change the texture of the dough!
- Butter: You can use your favorite dairy-free butter to make these cookies dairy-free.
- Hershey’s Kisses: This recipe isn’t complete without Hershey’s chocolate Kisses! Freeze them ahead of time so they don’t melt on the cookie. For dairy-free, you can use a chunk of dairy-free dark chocolate in place of the chocolate Kiss.
If you love peanut butter be sure to check out these gluten-free peanut butter cookies, gluten-free peanut butter pie, peanut butter balls with rice krispies, gluten-free no-bake cookies and gluten-free monster cookies.
How to Make Gluten-Free Peanut Butter Blossoms
Here’s an overview of how to make these cookies. You can jump to the recipe for the full instructions!

- In a medium bowl: Whisk together the flour, baking soda, and salt, then set to the side.
- In a separate bowl: I use a stand mixer with the paddle attachment, but you can also use a large bowl with an electric hand mixer. Beat the butter on high until creamy (1 minute).
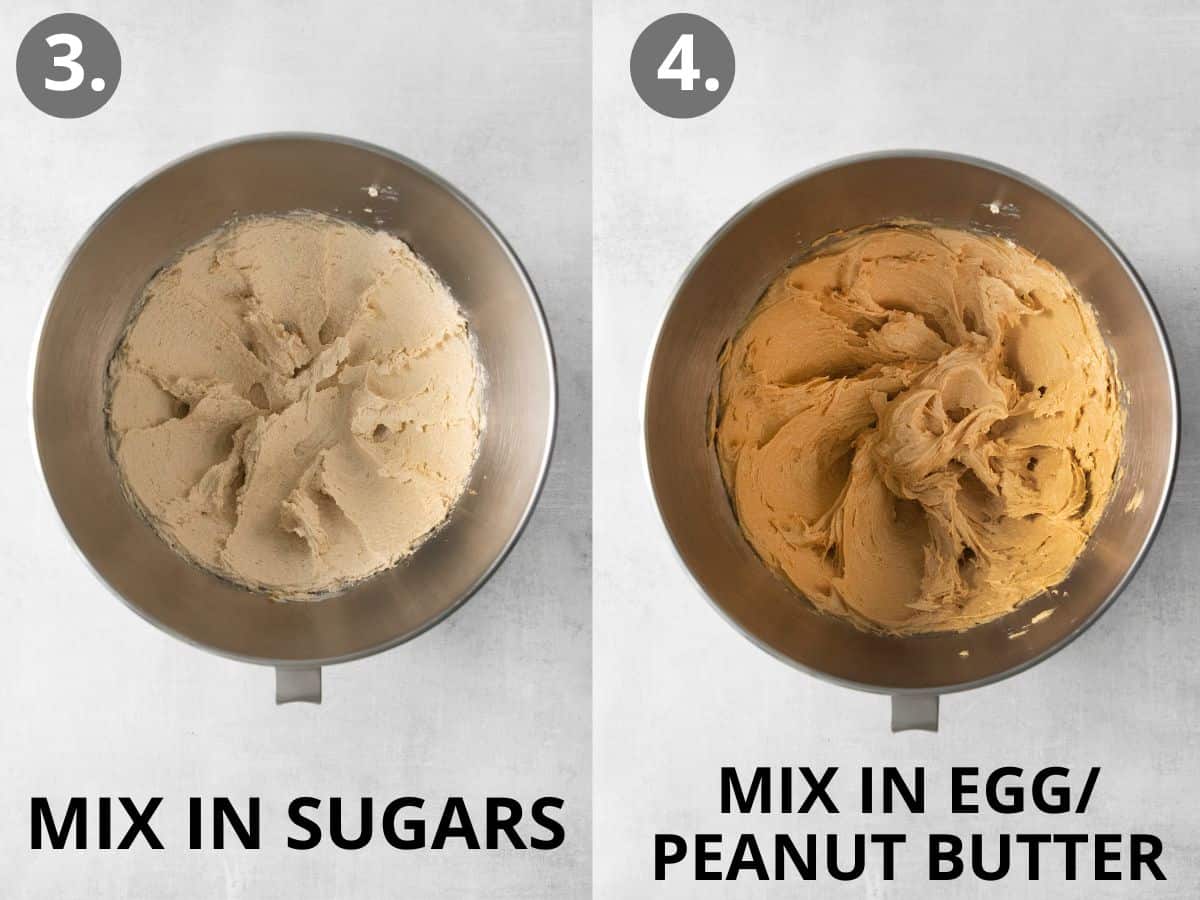
- Mix in sugars: Mix in both the brown and granulated sugars on medium-high speed until creamed (about 2 minutes).
- Mix in more: Add the egg, peanut butter and vanilla. Beat on medium-high speed until well-combined (about a minute or so).

- Add dry ingredients: Put the mixer on low and slowly add in the dry ingredients. Continue to mix on low until combined. Cover the bowl and refrigerate for at least 1 hour.
- Roll in sugar: Use a cookie scoop to create 1 tablespoon-sized balls. Roll each ball in sugar before placing on the prepared baking sheet about 3 inches apart.

- Bake: Bake on 350°F for 11-13 minutes or until the tops begin to slightly crack.
- Add Kisses: As soon as the cookies come out of the oven, press a frozen chocolate Kiss into the center of each cookie until it sticks. Let cool for 5 minutes, then transfer to a wire rack to cool completely.
Make-Ahead/Storage/Freezing Instructions
- To Make-Ahead: Prep the dough and wrap tightly in plastic wrap, then refrigerate for up to 3 days before baking. Or freeze the dough balls by placing them in the freezer on a baking sheet for 1-2 hours until set, then storing them in an airtight container or freezer bag. Freeze for up to 3 months then bake according to recipe (you may need to add a few extra minutes when baking from frozen).
- To Store: Store the cookies in an airtight container at room temperature for up to 5 days. Be careful stacking the cookies! If you can’t store them in a single layer, make sure to place parchment paper between the layers to prevent sticking.
- To Freeze: Let baked cookies cool completely then freeze for up to 3 months. They freeze best in a single layer in an airtight container or freezer bag. To thaw, let sit at room temperature for a few hours before serving.
Can these gluten-free peanut butter blossoms be made dairy-free?
Yes! You can use dairy-free butter and dairy-free dark chocolate chunks in place of the chocolate Kisses.
How do I prevent the cookies from spreading too much?
Chilling the dough before baking helps prevent extra spreading. Accurate measurements and oven temperatures also make a difference. Keep in mind warm baking sheets and even the material of the baking sheets can all change how much or little the cookies spread.
Can I use natural peanut butter or other nut butters?
This recipe works best with creamy peanut butter, like Jiff or Skippy. Using natural peanut butter or other types of nut butters can impact the texture and overall structure of the cookies. I also don’t recommend using crunchy peanut butter for the same reason.
Recipe Tips
- Don’t make the dough balls any bigger than 1 tablespoons. If you make them bigger, the cookie-to-chocolate ratio will be off.
- For best results with these peanut butter Kiss cookies, use a smooth peanut butter (like Jiff or Skippy) for this recipe. You also might like this peanut butter popcorn.
- I like to place the Hershey’s Kisses in the freezer so they don’t melt when you place them on the cookie. (Place the chocolate kiss on the baked cookie right after it comes out of the oven so it sticks!)

More Gluten-Free Christmas Cookies

Gluten-Free Peanut Butter Blossoms (Tried-and-True Recipe!)
Ingredients
Dry Ingredients
- 1⅓ cups (200g) gluten-free measure-for-measure flour
- ½ teaspoon baking soda
- ¼ teaspoon kosher salt
Other
- ½ cup (113g) butter at room temperature
- ½ cup (106g) brown sugar
- ¼ cup (50g) granulated sugar
- 1 large egg
- ¾ cup (187g) creamy peanut butter
- 1 teaspoon vanilla extract
- 24-32 chocolate kiss candies unwrapped
- granulated sugar for rolling
Instructions
- In a medium bowl, whisk together the gluten-free flour, baking soda and salt. Set aside.
- In the bowl of a stand mixer, or using a hand mixer, beat the butter for 1 minute until creamy.
- Add the brown sugar and granulated sugar and mix until creamed, about 2-3 minutes.
- Add the egg, peanut butter and vanilla and beat until creamy and smooth, another minute or so. Scrape down the sides and bottom of the bowl.
- With the mixer running on low, slowly add the dry ingredients to the wet ingredients and mix until well-combined.
- Cover the bowl and refrigerate for at least 1 hour, or up to 3 days.
- Preheat the oven to 350°F. Line large baking sheets with parchment paper or silicone baking mats.
- Place the unwrapped chocolate kiss candies in a bowl and set them in the freezer.
- Scoop the cookie dough into round balls, 1 tablespoon per ball. (Don’t make them too big or you won’t have the right cookie-to-chocolate ratio.) Roll each ball in granulated sugar before placing it on the baking sheet, about 2 inches apart.
- Bake for 10-12 minutes or until the tops crack slightly.
- Remove from the oven and immediately press a chocolate kiss candy into each cookie.
- Let cool on the baking sheet for 5 minutes, then transfer to a wire rack to cool completely.


These were delicious-exactly like the non-GF ones! I made the cookies a little too big and they were still excellent. Listen to the author’s instructions and make the cookie balls 1T sized. 😉
Hi Sofia, thanks for your great review! The right sizing is definitely helpful!
These are by far the BEST peanut butter blossom recipe out there! I’ve tried others that omit flour and rely heavily on sugar and peanut butter and egg only, and they do not bake up nicely at all. I love the inclusion of GF flour and the perfect ratio of other ingredients to make the end result nice and puffy, just like the original recipe. This keeps great in the freezer and doesn’t get crumbly either. Thanks for a GREAT recipe. This will be added to my Christmas baking collection.