

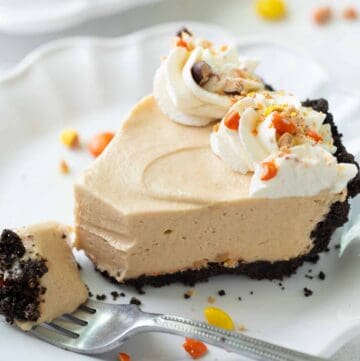
This gluten-free peanut butter pie has a smooth, creamy cream cheese-based peanut butter mousse and an easy, gluten-free Oreo crust.
Made from scratch (with no cool whip in sight!), this pie is the perfect dessert for any occasion! It’s quick and easy to make, but guaranteed to impress.
This pie features an easy, gluten-free oreo pie crust. We love to make it for birthdays, BBQs and more!
Meet your new favorite gluten-free dessert! This gluten-free peanut butter pie is fluffy, rich and perfectly peanut-buttery. Check on this post on is peanut butter gluten-free.
I love to make this pie when I want a special dessert that’s also easy to make. For more decadent treats, try these recipes for gluten-free chocolate pie, gluten-free key lime pie or gluten-free pecan pie.
If you love peanut butter you might also like these recipes for peanut butter popcorn, peanut butter bars and gluten-free monster cookies!
How to Make Gluten-Free Peanut Butter Pie
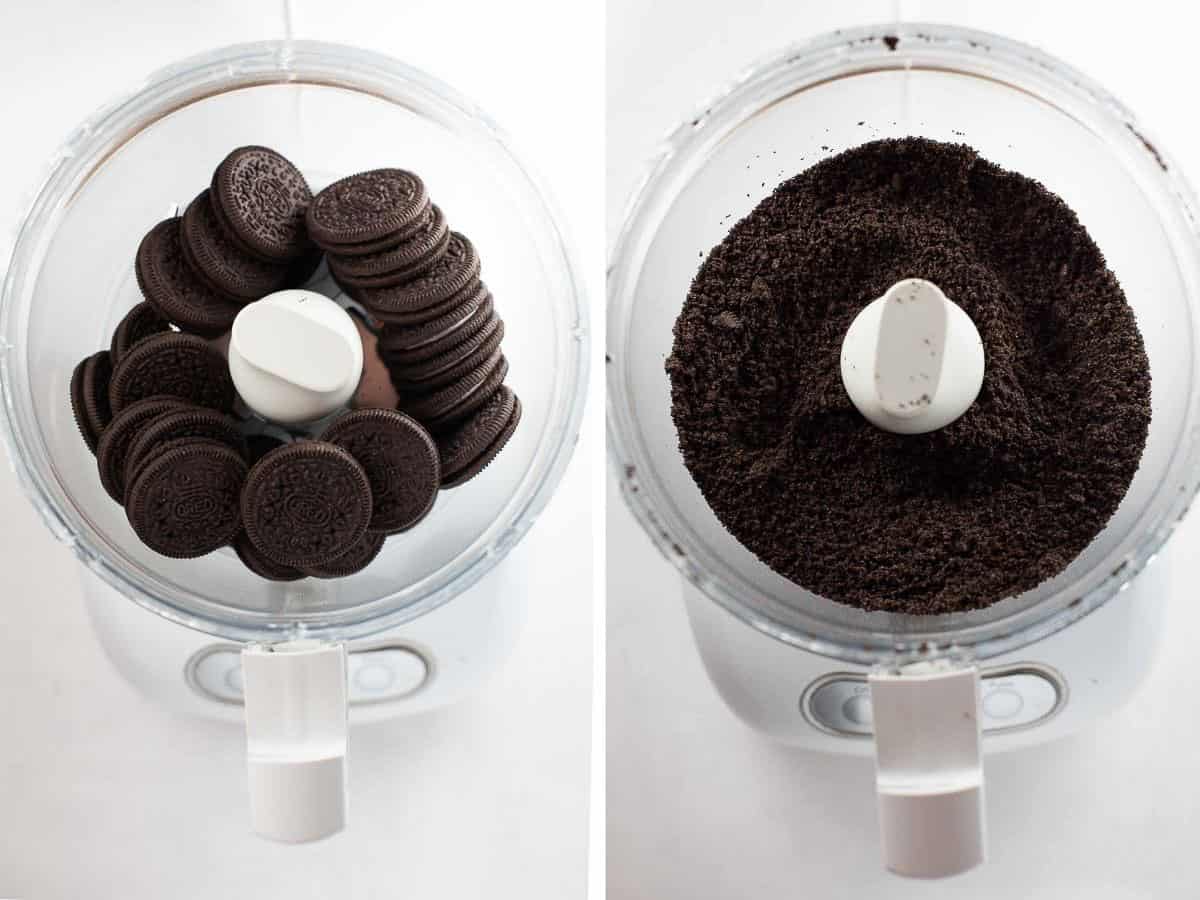
To make the crust, you’ll just need a food processor and a pie plate.
Make the Crust
Start by blending the gluten-free Oreo cookies (crust and cream) into a powder. If any large cookie chunks remain, simply remove them (chef’s snacks!).
You can also use this crust in my gluten-free peppermint oreo pie!
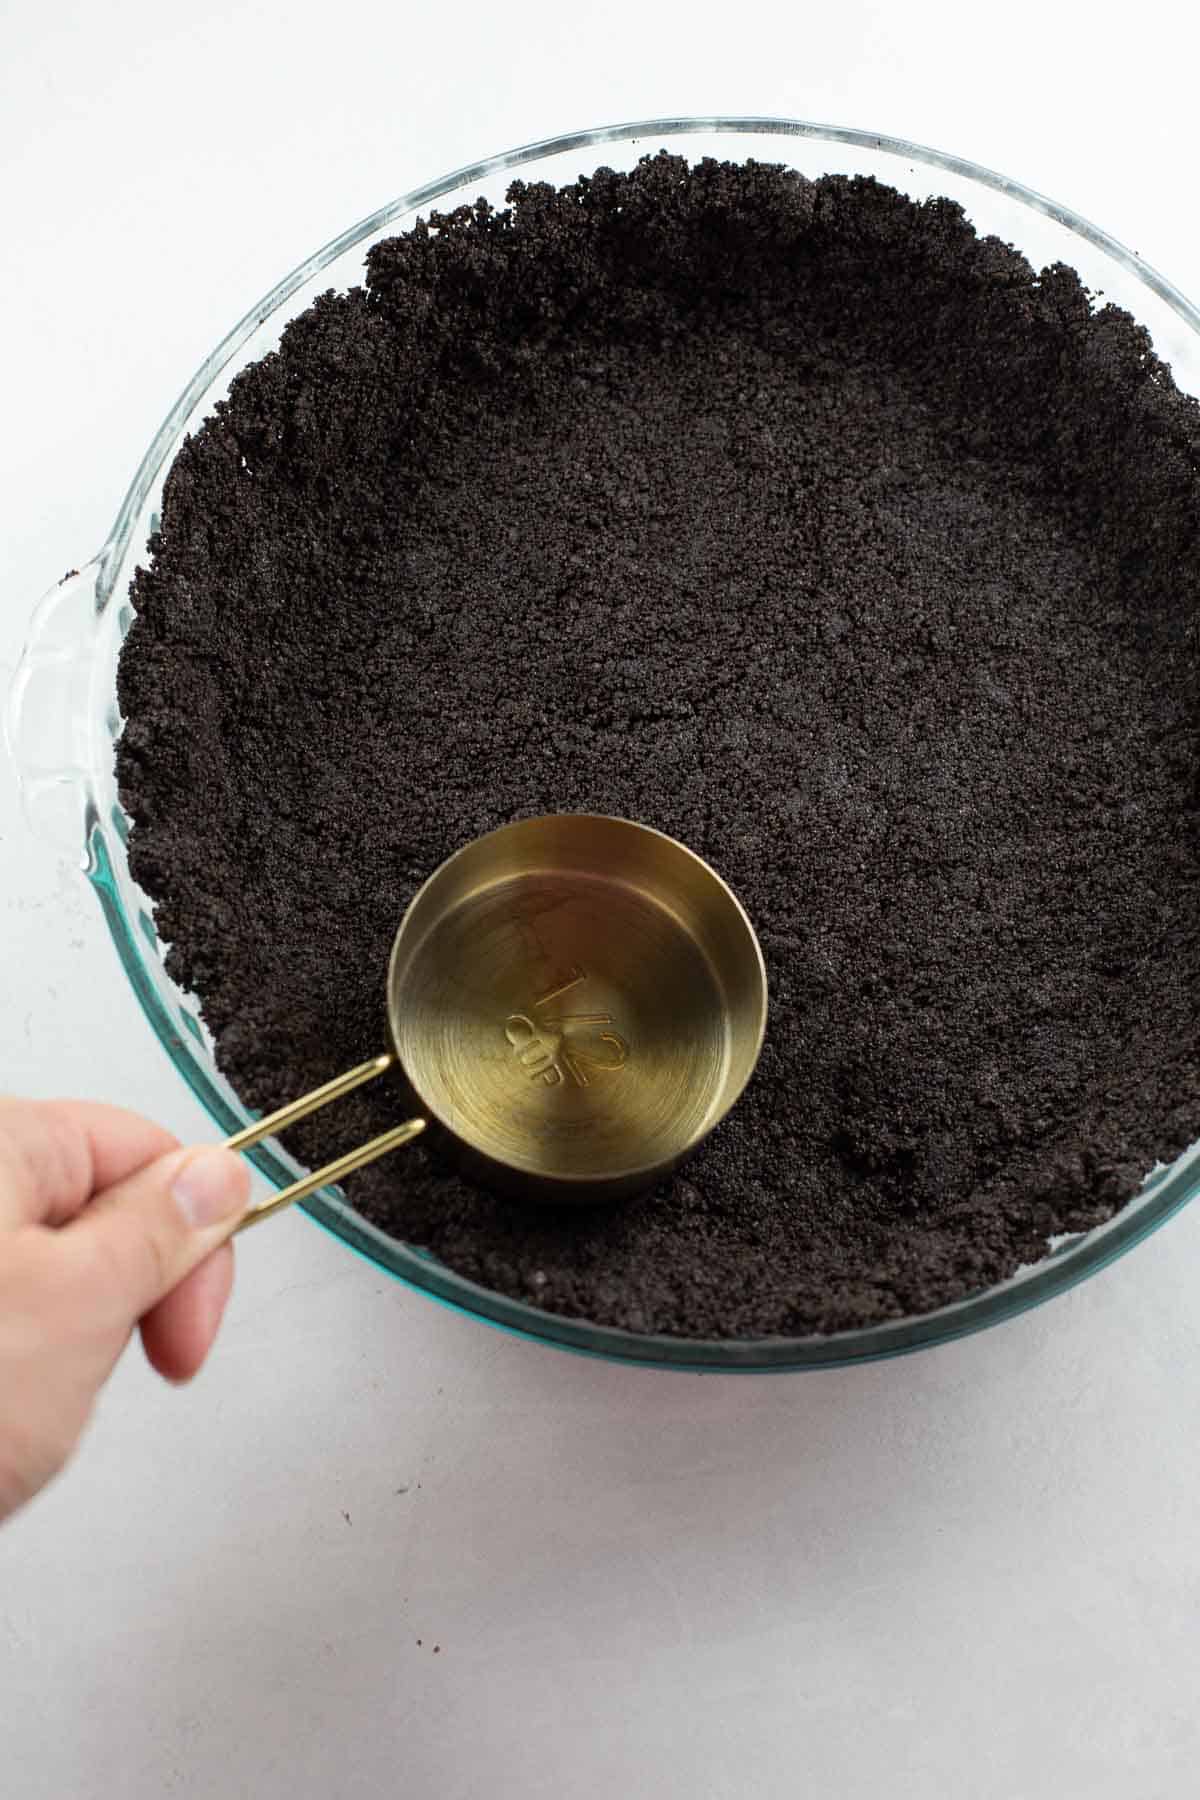
Mix the oreo crumbs with melted butter and press into a pie plate. You’ll bake the crust for 10 minutes and then it completely cool before adding the peanut butter mousse.

Make the Whipped Peanut Butter Filling
All you need is a stand or hand mixer and large mixing bowl to make the peanut butter mousse. The method for making this pie is very similar to my gluten-free chocolate mousse cake.
First, mix together the base ingredients, then slowly add the whipped cream and mix until light and fluffy.
Tip: Be sure to use “heavy cream” because it contains a milk fat percentage of 35% (or higher). Many brands of heavy whipping cream only have 30-35% milk fat, whereas heavy cream has 35% or higher. This mousse needs the extra milk fat to be sure it turns out thick and creamy. I prefer Darigold heavy cream (40% milk fat). Not all brands or cartons label the milk fat percentage, so to be safe, look for a brand that has 35% (or higher) written on the carton.

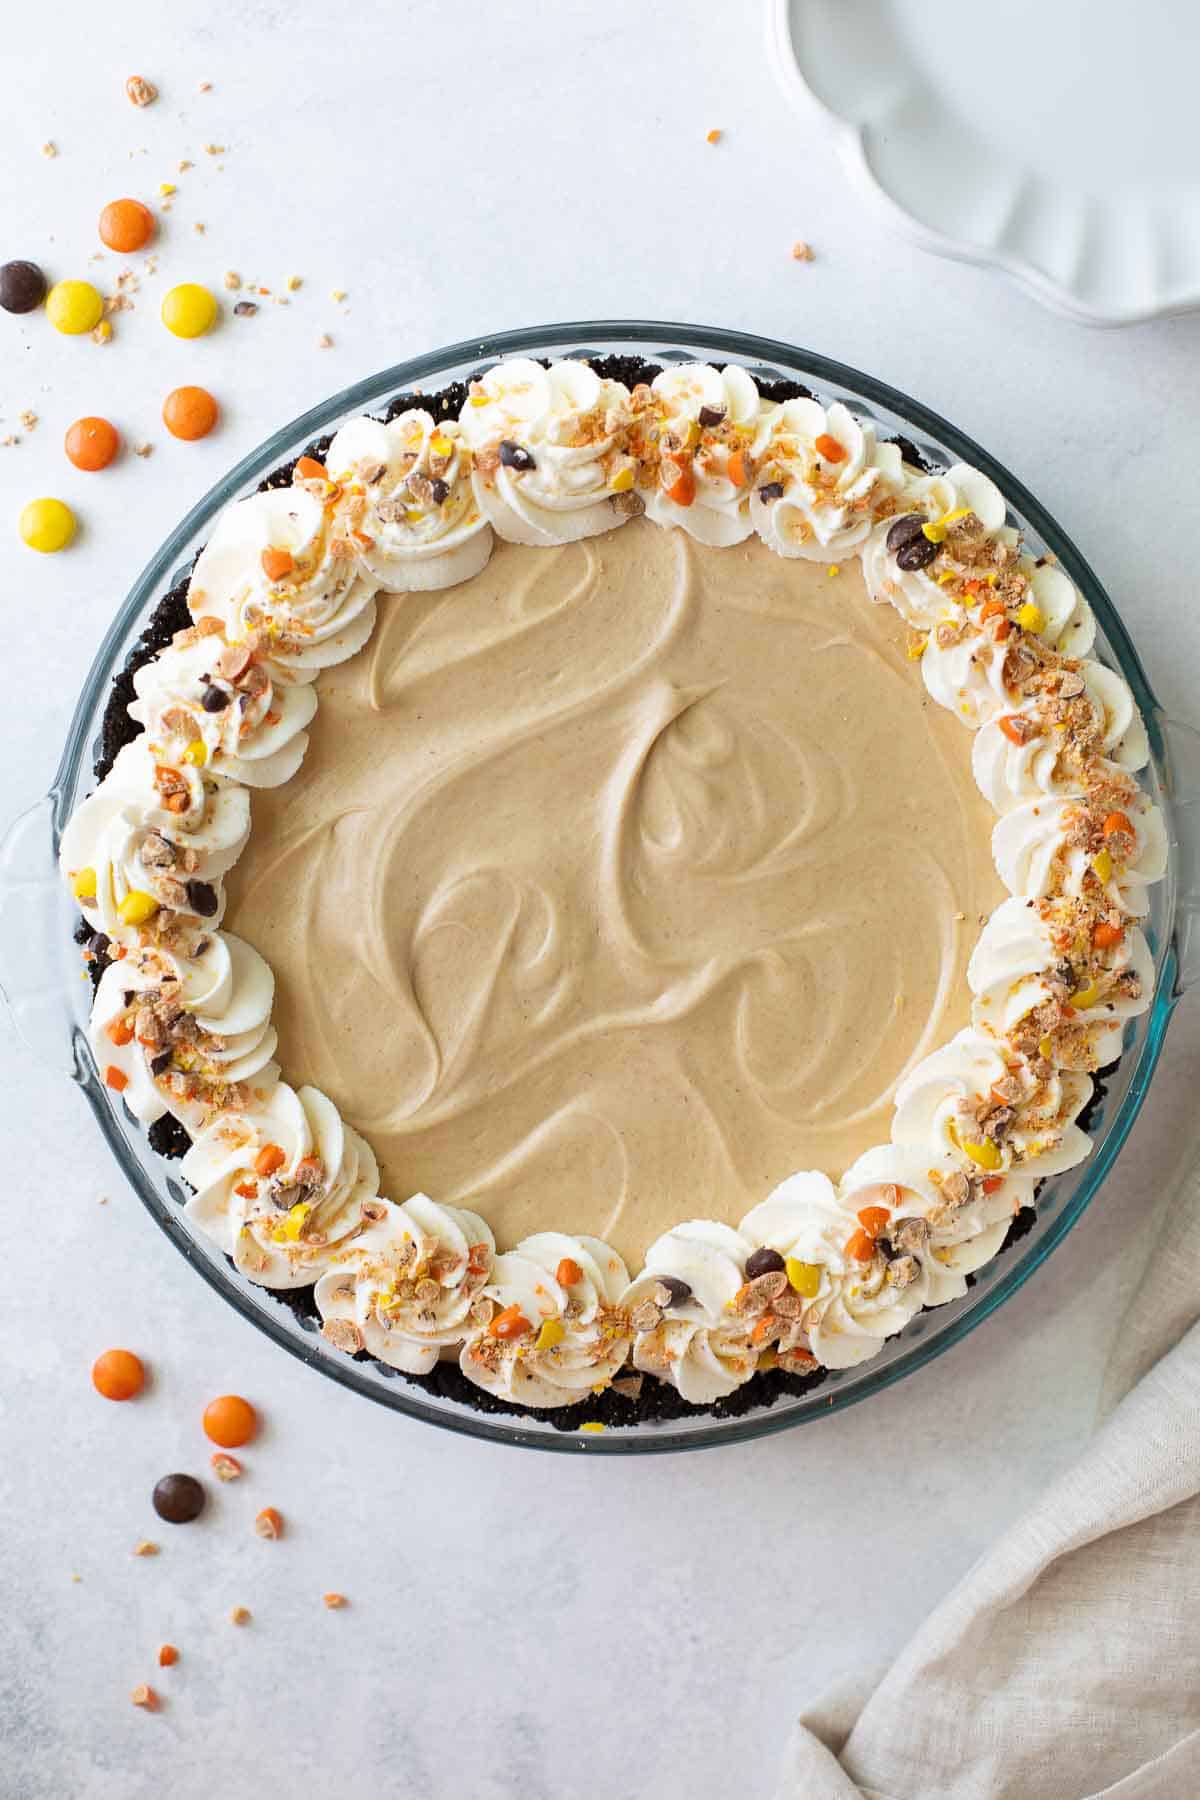
Once the crust is cooled, I like to add a layer of crushed Reese’s pieces for a little extra texture and color! You can totally skip this though.

Add that dreamy, creamy fluffy filling over top and smooth it out. Cover and refrigerate for at least 6 hours or up to 3 days. Top it with whipped cream and more crushed Reese’s pieces before serving!

Make it in Advance
This pie is a great make-ahead dessert option! It will keep in the fridge for up to 3 days (even 4-5!). Unlike other gluten-free pie crusts, the Oreo crust won’t get soggy as fast.
More Gluten-Free Desserts
- Gluten-Free Chocolate Sheet Cake
- Gluten-Free Cheesecake
- Gluten-Free Pumpkin Pie
- Gluten-Free No-Bake Cheesecake
- Gluten-Free Angel Food Cake
Happy Baking! I hope you like this recipe as much as we do. If you make this recipe, please leave me a comment/rating below!
Gluten-Free Peanut Butter Pie
Ingredients
For the Crust:
- 24 gluten-free Oreos
- 4 Tablespoons butter melted
For the Peanut Butter Filling:
- 12 oz cream cheese the brick kind in the foil wrapper
- 1 1/2 cups creamy peanut butter
- 1 3/4 cups powdered sugar
- 1 teaspoon vanilla extract
- 1 1/2 cups heavy cream
- Crushed Reese’s Pieces optional
For the Whipped Cream Topping:
- 1 cup heavy cream
- 1/4 cup powdered sugar
- 1/2 teaspoon vanilla extract
Instructions
Make the Crust:
- Preheat the oven to 350F. In a food processor or blender, pulse the whole gluten-free Oreos (cream filling and cookie) into a fine crumb. Remove any large pieces of Oreos. Stir the Oreo crumbs and melted butter together.
- Using your hands or a measuring cup, press into the bottom and up the sides of a 9 ½-inch pie dish. Bake the crust for 10 minutes. Cool completely before adding the filling.
Make the Filling:
- In the bowl of a stand mixer, add the cream cheese, peanut butter, powdered sugar and vanilla. Mix until completely smooth, scraping down the sides and bottom 1-2 times.
- With the mixer running on low, slowly pour in the heavy cream. Scrap down the sides and bottom of the bowl, then increase the speed of the mixture to medium-high and whip until light and fluffy, about 3-4 minutes.
- Sprinkle the crushed Reese's Pieces over the bottom of the cooled crust (if using). Spread the peanut butter filling over the crust. Smooth the top. Cover and refrigerate for at least 6 hours or up to 3 days.
Make the Topping:
- Using an electric mixer, beat the cream and powdered sugar in a medium bowl until soft peaks form. Pipe or spread the whipped cream over the pie. Sprinkle with more Reese's pieces, if desired. Enjoy!


I’ve made this a few times for parties and it’s the dessert everyone requests now! So simple and decadent!
We love to hear this, Lauren! Thank you for such wonderful feedback!
I made this recipe for a group of our friends, and one of those friends is of. Everyone raved about the dessert and had no clue it was of, except I told my of friend. 10 out of 10, and I dont give those marks lightly. Thanks so much for sharing the recipes.
Aww, thank you for such amazing feedback, Tammie! We’re so happy to hear the pie was a hit with everyone, Gf and not!
I haven’t tried this recipe yet, but need to confirm the ingredient list: “12 oz brick of cream cheese.” That would be 1-1/2 packages of the foil-wrapped bricks(?).
Hi Kathleen, yes the brick kind of cream cheese usually comes in 8 oz packages so you’ll use 1.5 packages. We hope you love the pie!
Delicious pie. Using the heavy cream instead of Cool Whip, like most recipes call for, takes it next level! Like others have mentioned, I did have a lot of filling left. Is this something that could be frozen and used at a later time? After it is thawed and re-whipped?
Hi Kim, we’re so glad to hear how much you enjoyed the pie! We haven’t tried freezing the filling, but it should work okay. We’d let it set in the fridge first, then it should keep in the freezer for about a month. Thaw in the fridge overnight and then rewhip. If you decide to test it out, we’d love to hear how it goes!
Delicious pie! Everybody loved it. I ended up with way too much filling, so next time I will scale that down. I will also add more crushed Reese’s to the crust! I’m loving my new cookbooks
Hi Kate, thanks so much for sharing! So happy to hear you enjoyed this pie and the cookbooks overall!
If I want to make this into 5oz. Cups could I just not bake the crust? Do I still use butter in the cookie crumbs and just press into cups? Thank you
Hi Holli, we still recommend baking the crust as instructed here, just shorten the baking time. This will help the crust stick together and give it a crisp texture—otherwise you’ll just end up with fine, dusty cookie crumbs. But if you’re okay with that, you could try it that way!
I made this for my hubby who loves PB. It turns out lighter than what he remembers and I think it is because of the whipped cream cheese filling. The cream cheese gives it a nice balance. I browned the melted butter a little before incorporating it into the cookie crumbs. I also added a pinch of kosher salt to the whipped cream as I was whipping it and really liked how it turned out. Did realize you have to be careful not to end up making butter. lol
Thank you for the recipe!
Thank you for taking the time to share your positive feedback with us, Victoria! We’re so pleased you and your husband enjoyed the recipe and that those adjustments worked well for you. Happy baking!
I love peanut butter, but I love this pie even more! Made it for my Father’s Day dessert and shared with my family. Huge hit!!! Can’t wait to make it again!
Yay! Thank you for taking the time to share this positive experience with us! We’re so pleased to hear how much everyone enjoyed the pie!
Has anyone tried to freeze this? Would really like to know.
Hi Feebee, we haven’t tried it, but it should freeze okay without the whipped cream (whipped cream will deflate). You’d still want to refrigerate it first to set the filling, then wrap it tightly in plastic wrap before storing it in foil or an airtight container. It should hold up in the freezer for up to 1 month. Then, thaw in the fridge overnight and top with fresh whipped cream to serve. We hope you enjoy the recipe!
This is EXCELLENT!!! My grandsons loved the Oreo Cookie crust and the Reese’s Pieces on top.
Fantastic recipe!!! Thank you as always!!!
Yay! We’re so pleased to hear how much you and your grandsons enjoyed this pie, Vicki! Thank you for taking the time to share your positive experience with us!
I made it for Easter it was a hit! Deliciously smooth ! Your recipes are amazing ❤️
Hi Stephanie, thank you for sharing your kind feedback with us! We’re so pleased to hear the pie was such a hit!
Someone just told me this was their favorite pie from the Pi Day party, and they had no idea it was gf! Thanks again for the inspiration.
Aww, what great feedback! We’re so glad this recipe was such a hit! Thank you for sharing this with us, Michelle.