


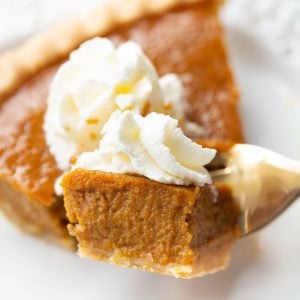
Gluten-Free Pumpkin Pie! A crowd-pleasing holiday favorite made from scratch with a flaky gluten-free pie crust. Thanksgiving isn’t complete without it!
Whether you’re a gluten-free eater or hosting a gluten-free guest, this blog post has all the tips you’ll need to make a smooth and rich pumpkin pie in a homemade pie crust. Nobody will be able to guess it’s gluten-free!
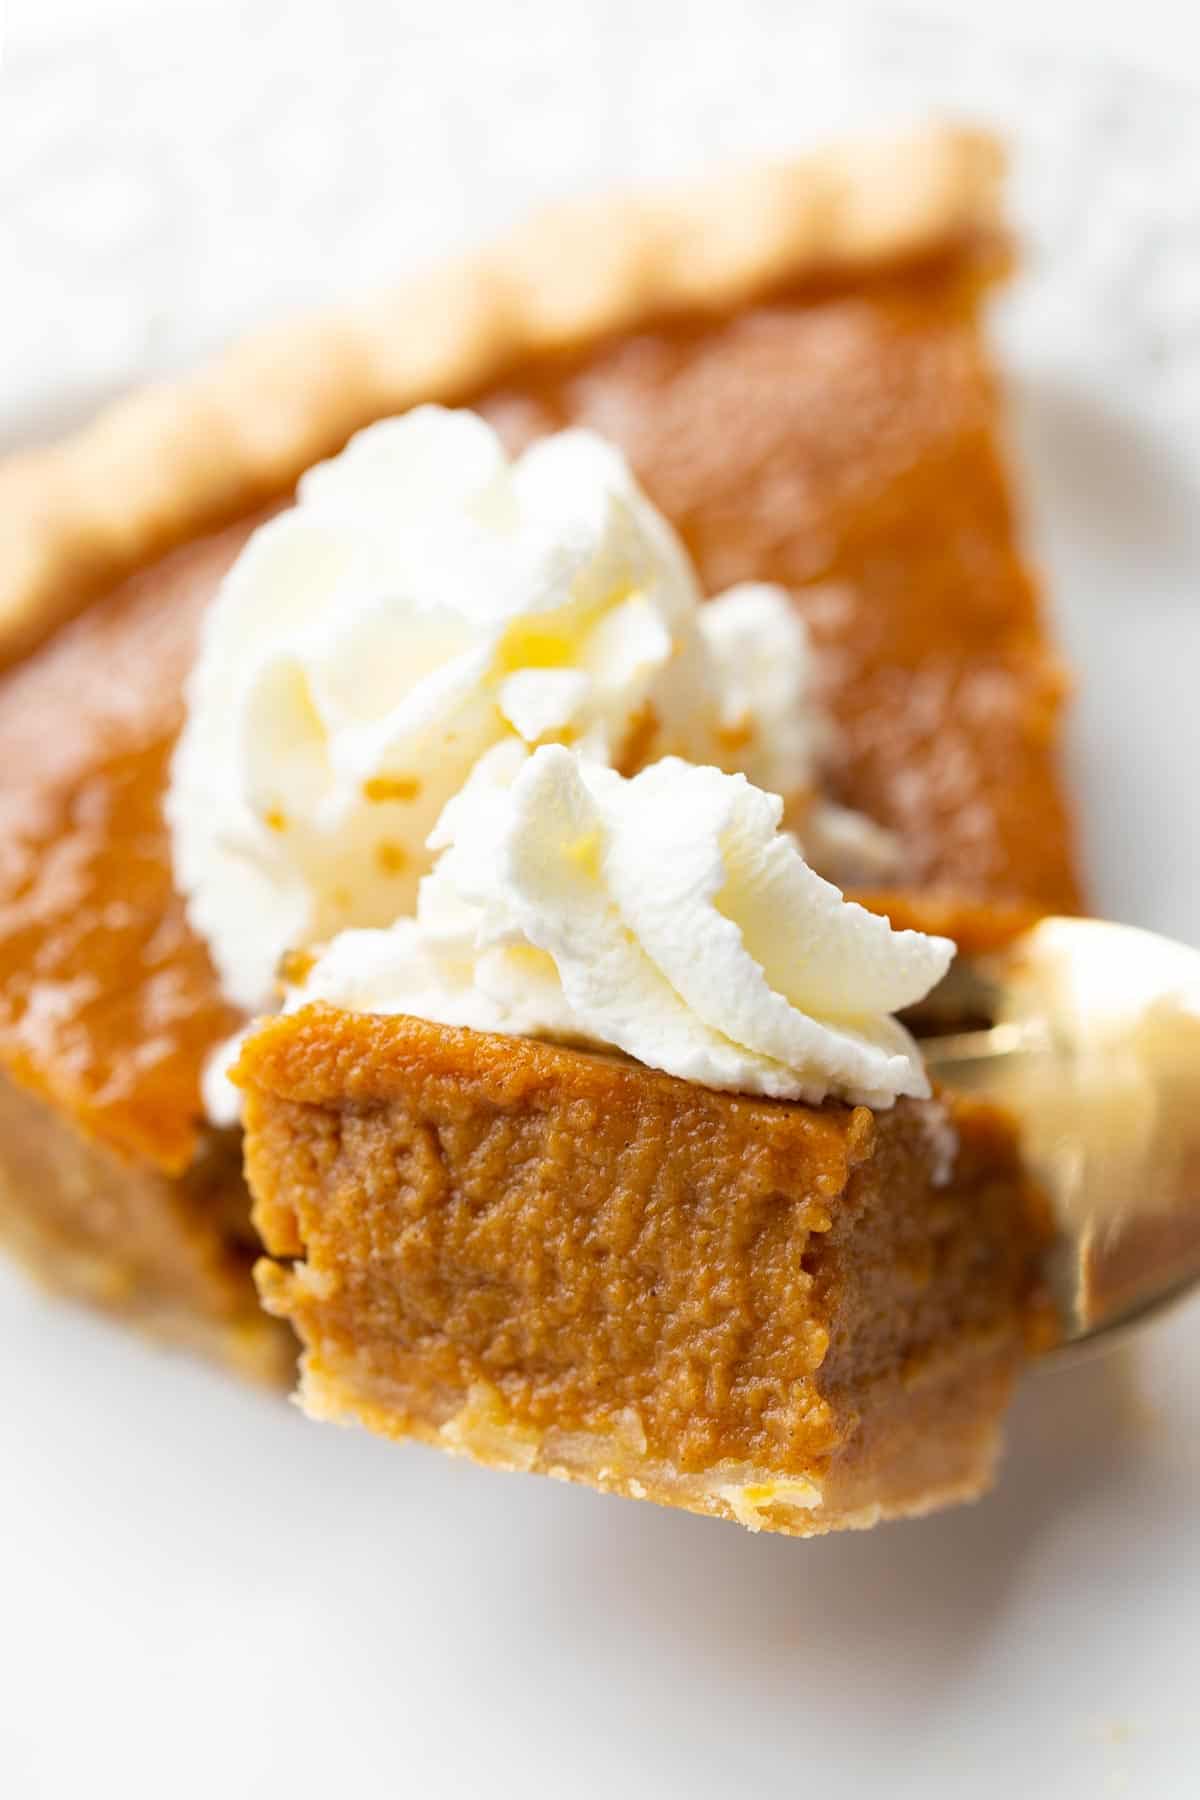
It wouldn’t be Thanksgiving without classic, custardy pumpkin pie! Pumpkin pie is my favorite of all the holiday pies. And that is saying a lot considering how much I love this gluten-free chocolate pudding pretzel pie!
It’s taken me quite a few years to get comfortable making gluten-free pie crust. This traditional pumpkin pie is made with my very favorite flaky, buttery, gluten-free pie crust recipe. I use this flaky crust in my family’s favorite gluten-free apple pie and gluten-free pecan pie too.
Just as a note, it’s very important to use the listed ingredients and follow the directions when making this pie crust. I’ve tested it many times to get it just right!
Ingredients for Gluten-Free Pie Crust
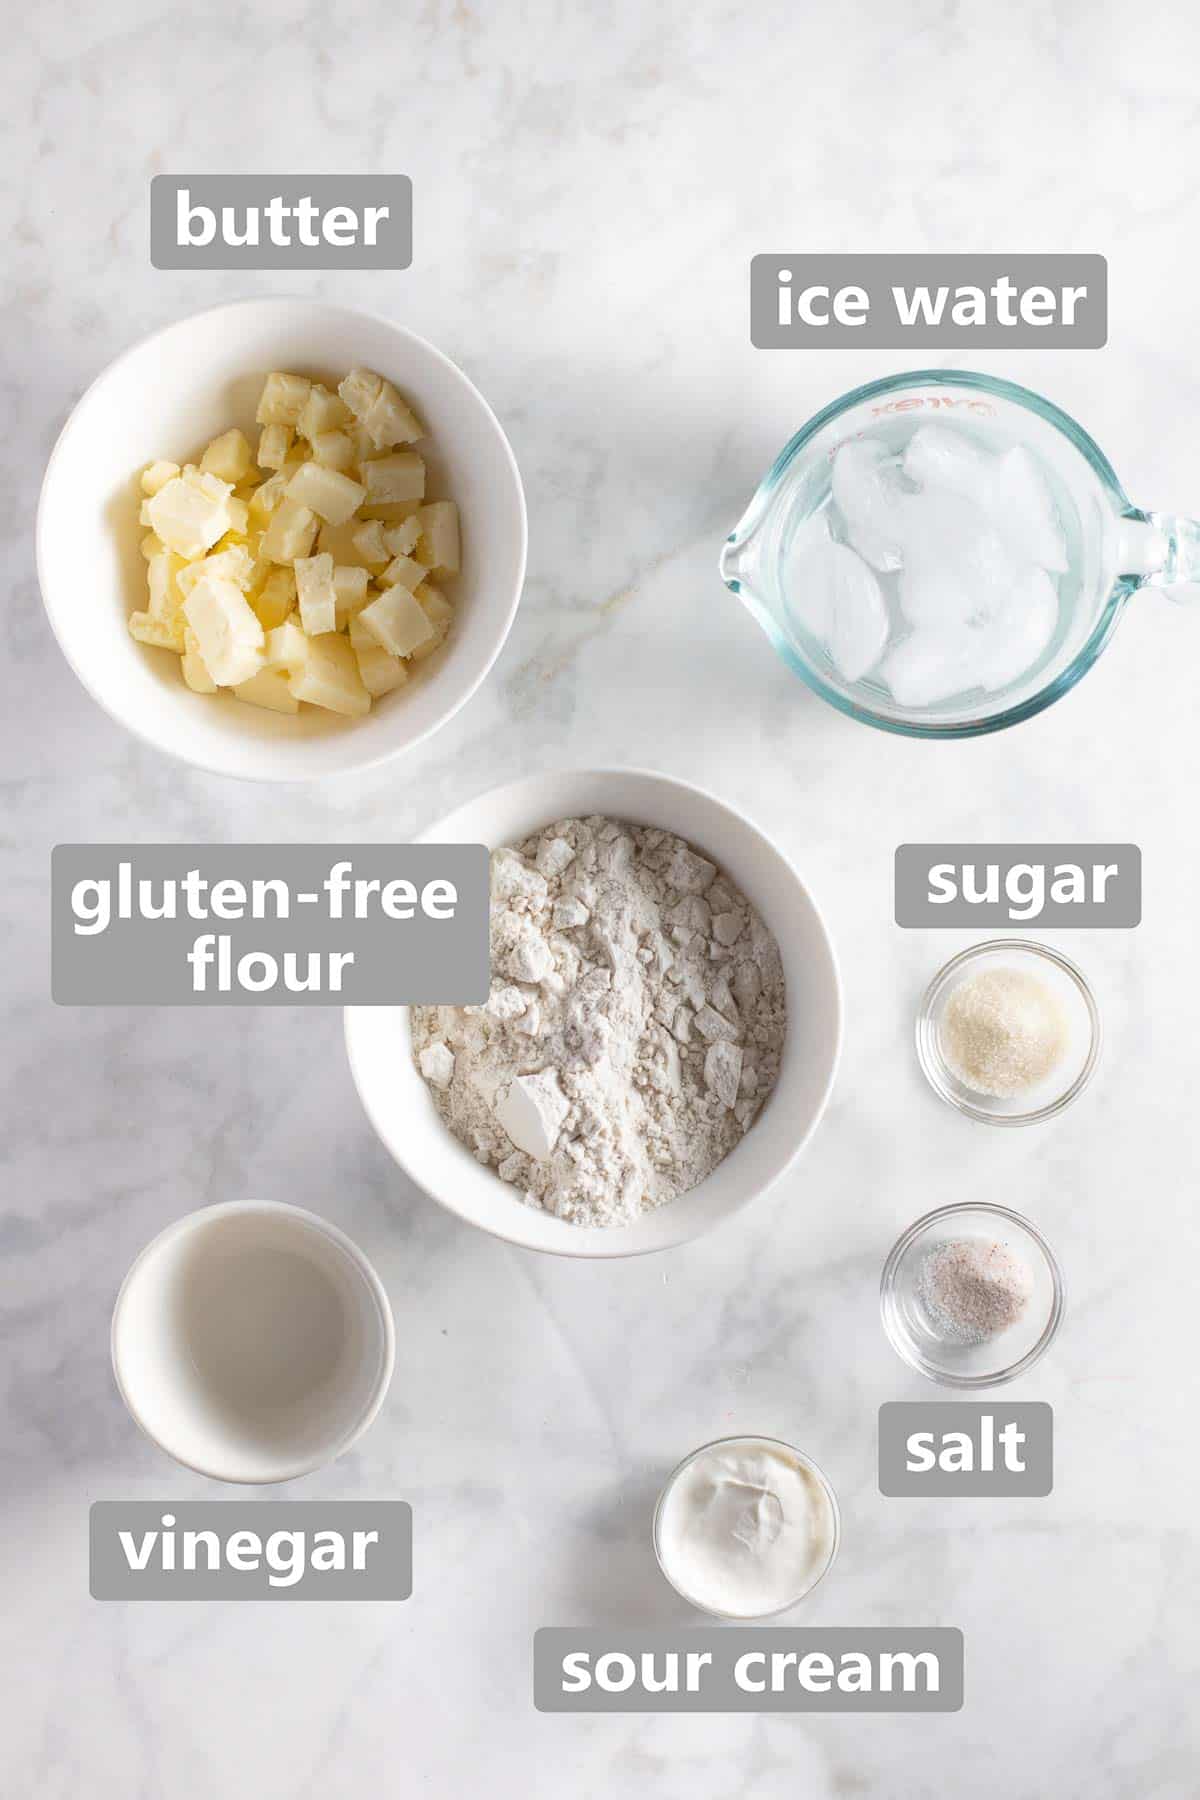
This combination of ingredients creates a gluten-free pie dough with just the right consistency! Here are a few notes on the ingredients.
- Gluten-Free Flour: I like to use a high-quality 1:1 gluten-free baking flour that contains xanthan gum. This is my favorite brand.
- Vinegar: I prefer white vinegar or rice vinegar.
- Sour Cream: Gives the dough a little stability and helps it brown.
- Butter/Ice Water/Salt/Sugar: All the usual suspects when it comes to pie crust!
Dairy-Free? I don’t recommend swapping in ingredients to make this crust dairy-free.
Make the Pie Dough
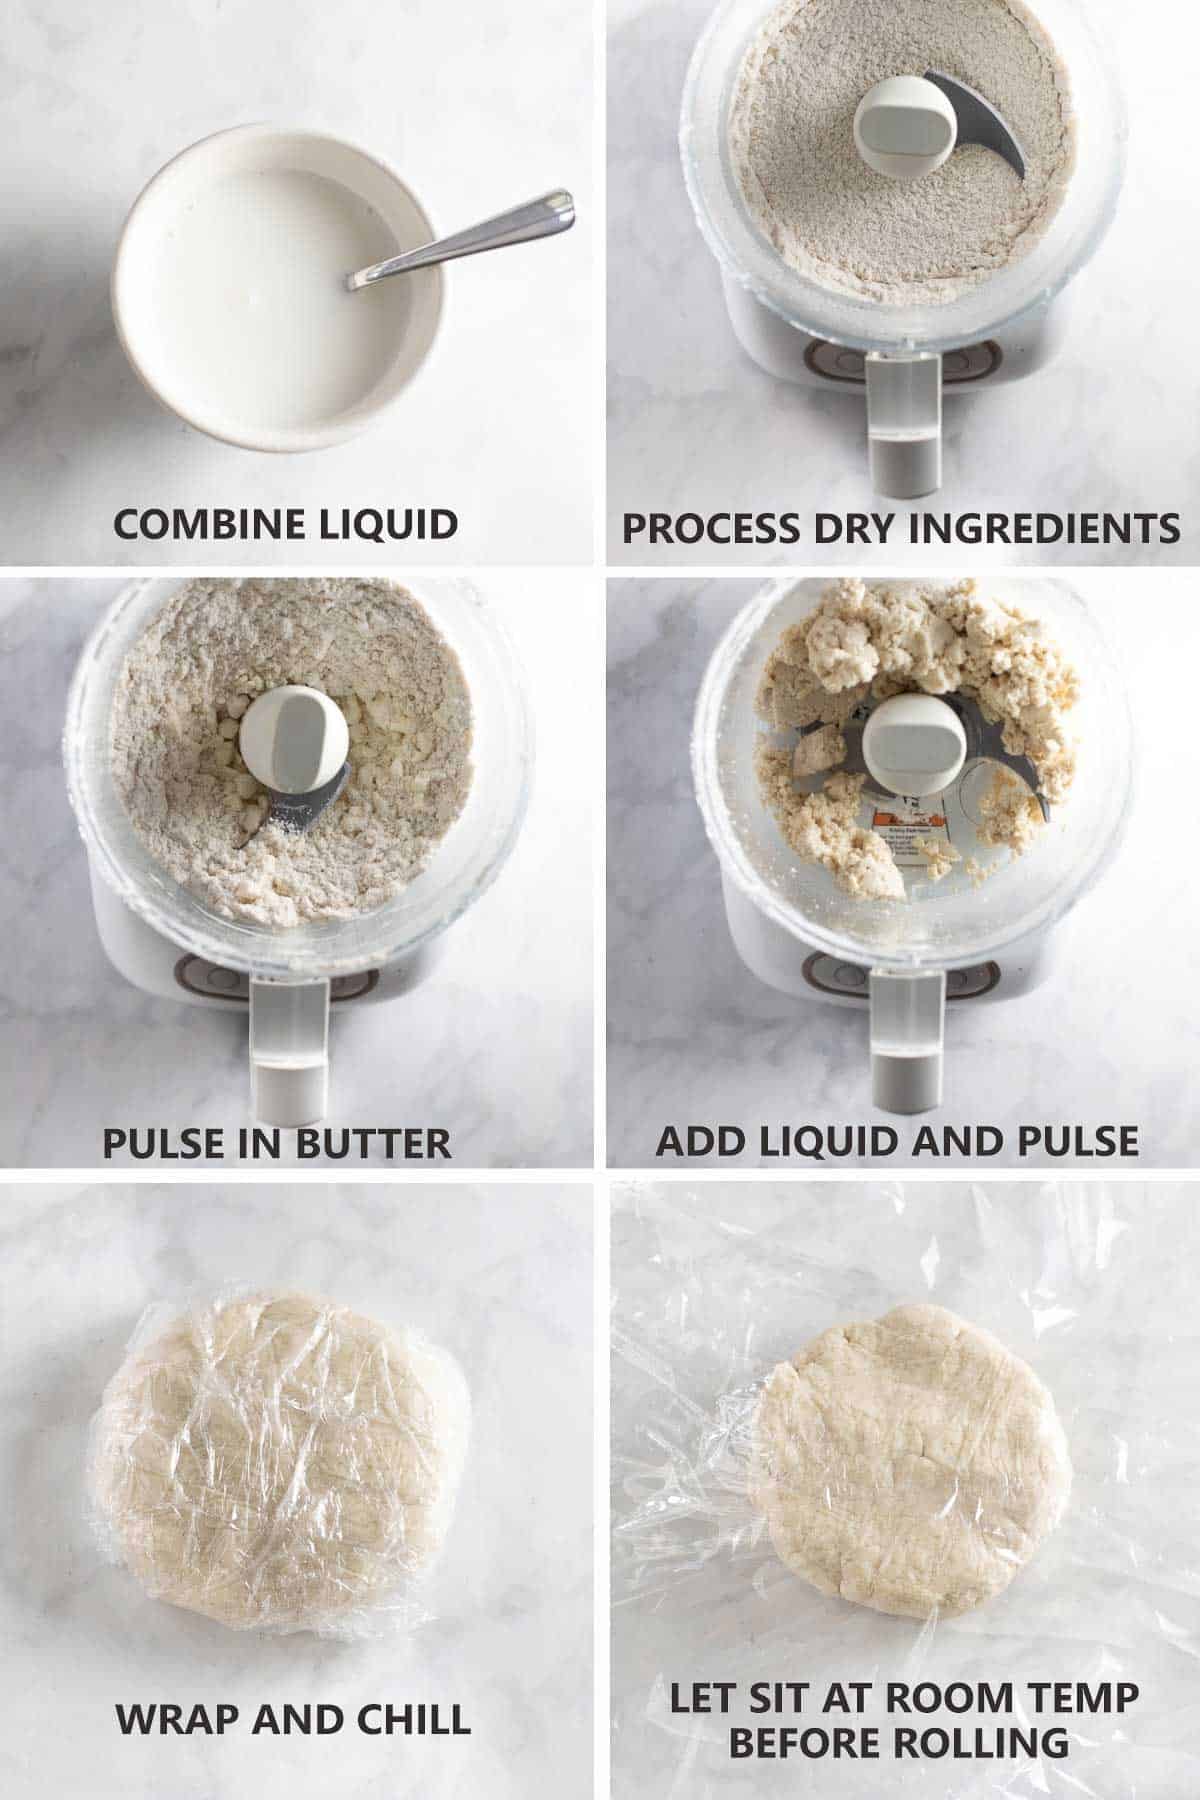
Tips for Gluten-Free Pie Dough Success
I really like making this pie crust in the food processor because it’s quick and reliable. You could also cut in the butter by hand using a fork or pastry cutter.
It’s important to let the pie dough sit in the fridge for at least 1 hour (up to overnight) before rolling it out. This allows the dough to hydrate form a cohesive ball.
After the chilling time, the pie dough also has to sit at room temperature for 15 minutes before you roll it out.
Shape the Crust
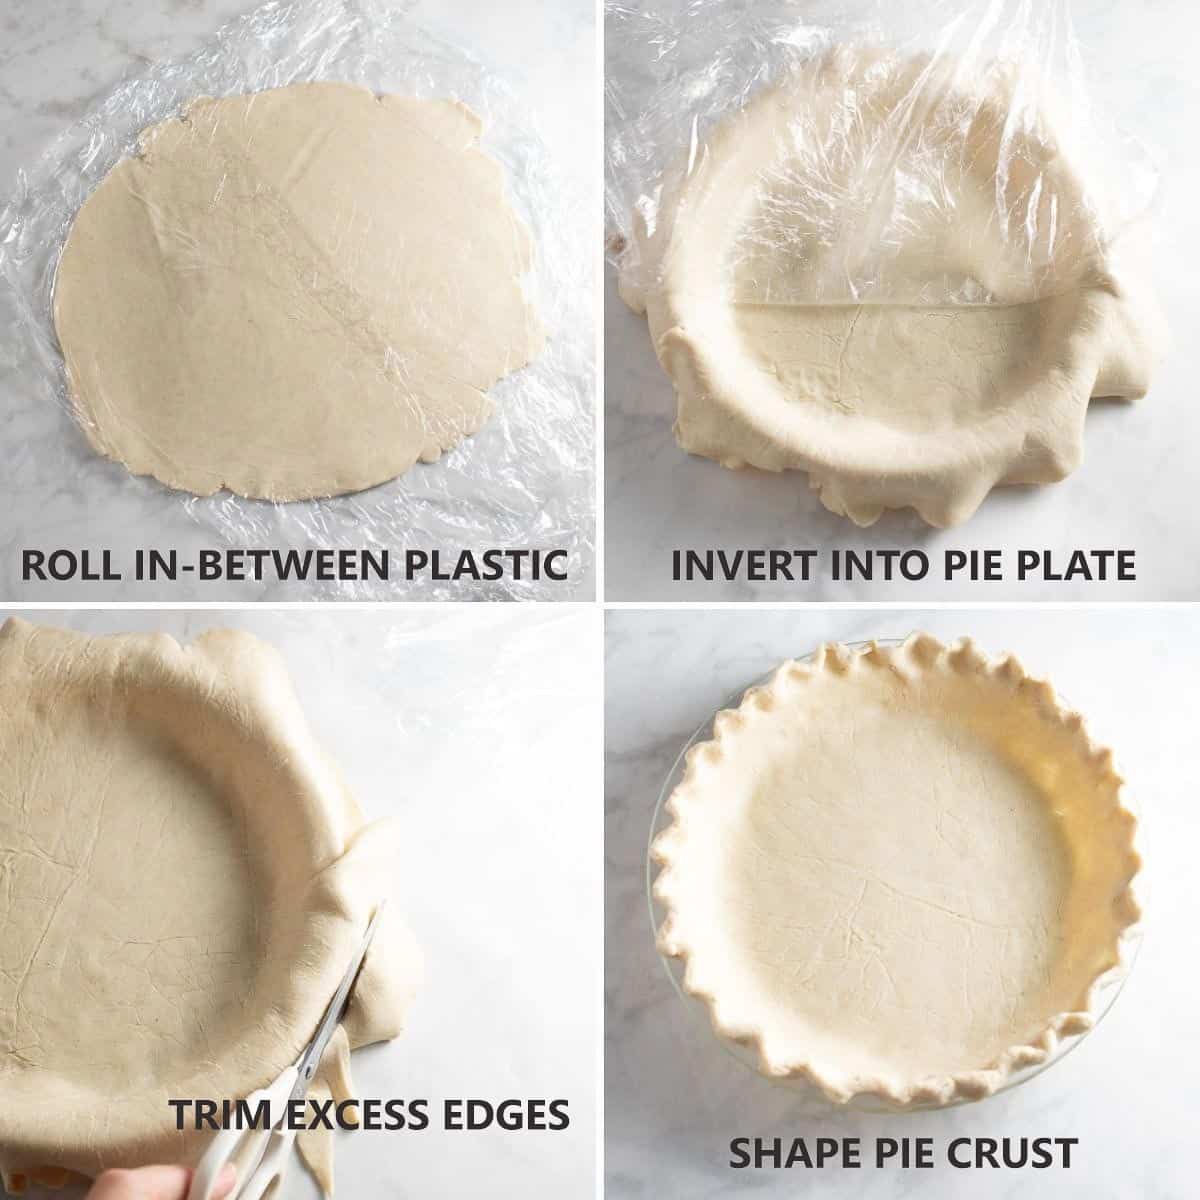
Gluten-free pie dough is more delicate than regular pie dough. It helps to roll the dough in-between plastic wrap so you can easily transfer it to the pie plate.
Peel off the top layer of wrap and carefully invert the rolled crust onto the plate. Then peel off the remaining plastic wrap. After this you can trim the edges and shape the crust as usual.
Ingredients for the Gluten-Free Pumpkin Pie Filling
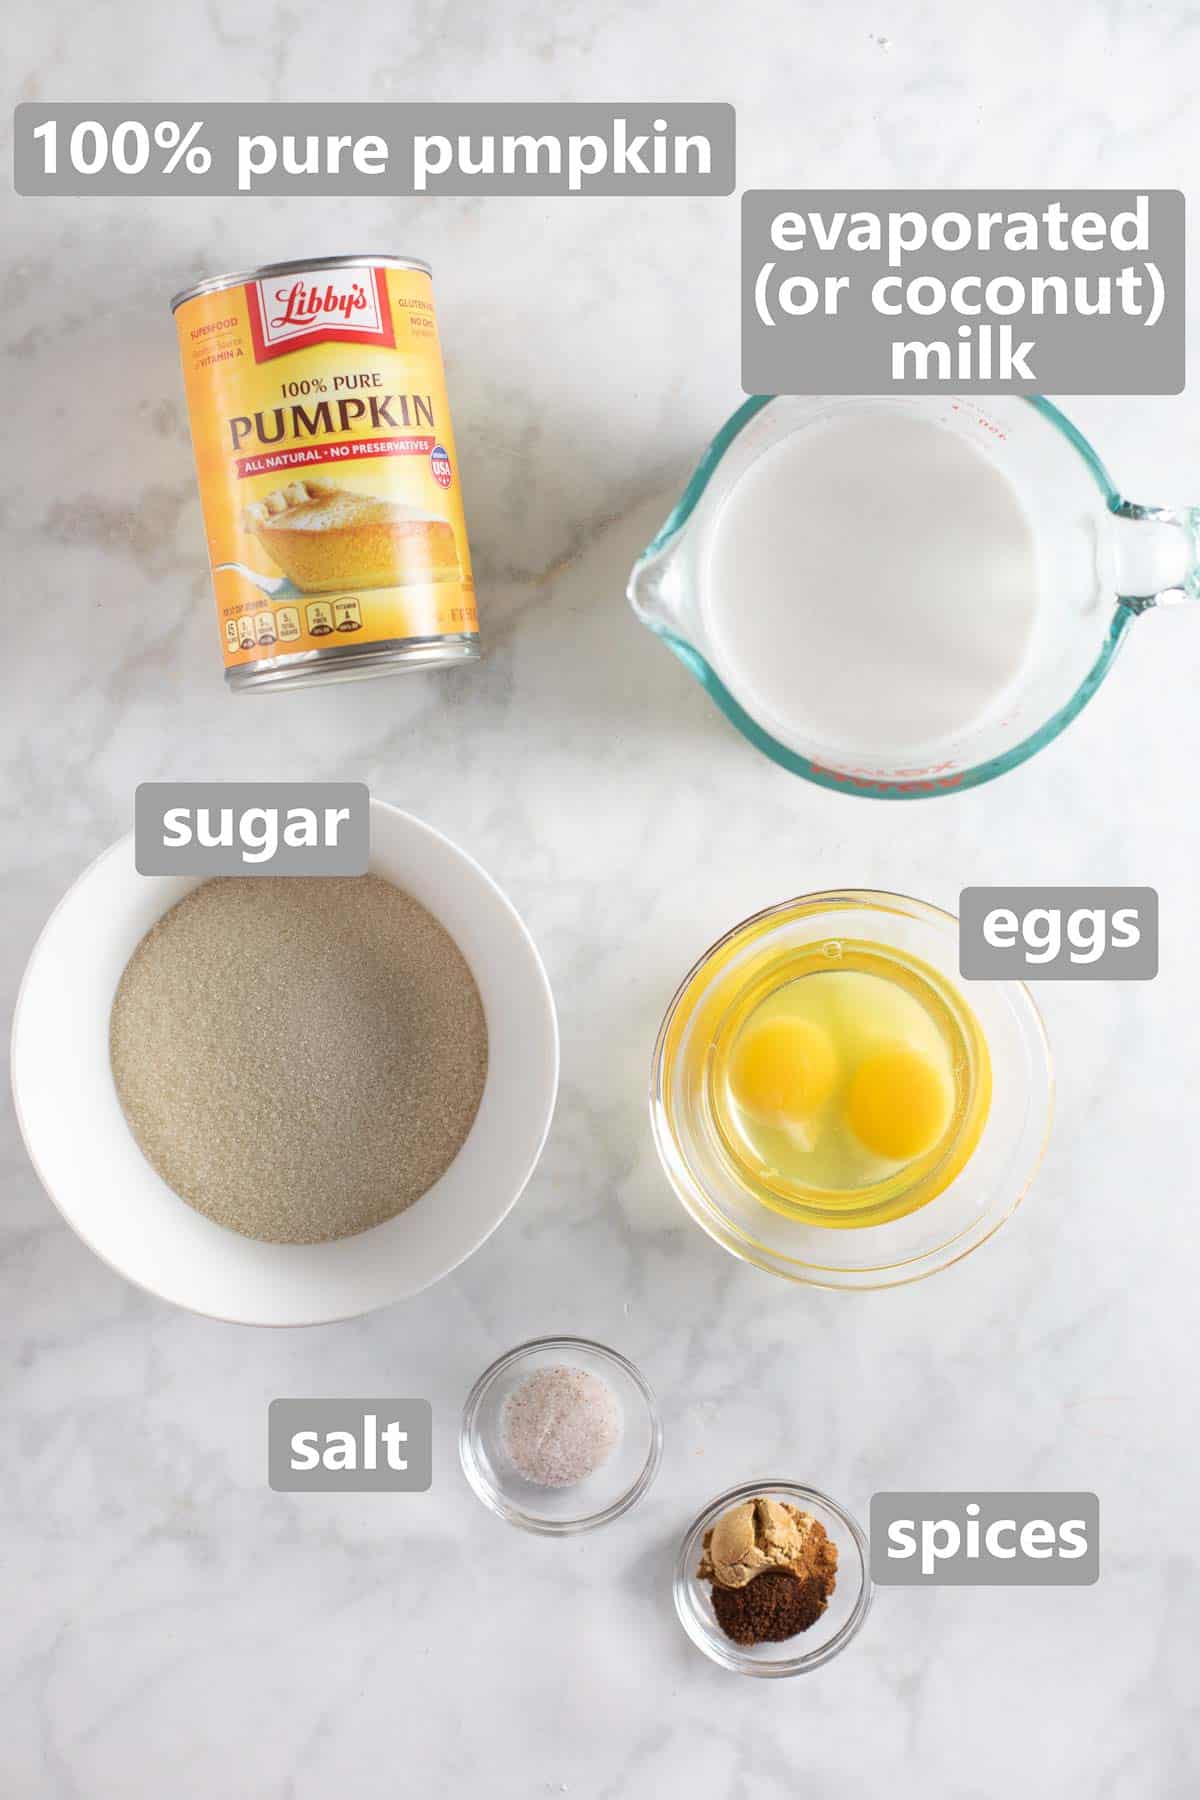
Growing up my Mom always made the good old back-of-the-pumpkin-can recipe for pumpkin filling. I like to do the same! The only changes I’ve made are I reduce the sugar and sometimes swap out the evaporated milk for coconut milk. Be sure to use 100% pumpkin puree rather than pumpkin pie filling for this recipe.
Fill the Pie Crust
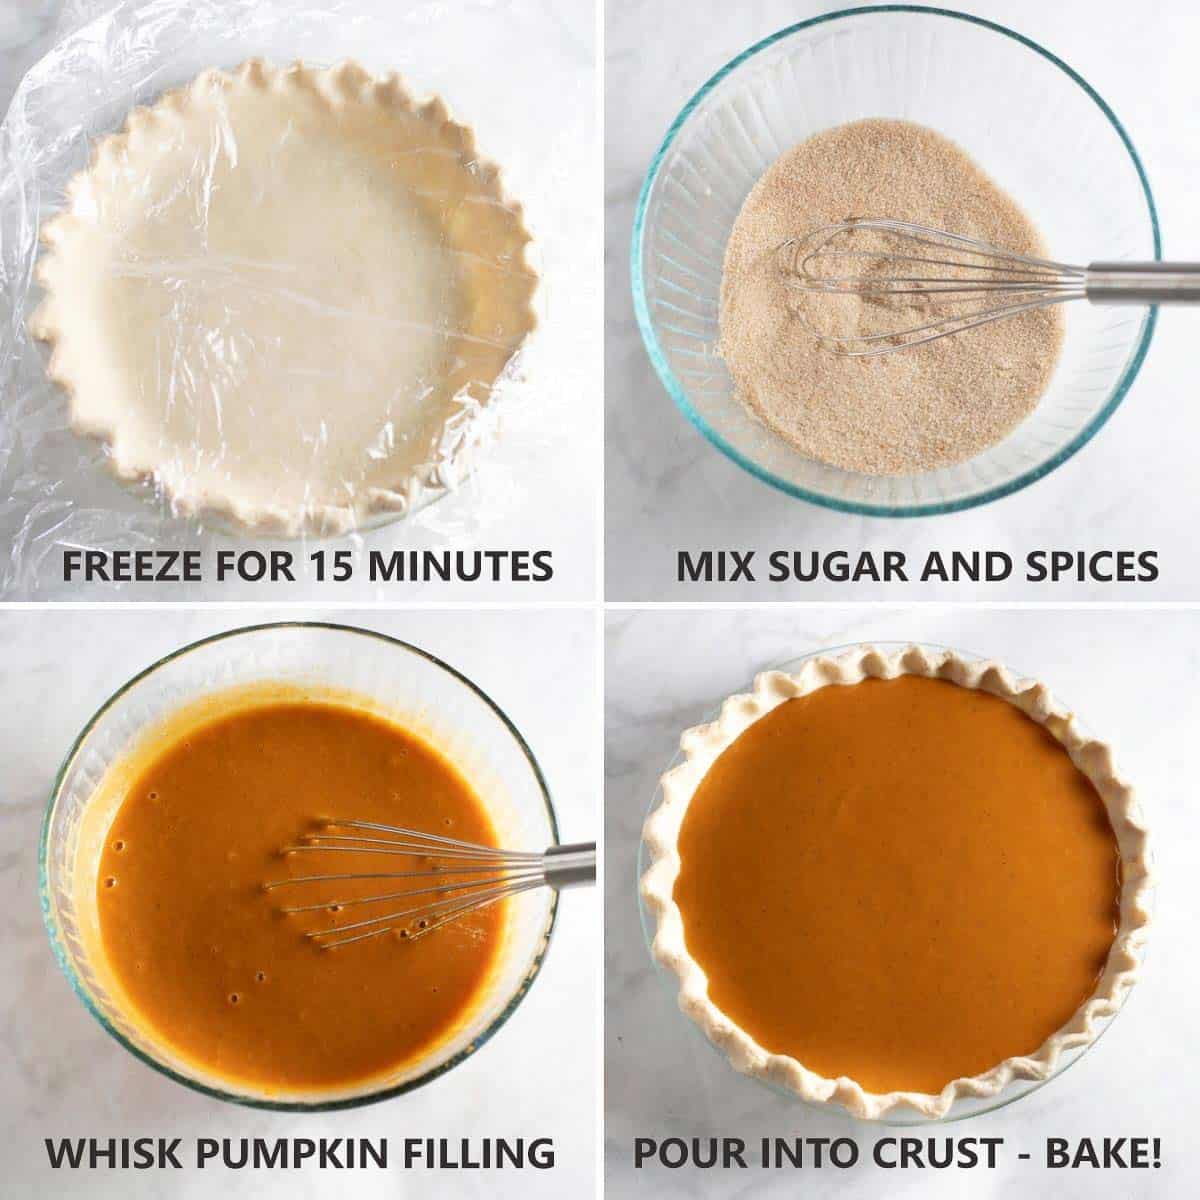
Once the pie crust is shaped and in the pie pan you’ll need to freeze it for 15 minutes. You want it to be really cold before it hits the hot oven!
Then it’s as simple as whisking the filling together, pouring it into the crust and baking.
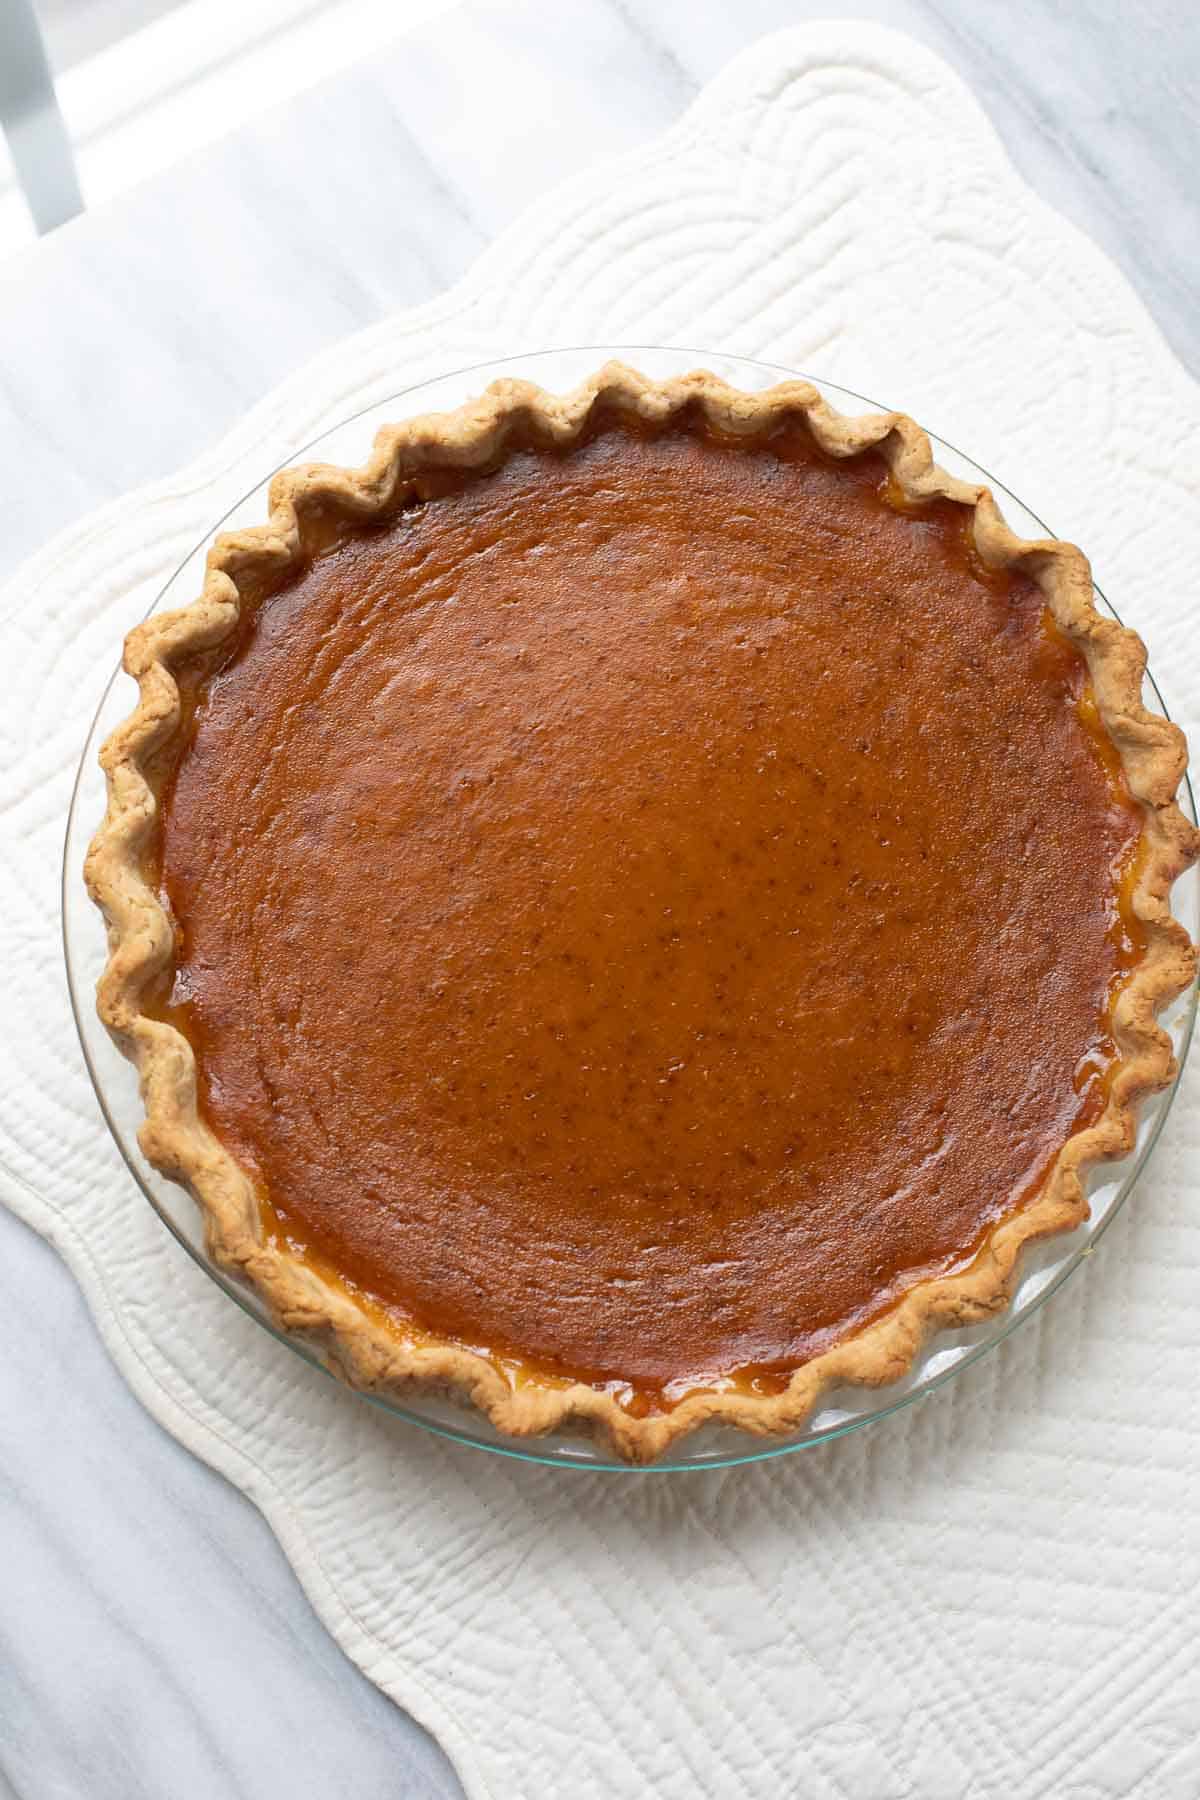
Serving/Storing Gluten-Free Pumpkin Pie
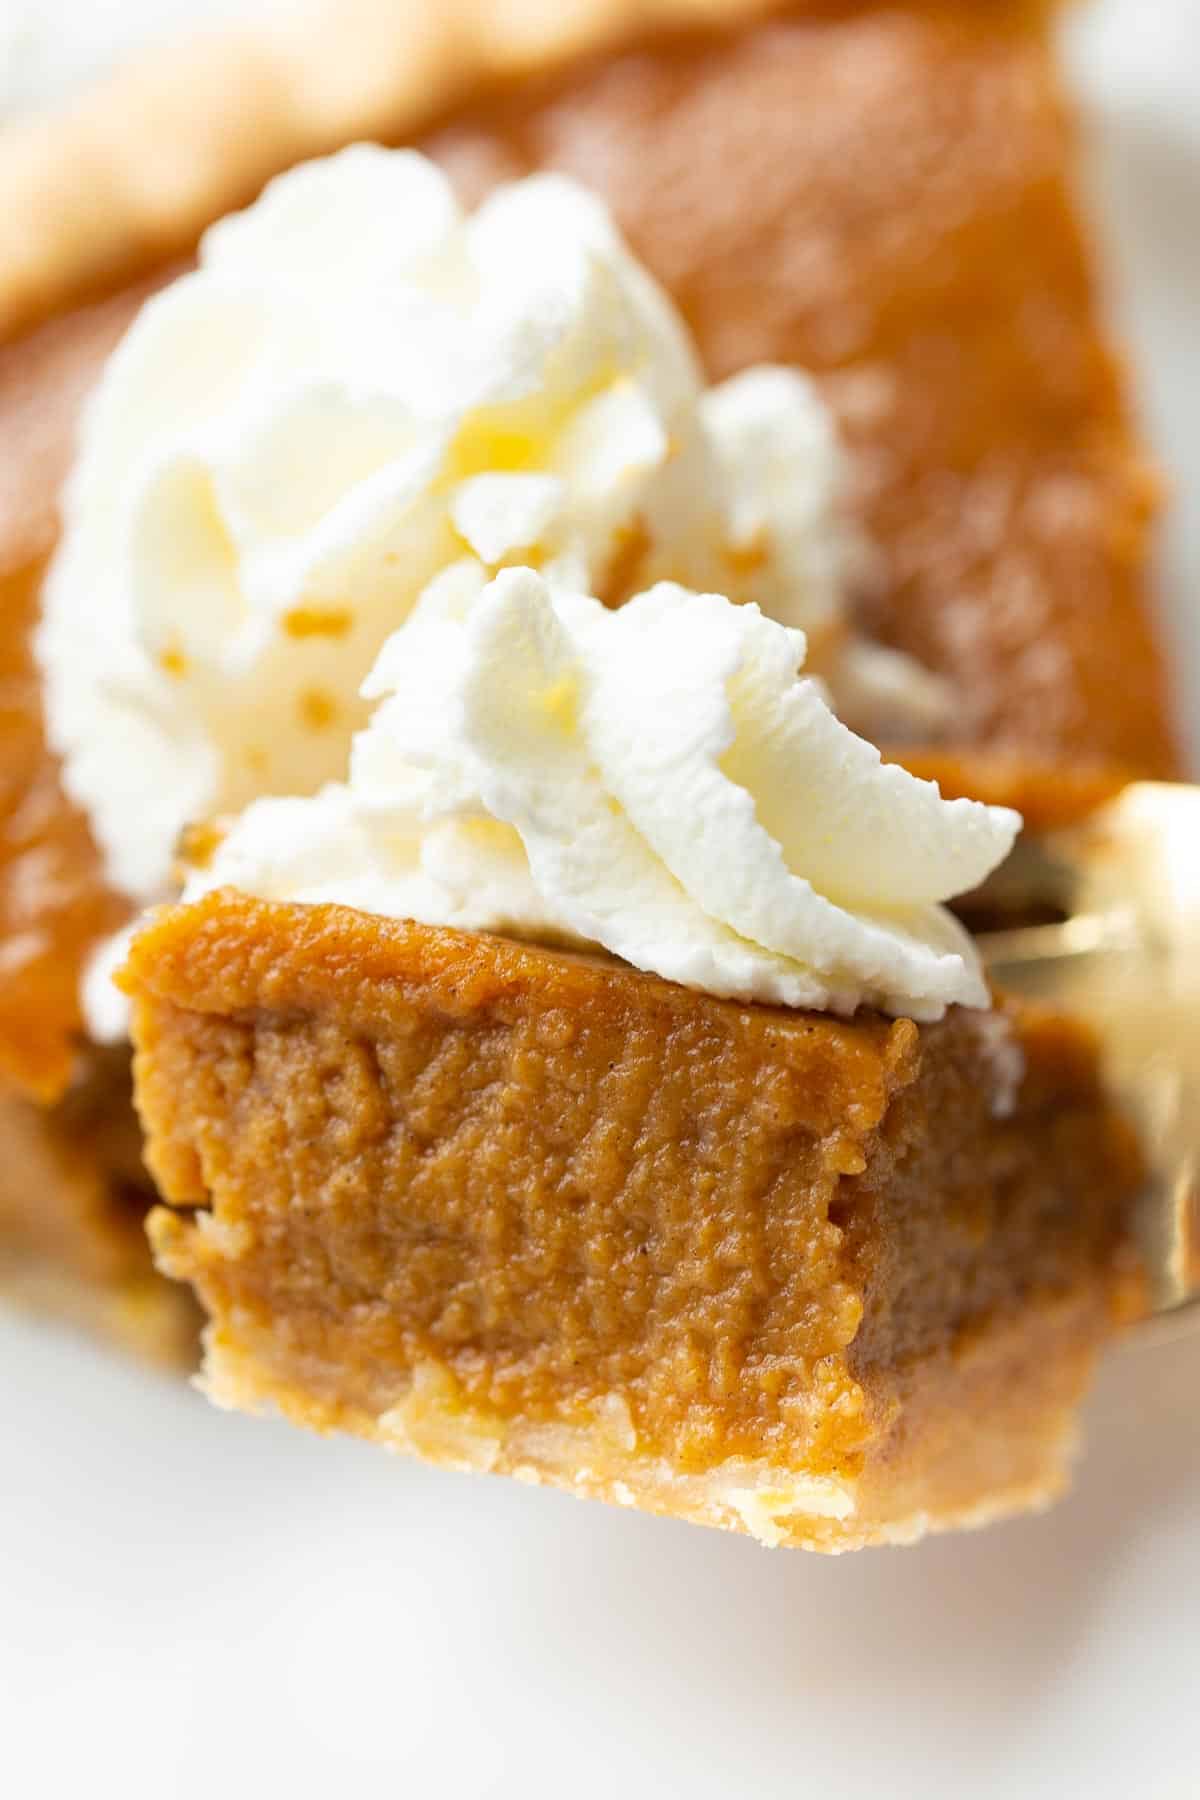
To Serve: I’m a big fan of gluten-free pumpkin pie being served cold! I recommend chilling it for at least 4 hours. It can also be served at room temperature if that’s your preference.
To Store: This pie should be refrigerated until you’re ready to serve. This pie does not freeze well.
Make Ahead? You can make the pie crust up to 2 days in advance. This pie can also be made 2 days in advance.
More Gluten-Free Thanksgiving Recipes
Gluten-Free Pumpkin Pie (with Homemade Crust)
Video
Ingredients
For the Crust:
- 8 tablespoons butter (1 stick)
- 3 tablespoons ice water
- 1 1/2 tablespoons sour cream
- 1 1/2 teaspoons white vinegar or rice vinegar
- 1 cup + 2 tablespoons gluten-free 1:1 baking flour 180 grams
- 1 teaspoon sugar
- 1/2 teaspoons salt
For the Pie:
- 2/3 cup sugar
- 1 teaspoon cinnamon
- 1/2 teaspoon ginger
- 1/4 teaspoon cloves
- 1/2 teaspoon salt
- 1 15 oz can of pumpkin
- 2 eggs
- 12 ounce (1 can) evaporated milk or 1 cup full-fat coconut milk
Instructions
For the Crust:
- Cut the butter into small 1/4-inch pieces and freeze for 10-15 minutes.
- Combine the ice water, sour cream, and vinegar in a small bowl. Whisk until smooth and set aside.
- Process the flour, sugar and salt in the bowl of a food processor until combined. Scatter the butter over top and pulse until the butter is the size of large peas, about 10 pulses.
- Add the sour cream mixture and pulse until the mixture begins to clump around the blade, about 10 pulses. (If the mixture doesn't clump after 10 pulses no worries! Pour it into a bowl and smash together with your hands to form a ball.)
- Turn the dough out onto a piece of plastic wrap. Gather into a flat disc and wrap tightly in the plastic wrap. Refrigerate for 1 hour or up to 2 days.
- If you refrigerated the dough longer than 1 hour, let the dough sit at room temperature for 15 minutes before rolling. Roll the pie crust out between 2 large pieces of plastic wrap, to ¼ inch thickness.
- After rolling, remove the top piece of plastic wrap and flip into a 9-inch pie plate. Gently ease the dough into the edges of the pan before removing the 2nd piece of plastic wrap. Trim any excess edges with scissors and shape the edges as desired.
- Wrap the shaped pie crust loosely in plastic and place in the freezer for 15 minutes or up to 1 hour until chilled and firm.
For the Pie:
- Preheat the oven to 425 F.
- In a medium bowl, whisk together the sugar, cinnamon, ginger, cloves and salt. Whisk in the pumpkin, eggs and milk until smooth.
- Pour filling into the prepared pie shell – pouring any extra filling into ramekins if needed. Bake for 15 minutes. Reduce the heat to 350 F and bake for another 40-50 minutes until the custard is set.
- Cool on a wire rack for 2 hours. Cover and refrigerate for up to 2 days. Serve chilled with whipped cream!


This was the most delicious gluten-free pumpkin pie my wife and I have ever had! This was a great way for me to surprise my wife with something that she normally can’t eat. I may have only made a pumpkin pie, but I sure did get some brownie points, lol.
We’re so glad you and your wife loved the recipe! Thank you for sharing your positive experience with us. Happy baking!
Love this recipe so much! As the only gluten free person when I got to my in laws this is a huge hit for everyone including the gluten eaters 🙂 I also sub all the spices for pumpkin pie spice and works wonderfully as well as a quick sub. Excited to make this for the third time this Thanksgiving! Thank you for posting
Can I use pumpkin pie spice in place of the separate spices listed for the filling? If so, how much would I need to use?
Definitely, Nicole! 1 1/2 tsp of pumpkin pie spice should work well in place of the individual spices. We hope you enjoy the pie!
Would I need to par bake the crust before adding the pumpkin?
I don’t want it to be soggy.
Thank you!
I was just googling the same thing. I think I will par-bake, I found a site that stated for fruit pies, no par-bake is necessary but it would be for custard pies. 🙂 Enjoy – Happy Thanksgiving!
Hi Val and Mary, thanks for your question! Due to the thickness of the pie filling and the total bake time, pre-baking the crust isn’t necessary. The recipe as-is produces a firm crust without any sogginess. If you like an even crisper pie crust, you can pre-bake for about 10-15 minutes at a low temperature. We hope this helps!
For the coconut milk substitute, were you referring to canned coconut milk?
Hi Kim, good question! Yes, canned coconut milk is recommended. We hope you enjoy the recipe!
With thanks giving coming just around the corner I think this helps greatly! Most of my family is gluten free and I am too. I’m so excited to make it! (I haven’t tried it yet) I will let you know how it goes!
We hope you and your family love it, Charlotte! Happy baking!
I don’t see any measurements for the recipes. How much of each ingredient do I need??
Hi Debra, at the top of the page you can click on “jump to recipe” to go straight to the recipe card with the measurements and instructions. Otherwise, you can find the information towards the bottom of the post. Both ways work! We hope you enjoy the recipe!
Would this filling work in a Wholly Gluten Free Pie Crust? Thanks!
I was wondering the same thing Sabrina, did you end up trying?
Hi Sabrina and Devin, we haven’t tried it in that crust, but it should work! We’d love to hear how it goes!
can you roll out the dough into a pie pan and freeze the crust?
Hi Patricia, yes you can freeze the crust by itself in the pie pan. That’s a great way to do some advanced prep. You’ll just want to wait on the filling. We hope you enjoy the recipe!
Can this be done with regular flour as well?
Hi Elizabeth, good question! Usually all-purpose flour can be used in our recipes at a 1:1 ratio, but we haven’t tried it with this one ourselves. If you give it a try, we’d love to hear how it goes!
What kind of cloves do you use
Hi Liz, any brand of ground cloves will work! We hope you enjoy the recipe!
can I freeze it?
Hi Christine, unfortunately this pie doesn’t freeze well. It can be made up to 2 days in advanced and refrigerated. We hope this helps!
This was a huge hit! No one new the crust was gluten free. I subbed 4% greek yogurt in the crust successfully. The edgers got brown a little fast but i just put some tinfoil around the crust of the pan and left the middle uncovered and it cooked beautifully!
Thanks for this! Will be saving for a repeat
Hi Kate, we’re so glad you enjoyed the recipe! Thank you for taking the time to share your positive feedback with us!
Made this crust last night (half recipe) and it was well received. Thanks for posting the recipe! Very delicious.
Hi Cindy, we’re happy to hear the recipe was well received! Thank you for taking the time to share your experience with us!
Tastes great! I’m new to GF baking, so I’m wondering why it’s recommended that it’ll only keep for 2 days? Is this a GF thing?
Hi Shannon, we’re so glad you enjoyed the flavor! The 2 days is a safe estimate to ensure the pie is being served with the best taste and texture. The longer a pie is stored, the greater the chance that the consistency/texture will change. We hope this helps!