

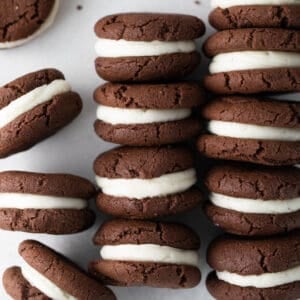
These gluten-free oreos are made of soft, mini chocolate cookies sandwiched around vanilla creme filling. They’re an irresistible homemade version of everyone’s favorite cookie!
This recipe has the option for a cream cheese frosting filling or a classic shortening-based filling. The cookies are easy to make and perfectly chocolatey.
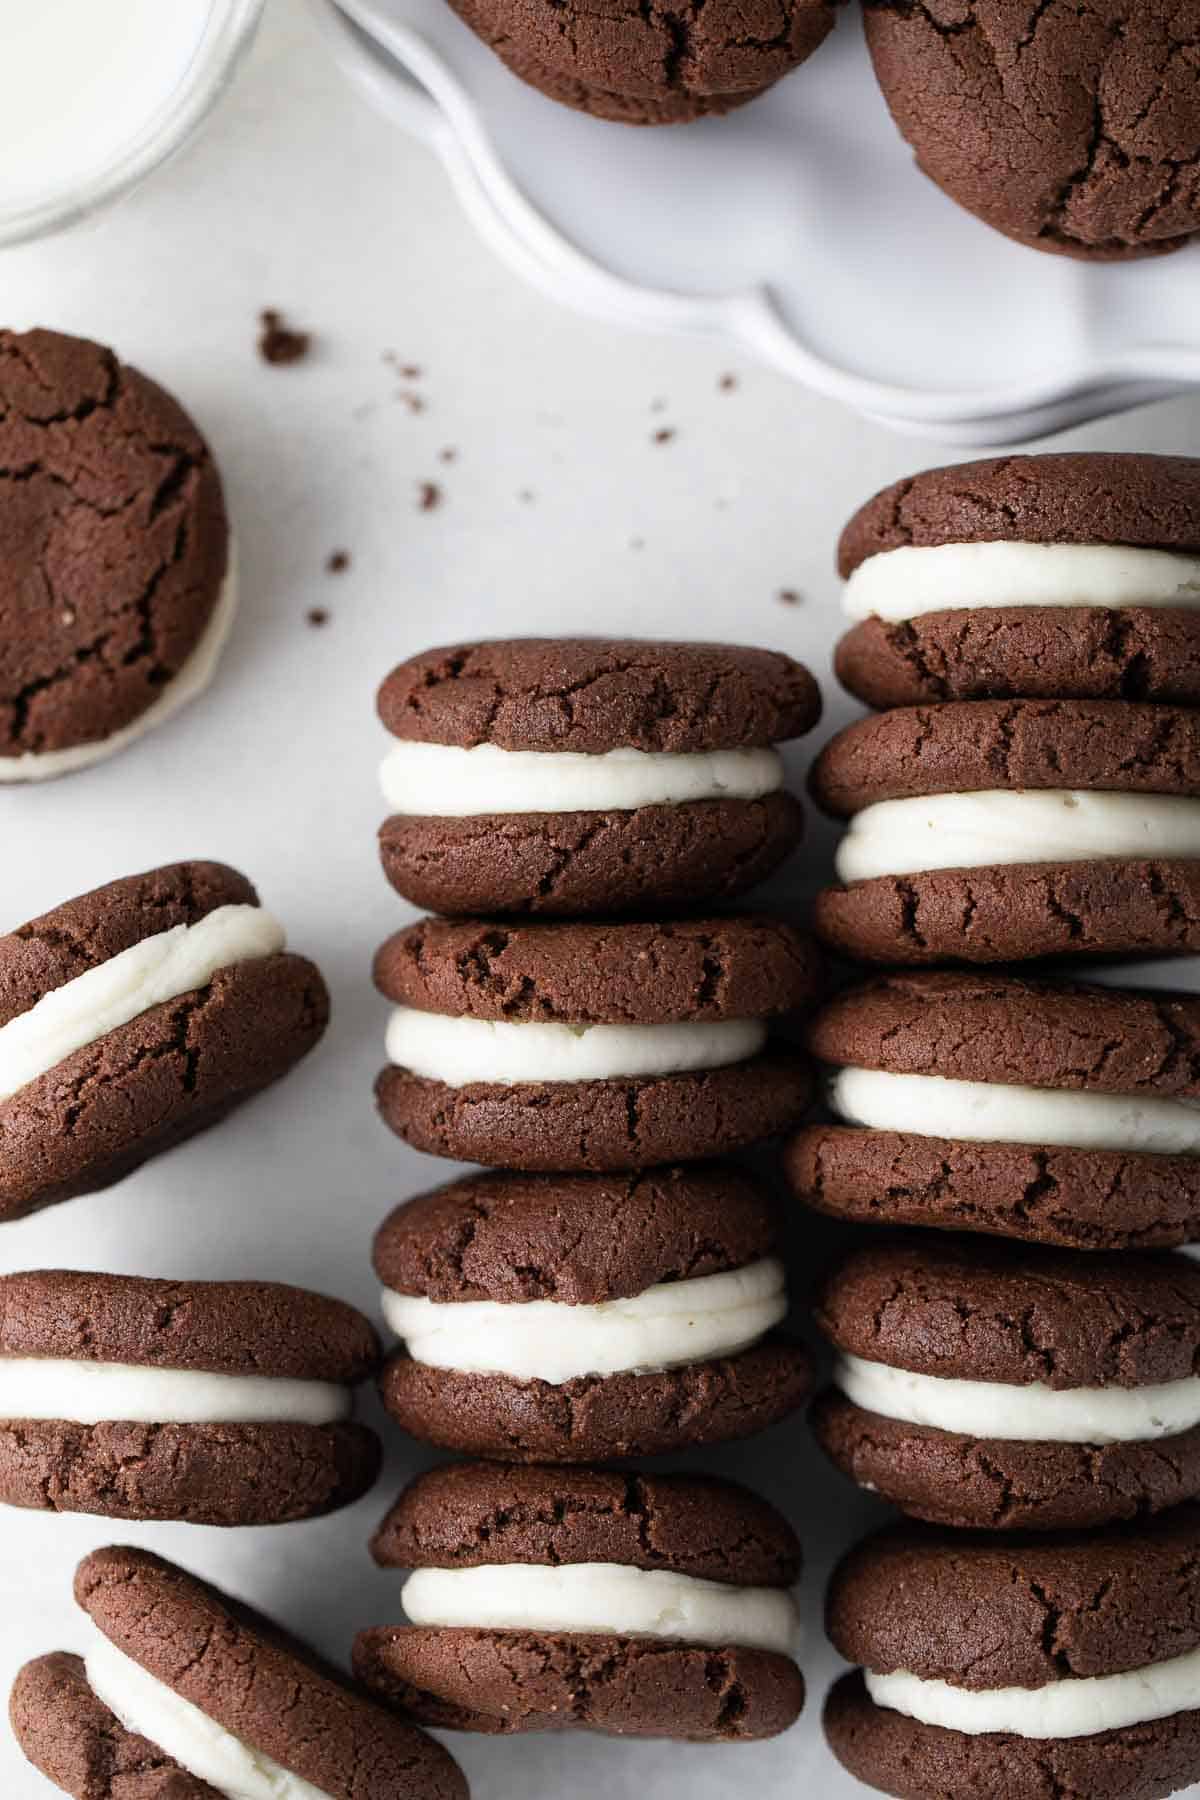
If you’re looking for a fun, easy baking project look no further! These gluten-free oreos are homemade take on the classic. Making homemade gluten-free oreos is easier than you’d think.
These cookies aren’t cakey like a whoopie pie, but they are also not as crispy as store-bought oreos. They’re in-between which is just right if you ask me.
These gluten-free oreos make great party food! Like these Gluten-Free Chocolate Mint Cookies, Gluten-Free Brownies, Gluten-Free Chocolate Cookies or these Flourless Chocolate Cookies, they’re always a crowd-pleaser. They’re perfect for birthday parties, super bowl snacks or holiday cookie platters.
You also might like these oreo rice krispies treats or gluten-free oatmeal cream pies!
Ingredients You’ll Need

Here are a few notes on the key ingredients for the gluten-free oreo chocolate cookies. If you have any other questions leave me a comment below and I’d be happy to help!
- Gluten-Free 1:1 Baking Flour: I like to use a high quality gluten-free measure-for-measure flour blend like King Arthur Flour in my baked goods. It works best to use a blend that contains xanthan gum in this recipe.
- Cocoa Powder: You can use any kind of cocoa powder for these cookies. I usually use Hershey’s. Dutch process cocoa will add an even richer chocolate flavor to these cookies.
- Butter: I usually use salted butter in all of my baked goods.
How to Make Gluten-Free Oreos

- Whisk together the flour, cocoa powder, baking soda, baking powder and salt.
- In a large bowl (or the bowl of a stand mixer) add the sugar and butter. Mix with an electric mixer for 1-2 minutes until creamed.
- Add the egg and mix for another 1-2 minutes, scraping down the sides.
- Add the dry ingredients in 3 additions, mixing after each addition. Mix the dough until completely combined.
After you mix the dough altogether it’s important to give it a 30-minute rest. This gives the gluten-free flour time to hydrate and really makes a difference. It’s key for non-gritty gluten-free cookies!

- Using a 1/2 tablespoon or teaspoon measure, scoop out 1-2 teaspoon size balls of dough. I love these gold magnetic measuring spoons. I use the 1/2 tablespoon spoon to scoop these cookies. Roll into a ball and place on the lined baking sheet.
- Flatten the dough balls slightly then bake!
Note: If you want softer gluten-free oreos, bake the cookies for 6 minutes. If you’re wanting a crisper cookie bake the cookies for 8-9 minutes.
Vanilla Creme Filling – 2 Options!
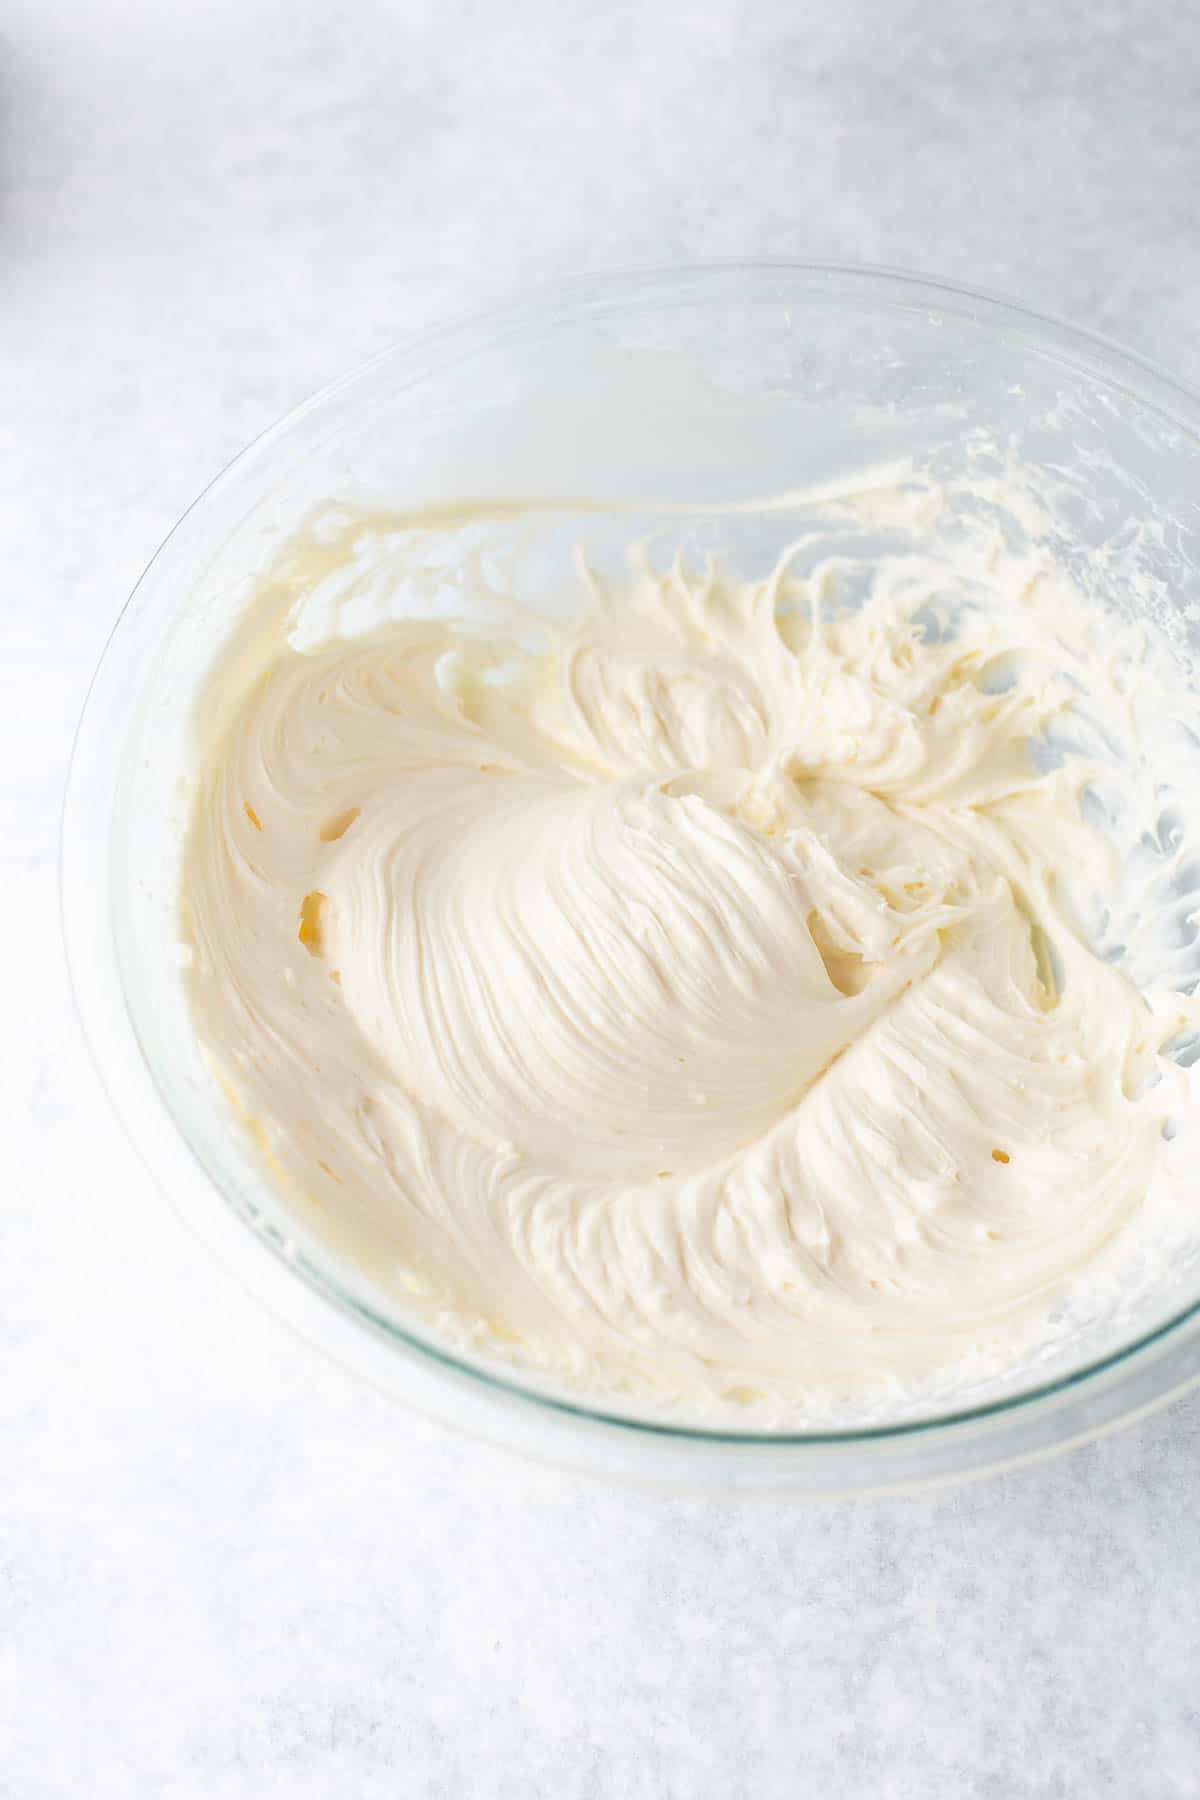
Once the gluten-free oreo cookies are baked and cooled you can make the filling. There are 2 options for the filling.
You can either make a cream-cheese based filling which isn’t traditional but is totally delicious. Or for a more classic option you can make a shortening-based filling. Both are delicious and it’s up to you!

To fill the cookies you can use a piping bag or simply a ziploc with a hole cut in the bottom. I like to match up even sized cookies when making the sandwiches.

More Gluten-Free Treats
I hope you love this recipe as much as we do! If you try it be sure to leave me a comment/rating below. I’d love to hear from you!
Gluten-Free Oreos {Easy Homemade}
Ingredients
For the Chocolate Cookies:
- 1 cup gluten-free 1:1 baking flour
- 1/2 cup unsweetened cocoa powder
- 1/2 teaspoon baking soda
- 1/4 teaspoon baking powder
- 1/4 teaspoon salt
- 1 cup sugar
- 10 tablespoons butter softened to room temperature
- 1 large egg
For the Filling:
- 1/2 cup butter 1 stick, softened to room temperature
- 8 oz cream cheese softened to room temperature (or vegetable shortening for a more classic filling)
- 1 teaspoon vanilla extract
- 3 1/2 cups powdered sugar
Instructions
Make the Cookies:
- In a medium bowl, whisk together the flour, cocoa powder, baking soda, baking powder and salt.
- In a large bowl (or the bowl of a stand mixer) add the sugar and butter. Mix with an electric mixer for 1-2 minutes until creamed. Add the egg and mix for another 1-2 minutes, scraping down the sides.
- Add the dry ingredients in 3 additions, mixing after each addition. Mix the dough until completely combined. Cover the dough tightly with aluminum foil or plastic wrap and chill for 30 minutes. Chilling is mandatory. If you chill the dough for longer, let it come to room temperature for 15 minutes before scooping.
- Preheat the oven to 375F. Line 2 baking sheets with silicone baking mats or parchment paper.
- Using a 1/2 tablespoon or teaspoon measure, scoop out 1-2 teaspoon size balls of dough. Roll into a ball and place on the lined baking sheet. Flatten the dough balls slightly.
- Bake for 6 minutes for soft cookies or up to 8 minutes for crisper cookies. Let cool for 5 minutes then transfer to a wire cooling rack to cool completely.
Make the Filling:
- Mix the cream cheese, butter and vanilla at medium-high speed in the bowl of a stand mixer fitted with the paddle attachment (or in a large bowl using handheld mixer) until well combined, about 30 seconds, scraping down the bowl with rubber spatula as needed.
- Add the vanilla and powdered sugar and beat on low speed for 10-15 seconds, then increase the speed to medium-high and whip for 1-2 minutes until fluffy.
- To assemble the cookies, in a pastry bag with a 1/2 inch, round tip, (or a ziploc with a hole cut at the end) pipe teaspoon-size blobs of cream into the center of one cookie. Place another cookie, equal in size to the first, on top of the cream. Lightly press, to work the filling evenly to the outsides of the cookie. Repeat with the remaining cookies. Enjoy!
Notes
- Gluten-Free 1:1 Baking Flour: I like to use a high quality gluten-free measure-for-measure flour blend like King Arthur Flour in my baked goods. It works best to use a blend that contains xanthan gum in this recipe.
- Cocoa Powder: You can use any kind of cocoa powder for these cookies. I usually use Hershey’s. Dutch process cocoa will add an even richer chocolate flavor to these cookies.
- Butter: I usually use salted butter in all of my baked goods.
- After you mix the dough altogether it’s important to give it a 30-minute rest. This gives the gluten-free flour time to hydrate and really makes a difference. It’s key for non-gritty gluten-free cookies!
- I use the 1/2 tablespoon from this set of gold magnetic measuring spoons to scoop the cookies.
- If you want softer oreos, bake the cookies for 6 minutes. If you’re wanting a crisper cookie bake the cookies for 8-9 minutes.


I love the cream cheese filling but what can I add to make it harder, it’s too soft?
Hi Marlene, we’re glad you enjoyed it! You can add a little more powdered sugar incrementally to thicken the filling to your desired consistency. Happy baking!
These turned out so well and were a hit with our dinner guests! I had a lot of leftover icing, but perhaps I should have squished more in between the layers!
Hi Judith, we’re so glad everyone enjoyed the recipe! Thank you for sharing your positive feedback with us!
These are absolutely amazing!!!
Yay! Thank you for your feedback, Stephani. We’re so glad you enjoyed the recipe!
My daughter would like to make these for her elementary school bake sale. I think the shortening based filling would be best for that audience. I am having trouble finding the recipe even though it’s mentioned in your write-up. Can you direct me to the recipe? Thanks!
Hello! Do you think these will be ok to freeze?
Yes I think they should freeze great. I would be preferable to freeze the cookies without the added filling. But either way will work!
This recipe was really good!! the cookies were actually really soft(unlike many other gfree recipes)!!
I’m so glad you enjoyed them!
Can the cocoa be replaced with Cacao?
Yes! That will work great.
I followed the recipe I had to leave the dough a extra 15 minutes to chill was still fairly sticky to roll but they did fluff up when baked. I used a lot purpose flour is that different to a 1 to 1 flour.
How much flour do we need?
Hi there, the recipe calls for 1 cup of gluten-free 1:1 baking flour. We hope you enjoy the cookies!
Thank you! Omg I used a teaspoon and only got 18. They became so big. Next time using a little less
These are the BEST cookie I think I have ever had and made! My whole family loves them and my husband is the gluten intolerant person in our household. I highly recommend this Oreo Cookie Recipe. DELICIOUS
What’s the serving size??
The nutritional information is for 1 cookie if you were to make 30 cookies 🙂
Will we have 30 full sandwich cookies by the end? Or do you mean 30 individual cookies (that will make 15 sandwiches)
This is a good question! I’ve updated the recipe because you’ll end up with about 15 cookie sandwiches. I hope this helps!
Since the filling is made of cream cheese do we keep them refrigerated?
Yes I would recommend refrigerating them!
These little sweeties are AMAZING!!!
Better than Oreos any day! Thanks, Erin!
I’m so glad they turned out for you! Thanks for the comment 🙂
Who needs store bought GF Oreos when you have this recipe? Not me! These are so delicious and I love how many options there are for fillings and making allergen adjustments. You always have the best recipes and this one doesn’t disappoint!